
How to build your first AI agent
From JTBD to multi-tool agent: A practical guide to building your first multi-tool AI agent, from a PM's perspective, by partnering with an LLM as your engineering assistant.

Many thanks to my GenAI professor at Sorbonne University, Kamila Kare, for his excellent course and for suggesting this very project.
You’ve heard the buzz. Everyone is talking about “AI agents.” You see fragmented demos and read conflicting definitions, making it all feel impossibly complex, like something reserved for a massive engineering team six months from now.
But what if you, as a product manager, could build one this week? What if the main blocker wasn’t the complexity of the code, but simply having a clear, valuable product idea?
This playbook is about demystifying AI agents. I’m not a staff engineer. I’m a product manager, just like you, who wanted to understand this new technology by building it. This is the story of how I partnered with an LLM (I used Gemini, but these principles work for ChatGPT, Claude, etc.) to turn a simple product idea into a fully functional AI assistant. This is a guide to AI-native product building.
This article isn’t just theoretical. It’s a real, hands-on build. You can find the complete code in the GitHub repo right here: github.com/adamfaik/paris-by-bike-agent.
This is a PM-to-PM story of that build. We’ll follow the entire journey, from the initial “what if?” to a working app. Here’s the agenda:
Part 1: The final product, a demo first: Before we get technical, let’s look at what we’re building: a full demo of the “Paris by Bike” assistant from a pure product and user experience perspective.
Part 2: The briefing, the core concepts: We’ll demystify the jargon with simple, PM-friendly analogies. We’ll define what an “AI Agent” actually is, what “RAG” means, and why the “system prompt” is your most valuable new product spec.
Part 3: The mission, the product brief: I’ll show you how I framed the entire project as a simple product brief, focusing on the “Job-to-be-Done” (JTBD) for the AI assistant.
Part 4: The action, the build process: The core of the playbook. I’ll share my step-by-step process of partnering with Gemini, showing you the exact prompts I used to generate the project’s entire code and structure.
Part 5: The debrief, analysis and trade-offs: We’ll look “inside the black box” to understand why it works and discuss the critical PM trade-offs (like speed vs. privacy).
Part 6: The lessons, your turn: We’ll conclude with a clear list of high-level lessons to help you build your own AI agent.
By the end of this article, you’ll have a clear, concrete understanding of what an AI agent is, see its immediate application for your own products, and have a complete, practical guide to building your very first one.
Ready to build? Let’s start with the vision.
Part 1: The final product, a demo first
Before we dive into the “how,” let me show you the “what” and the “why.” This whole project started from a personal frustration.
I recently bought a bike here in Paris. I have a few friends who are true bike enthusiasts, the kind of people who just know everything. They can instantly plan an amazing Sunday ride based on the weather, what new art expo is on, which boulangeries have the best pastries, and the historical secrets of a neighborhood. I was always amazed.
But... they aren’t available 24/7. When I found myself on my sofa on a surprisingly sunny Tuesday, I had no one to ask. I wanted a “digital bike friend” who was always there. Someone who could not only answer my questions but would actively motivate me to get off the sofa, grab my bike, and explore the city.
Imagine talking to an assistant that doesn’t just give you a list of 10 links, but says, “The weather is perfect for the next three hours, there’s a cool street art exhibit in Le Marais, and here’s a 45-minute scenic route to get you there and back. Go!”
That’s what I wanted to build. And here’s what it looks like.

On the surface, the interface (which we’ll build with a tool called Chainlit) looks familiar, it’s a clean, simple chat window, just like ChatGPT.
The difference isn’t the UI; it’s the brain underneath. This agent has two things a general-purpose chatbot doesn’t:
A private, expert library: A set of 10 expert guides I wrote (with the help of Gemini’s Deep Research tool) on everything from scenic routes to bike-friendly cafes.
Custom tools: A set of 5 superpowers I give it, like checking live weather, searching the web, and generating map links.
Let’s see these capabilities in action, from the simplest to the most powerful.
One quick note: In these demos, you’ll see the agent’s ‘thought process’ as it works, showing which tools it’s using (like Used 🤔 Thinking...). This is intentional. It’s an invaluable “debug mode” for us as builders to test and refine the agent’s logic. We’ll cover how to set this up later (it’s just a parameter) and how you can, of course, hide it for a polished, live product.
1. The persona: knowing when not to act

This is a crucial first test. The agent correctly identified a simple salutation and didn’t trigger a complex and expensive tool. This isn’t a simple if-then rule; it’s the agent’s brain (the LLM) correctly interpreting the user’s intent based on the SYSTEM_PROMPT (its job description) we gave it. It decided no tool was necessary. This is just as important as deciding which tool to use.
2. 📚 The library: the RAG tool
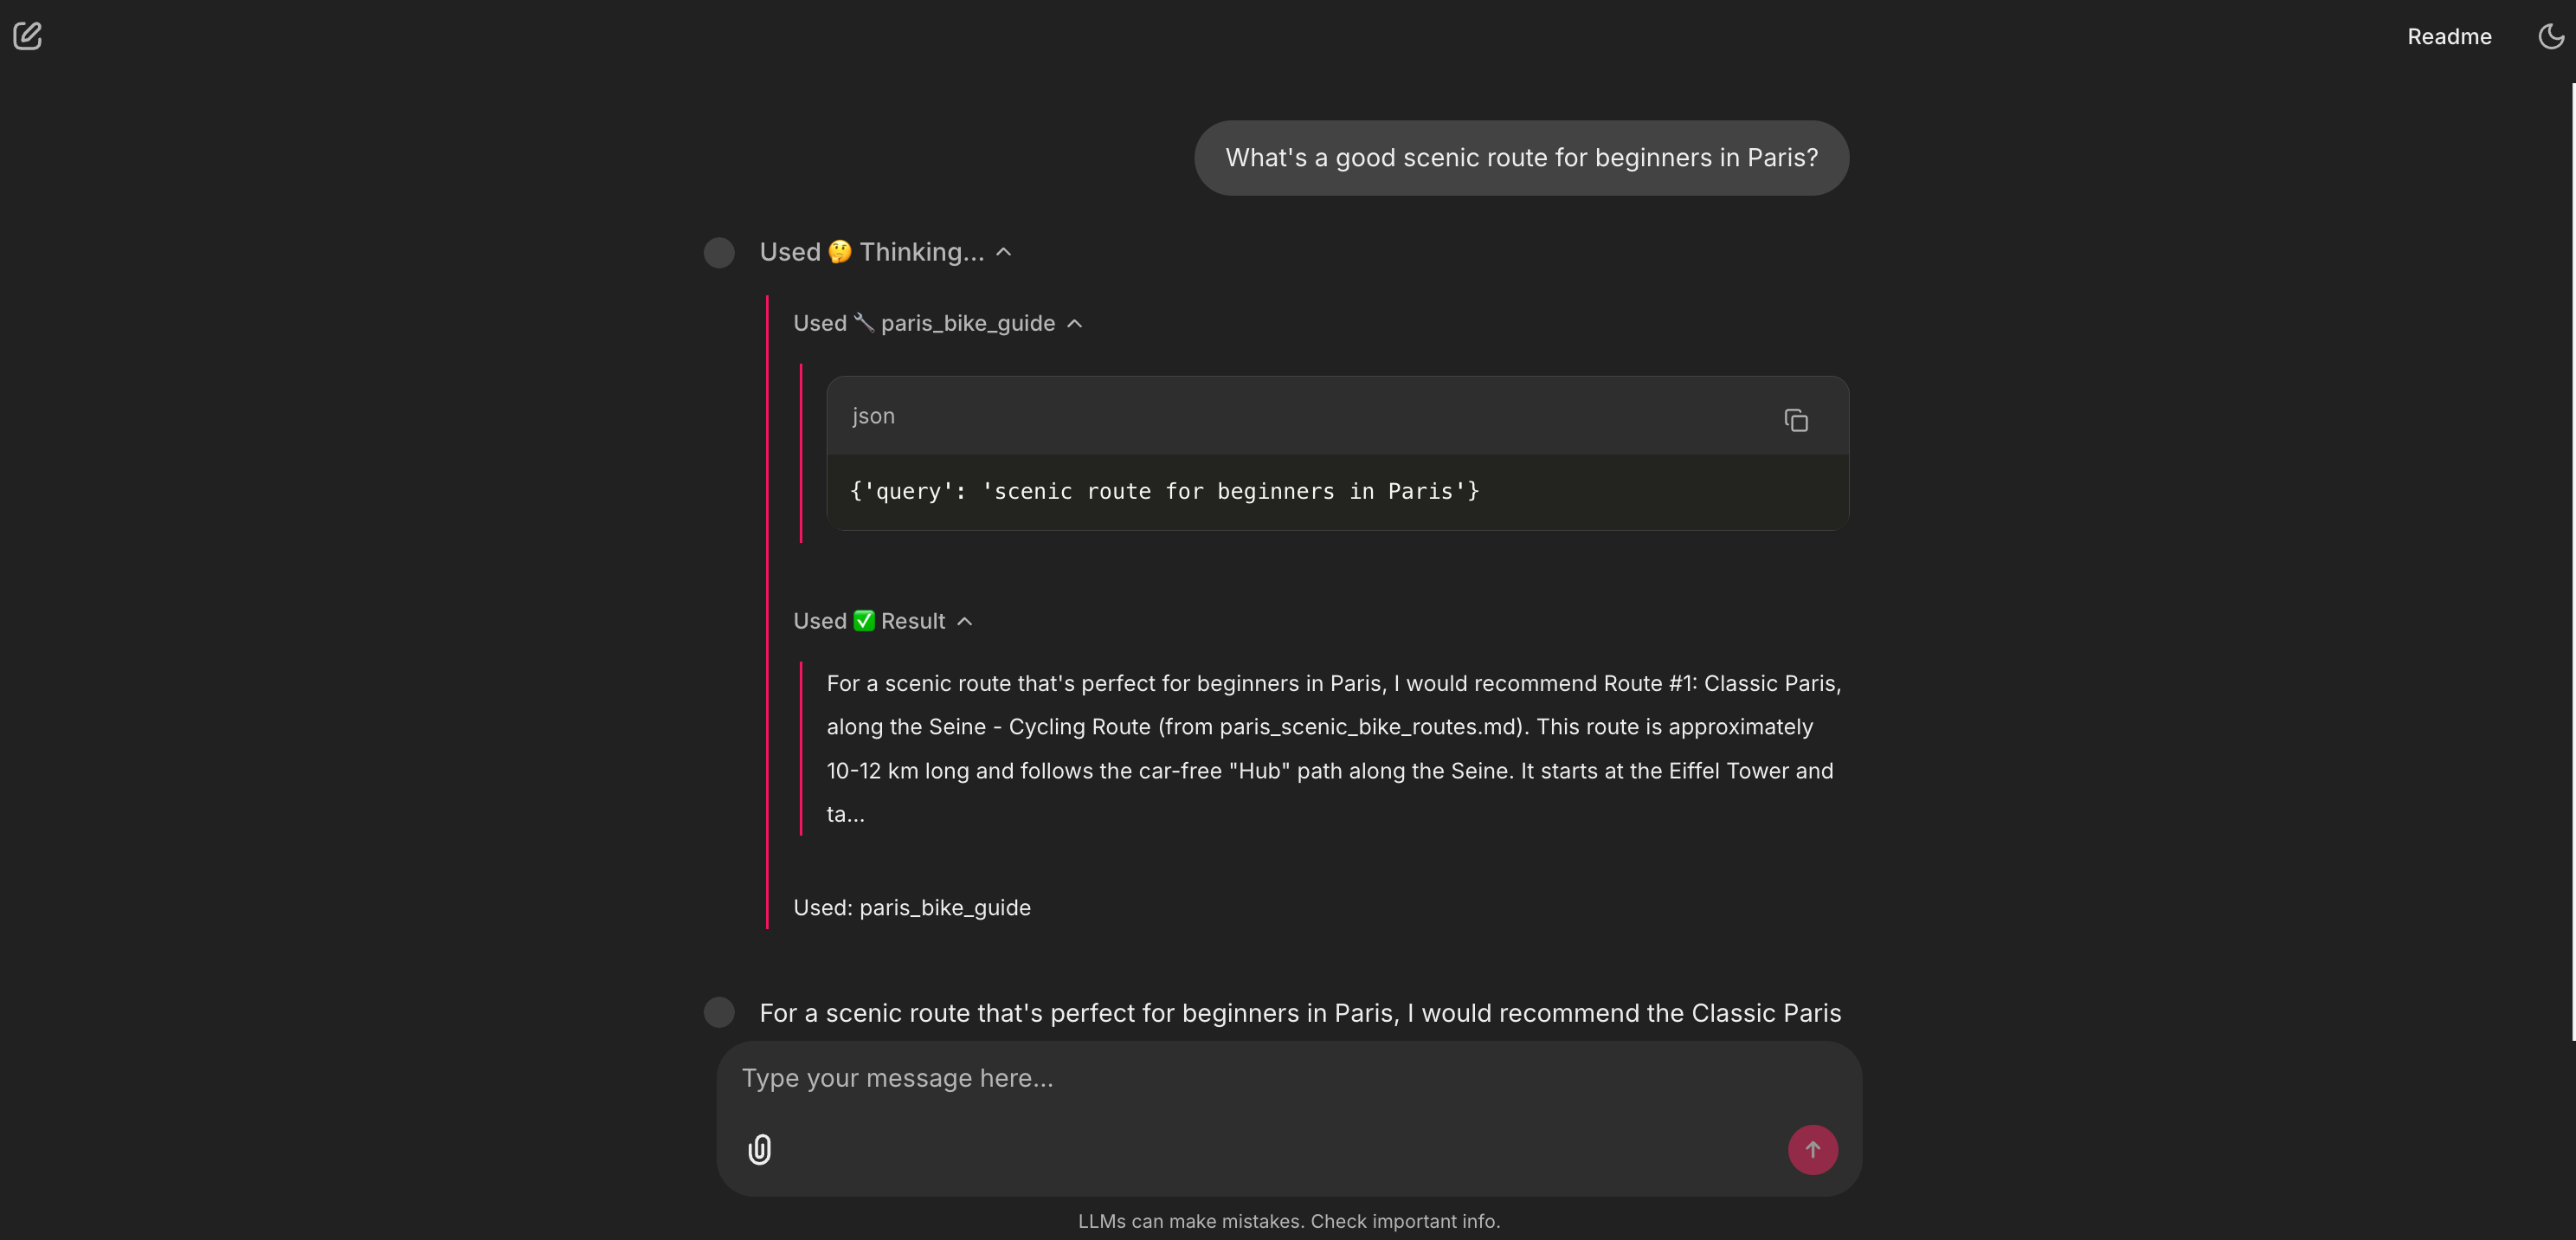

This is our Retrieval-Augmented Generation (RAG) pipeline in action. The agent didn’t Google a generic answer. It correctly identified this as a knowledge-base question and called its paris_bike_guide tool. The UI shows it thinking and selecting that specific tool. The answer it gives is high-quality, expert-level, and citable (it comes from paris_scenic_bike_routes.md) because I curated the data it’s pulling from.
3. 🧮 The calculator: a custom skill

This is a simple but powerful concept. We gave the agent a new “skill” by just writing a basic Python function. The LLM’s brain was smart enough to extract the entity (”90 minutes”) from my natural language query and pass it as a structured argument (duration_minutes: 90) to the tool. This is a non-trivial leap: the agent can understand unstructured language and convert it into a structured API call.
4. 🌤️ The window: a live API tool for weather

This is how we break out of the static library. The agent now has a window to the outside world. It can access live, real-time data from any API we give it. This unlocks any use case that depends on current information, which was the core of my initial digital bike friend idea.
5. 🕸️ The web browser: a live API tool for search
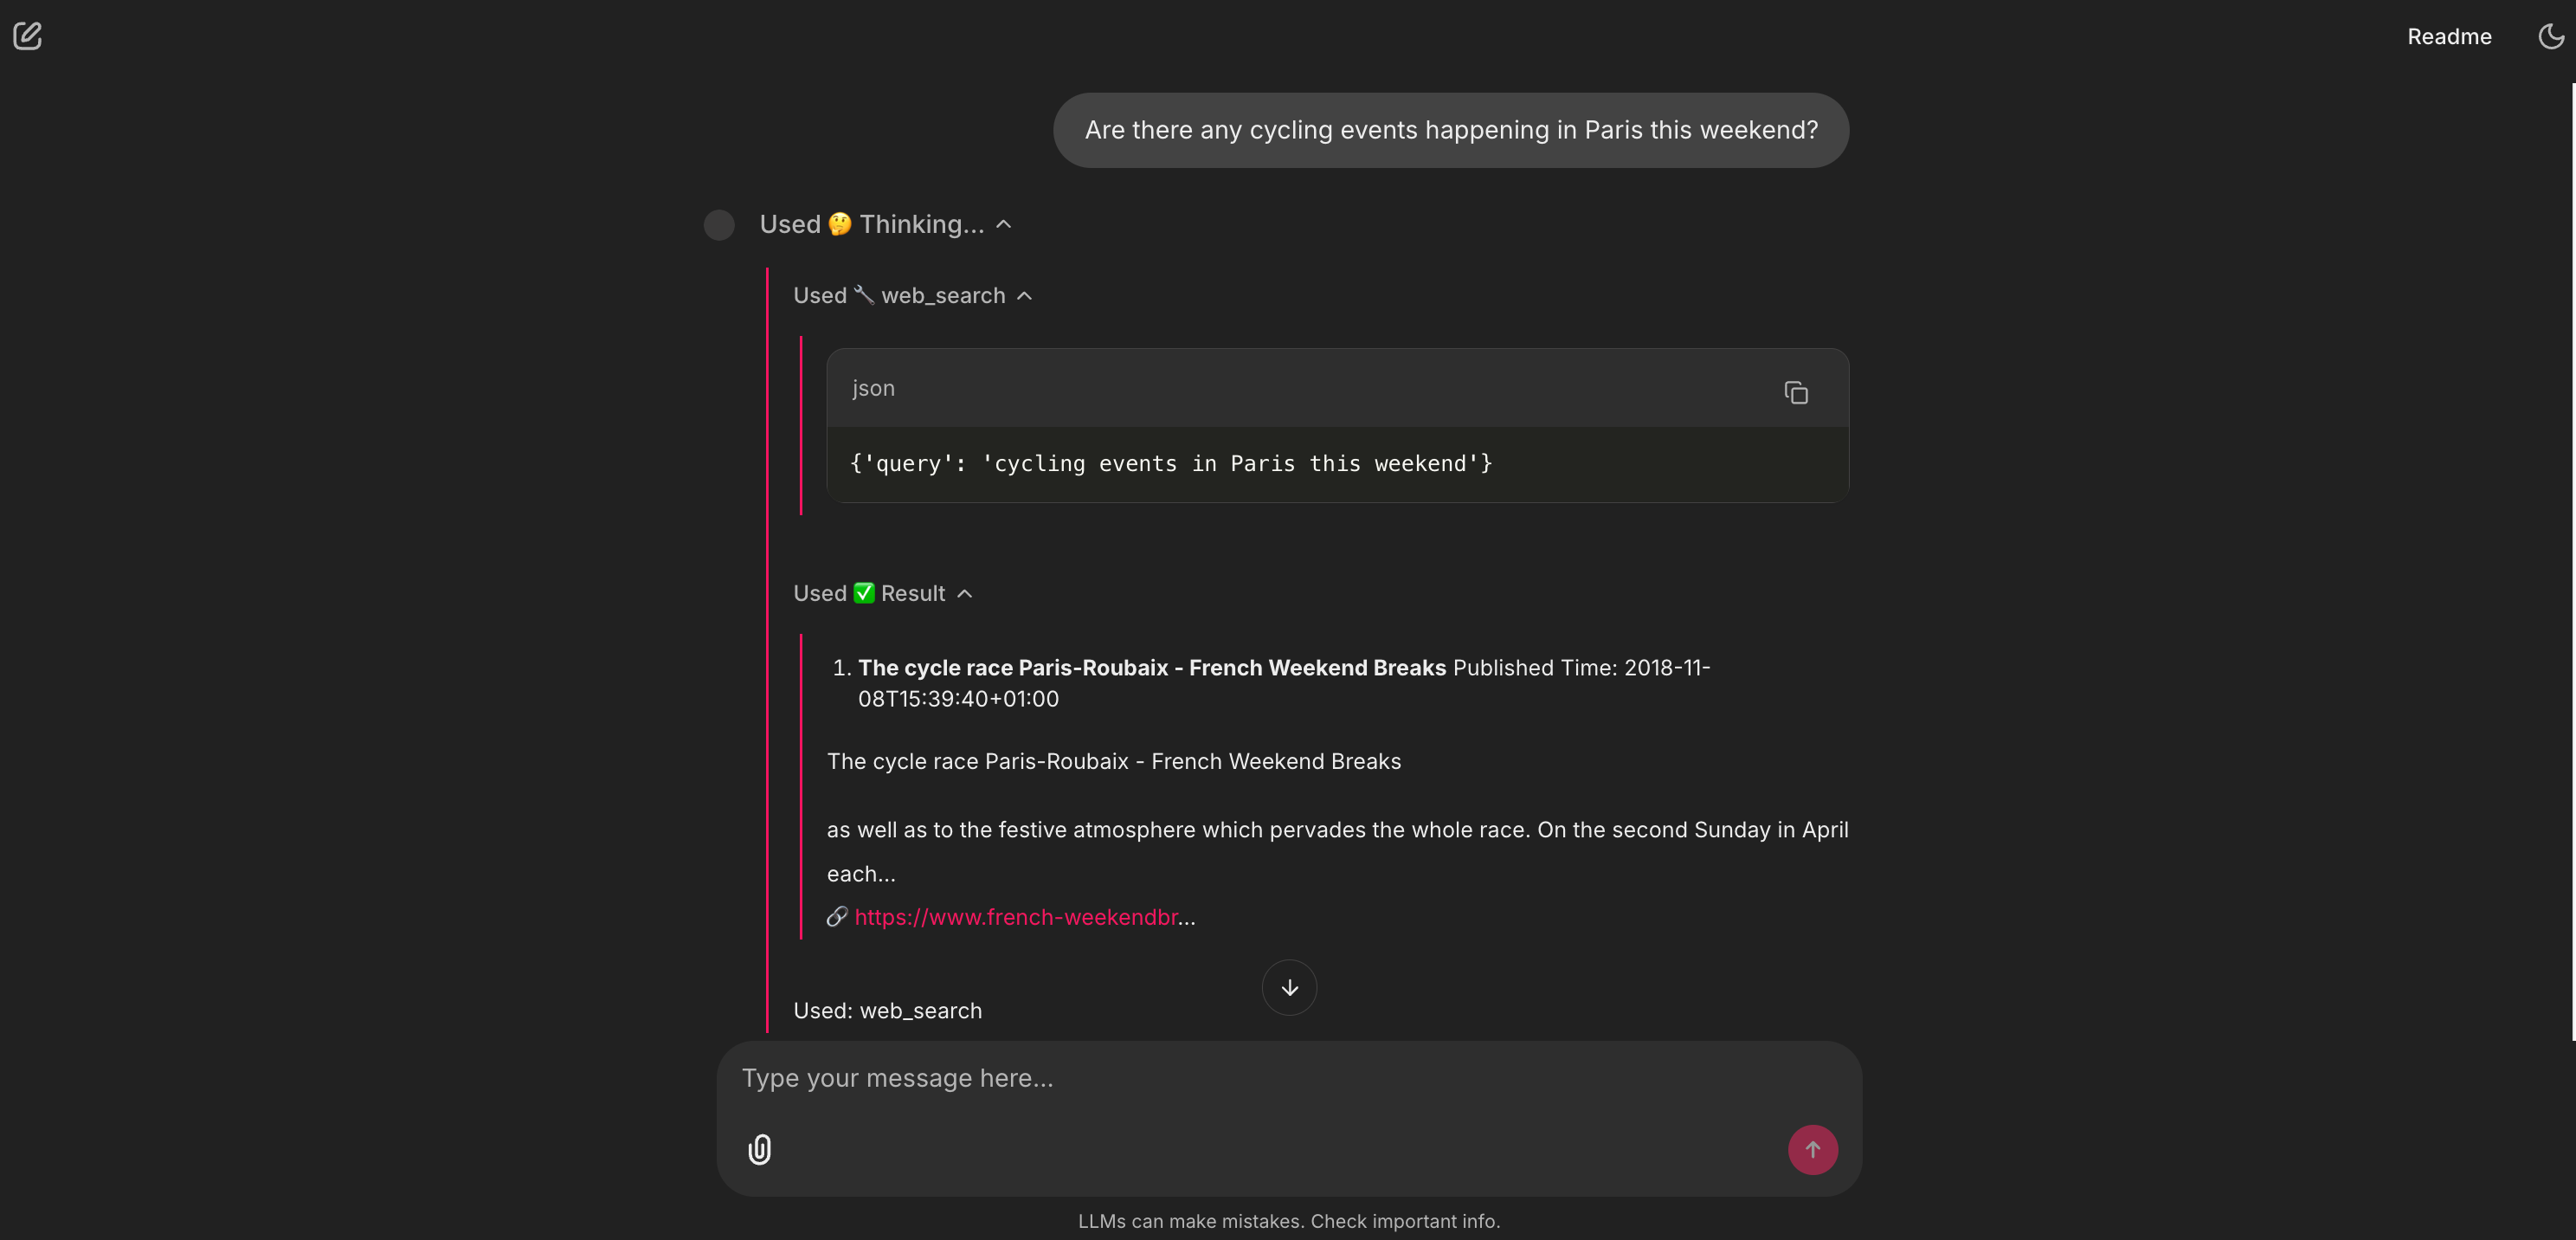

This is the agent’s safety net. My RAG library knows about routes, but it can’t know about an event happening this weekend. The agent’s reasoning (which we’ll see is defined in the System Prompt) is: “I’ll check my paris_bike_guide tool first. No results? Okay, this must be a current event. I’ll use the web_search tool instead.” This two-step fallback is a sophisticated piece of product logic.
6. 🗺️ The map: the actionable tool
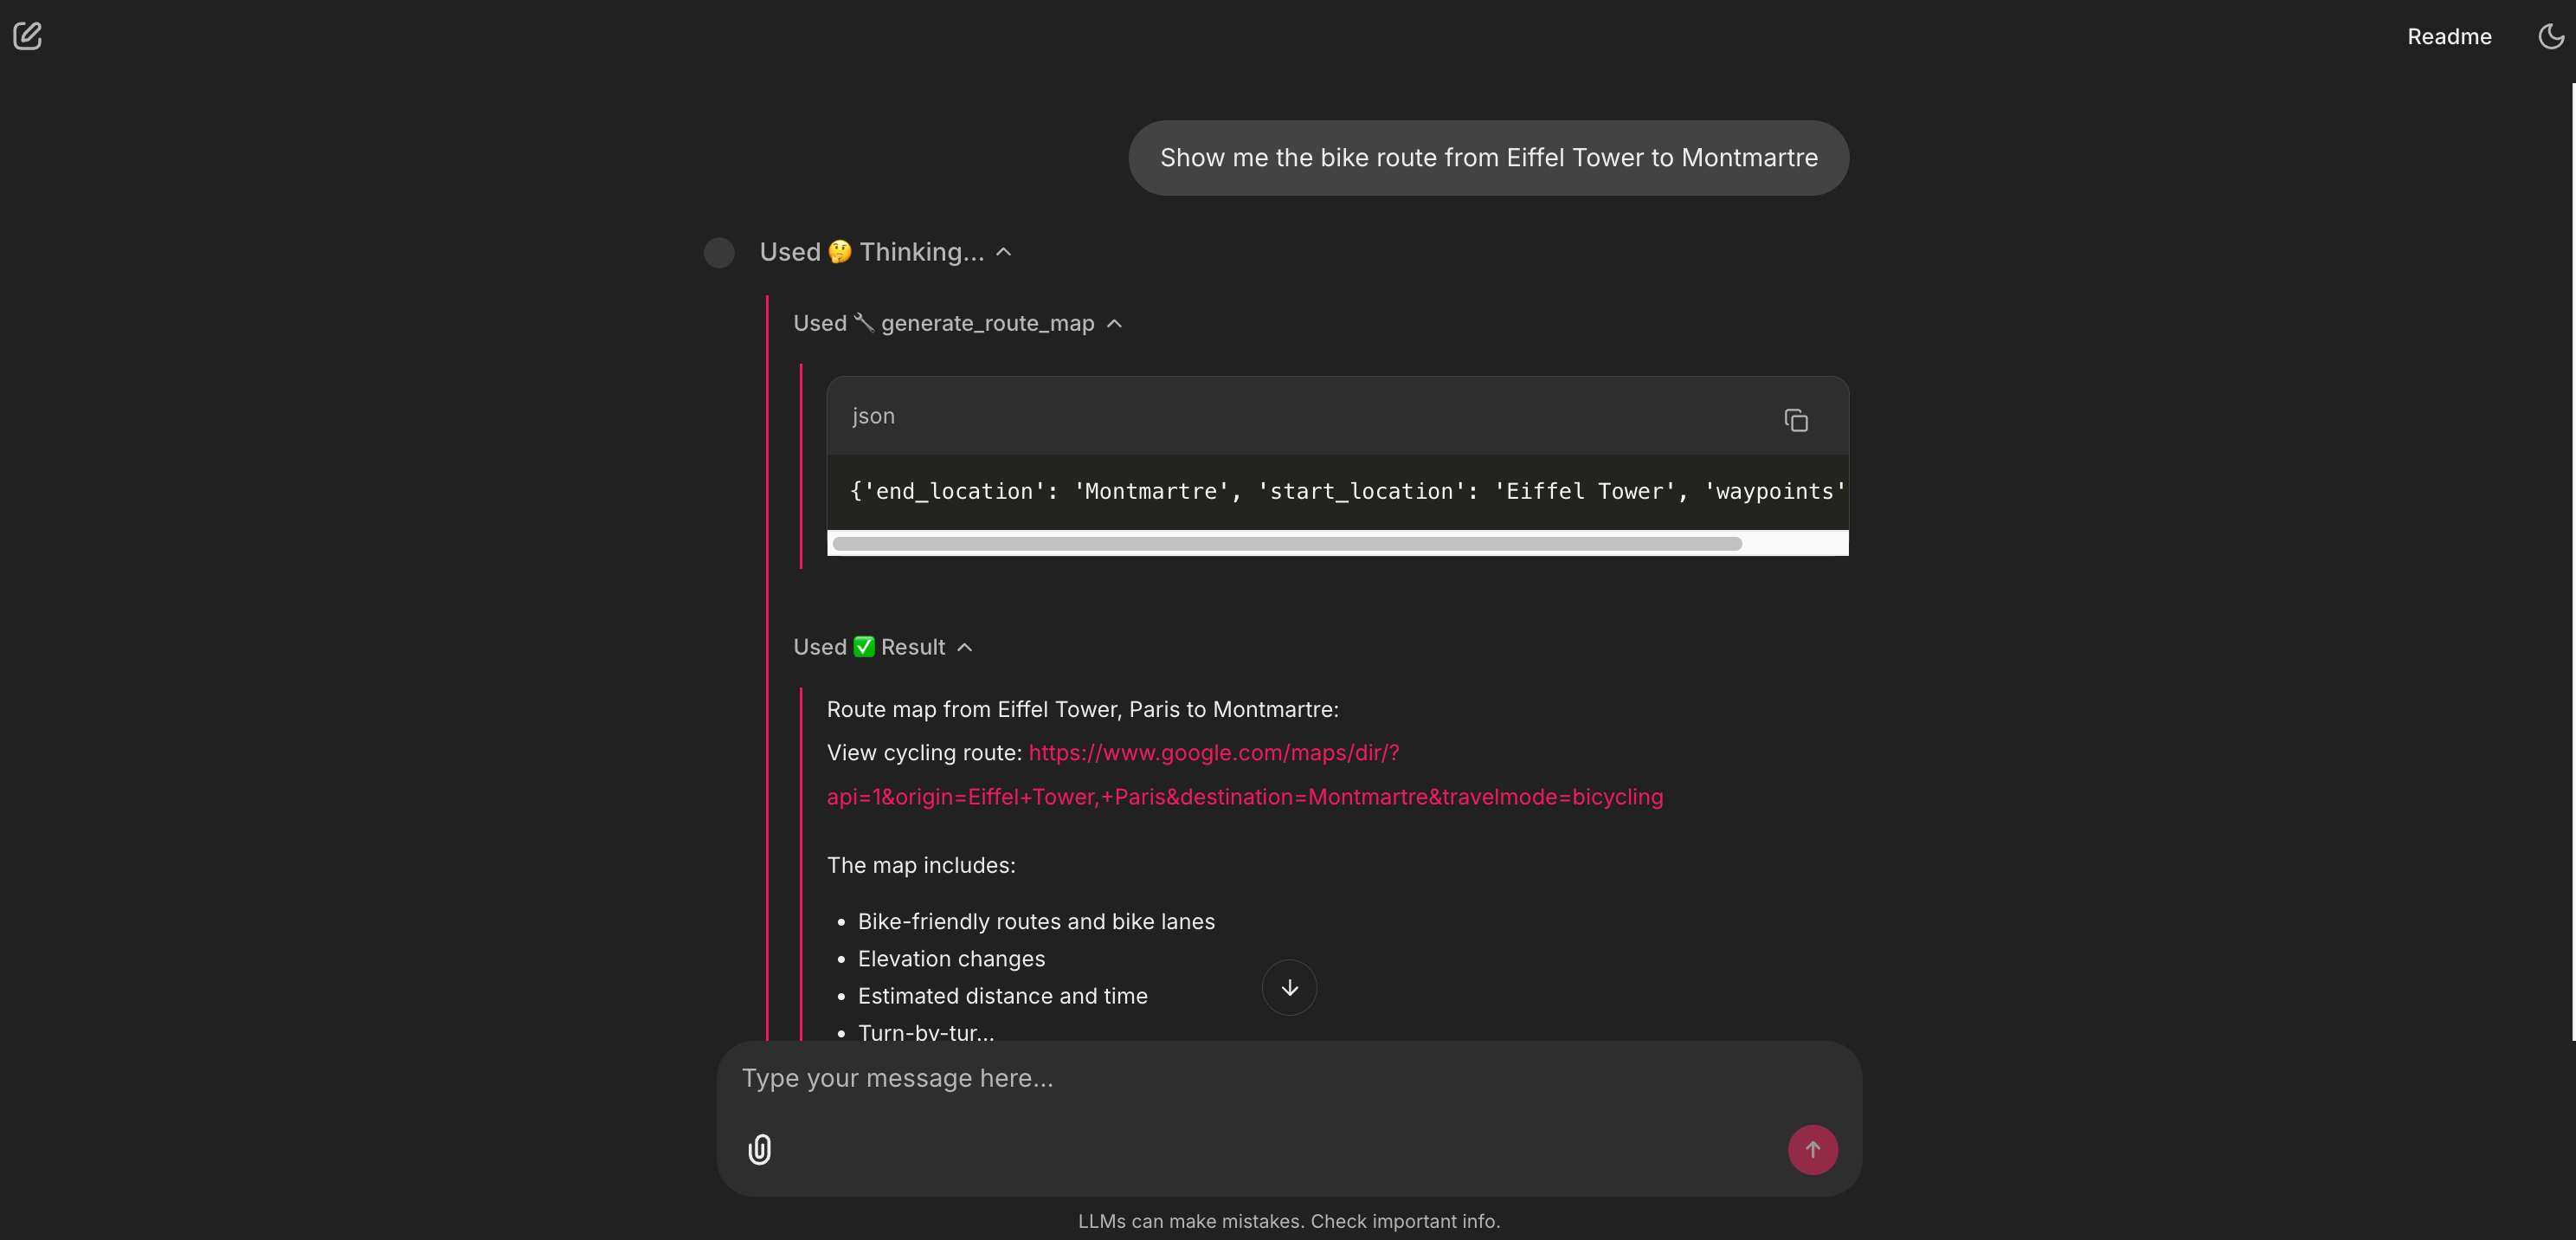
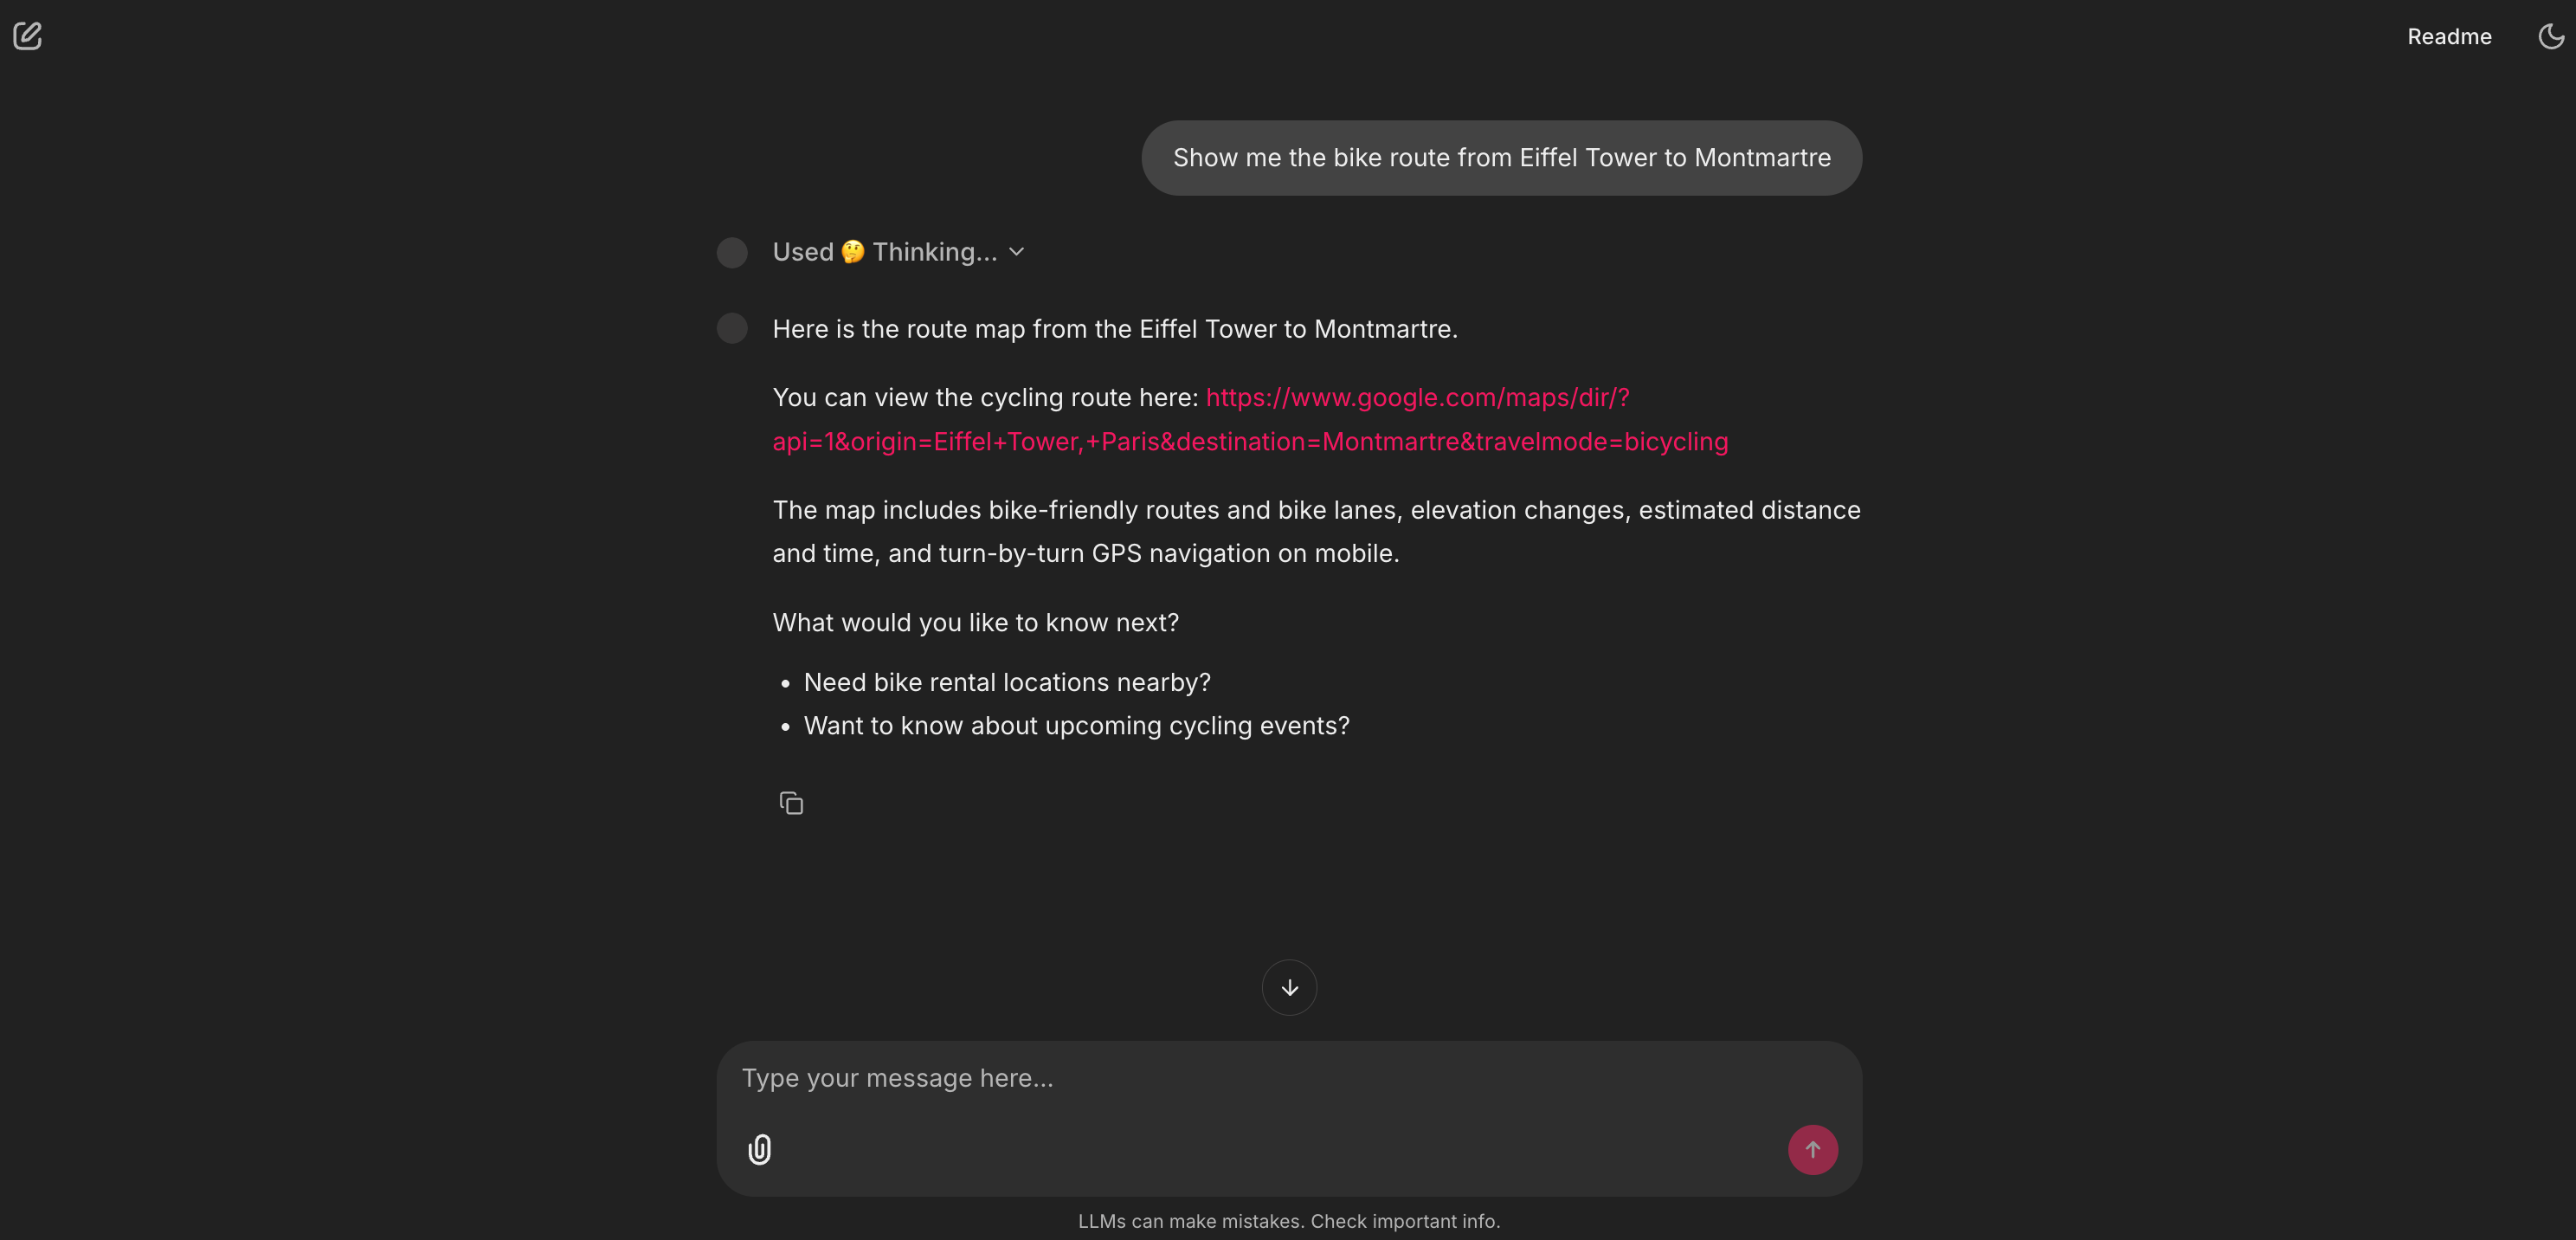

This is the last mile of the user’s Job-to-be-Done. The agent doesn’t just describe the route; it delivers it. This closes the loop. The user can now click this link and start their ride, which means they stay within our product ecosystem instead of leaving to open Google Maps themselves.
7. The Grand Finale: multi-tool planning
This is the magic moment, where the agent uses all its capabilities at once to solve a complex, multi-part problem.
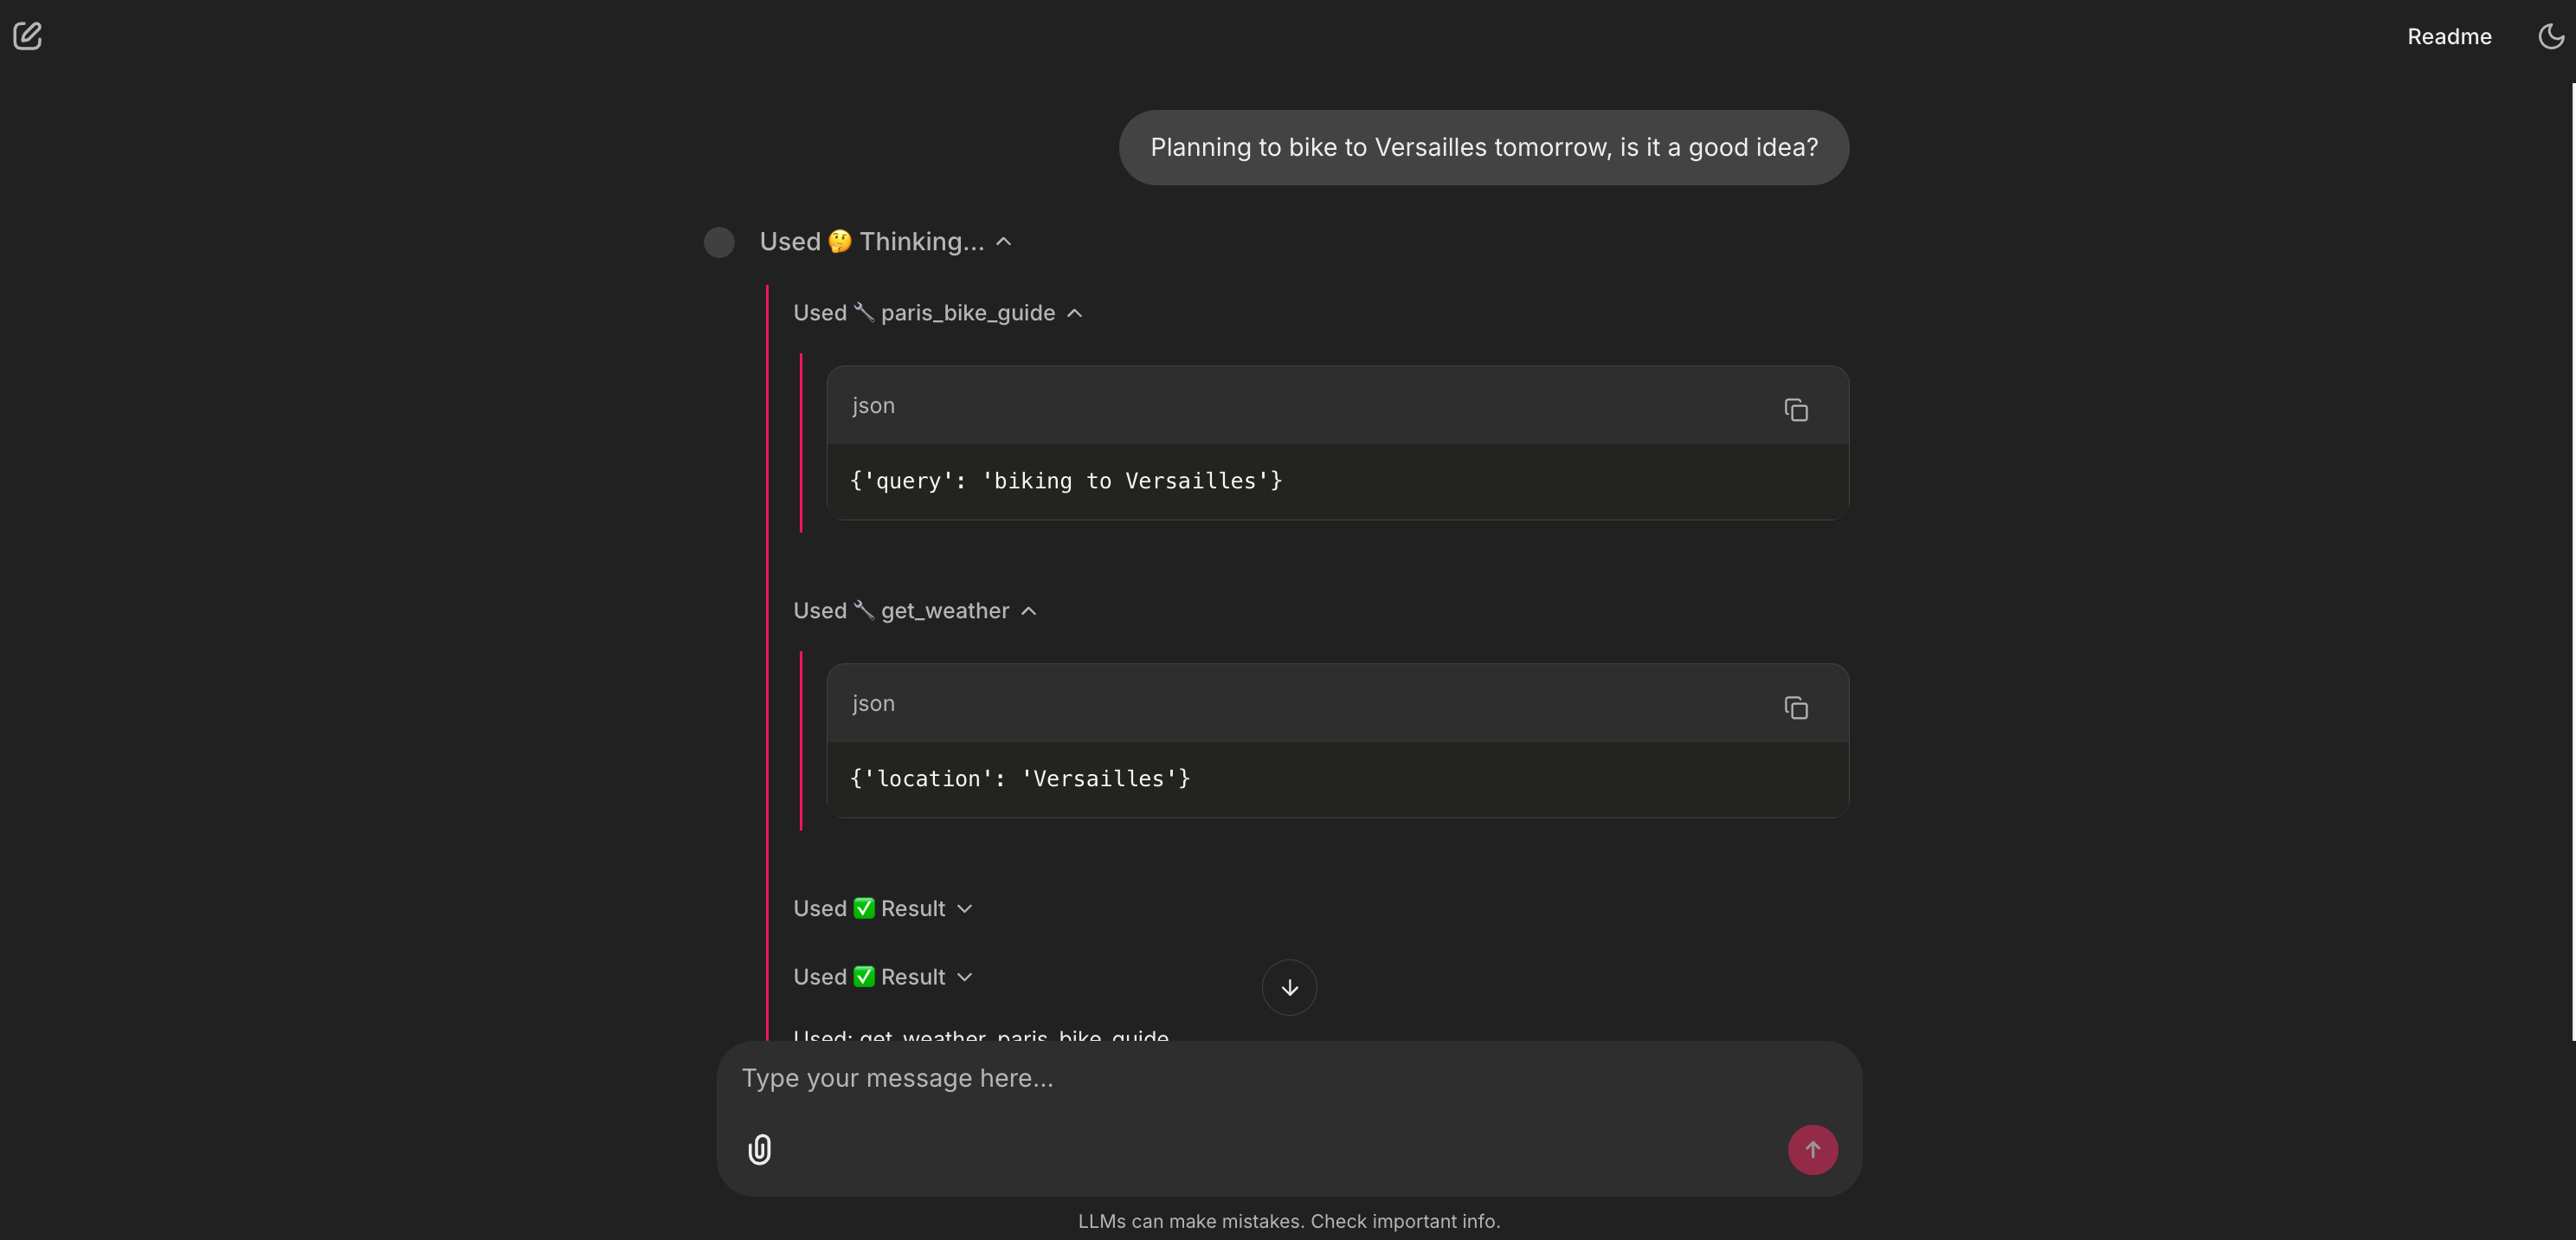
 with a Weather forecast (from an API).")
This is the whole a-ha! moment. The user asked one question, and the agent performed a multi-step analysis. It reasoned that the query had two parts (the route and the timing), called the two correct tools in sequence, and then synthesized the results into a single, cohesive, valuable answer. This is what separates a simple chatbot from a true AI agent.
So, what we’ve just built is an AI Agent.
At its simplest, an AI Agent is a system that uses an LLM as its brain (or orchestrator) to reason, plan, and use tools (like code functions or APIs) to accomplish a complex goal.
This architecture is a powerful blueprint. Imagine this same pattern for your own product:
HR onboarding: A RAG tool for the employee handbook + API tools to check vacation balances or book a 1:1 with HR.
E-commerce shopper: A RAG tool for product manuals + API tools to check live inventory, find accessories, or track a shipping status.
Data analyst: A RAG tool for all your data dictionaries + a tool that can write and execute SQL or Python code to answer questions.
Marketing assistant: A RAG tool for your brand’s style guides + Tools to search the web for trends and post drafts to social media.
Personal assistant: A RAG tool for your personal notes + Tools to check your live calendar and draft an email.
If you’re reading this, take five minutes right now. Think about your own product or workflow. What’s a user Job-to-be-Done that’s currently stuck in a leaky funnel?
Hold that idea in your head, because if you follow the next steps, you’ll be able to build it.
Part 2: The briefing, the core concepts
Before we open the hood, let’s get our terms straight. The AI space is filled with confusing jargon, and it’s the biggest barrier to getting started. As PMs, our job is to translate complex ideas into simple, powerful models. Here are the plain-English analogies I learned, which I now use to explain these concepts to my own teams.
What is Generative AI?
For the last few years, most AI we’ve used has been discriminative AI (a “sorter”). It’s brilliant at classifying or predicting. Think of it as a bouncer at a club who has learned to check an ID. The AI learns the conditional probability, P(y|x): ”Given this person x (the ID), what’s the probability y they are on the list?” It’s a “cat” or “not cat” machine.
Generative AI (a “creator”) is completely different. It doesn’t learn a decision boundary; it learns the entire pattern of the data itself. In technical terms, it learns the joint probability, P(x,y).
Forget the math. Here’s the simple version: The “sorter” AI learns to recognize a cat. The “creator” AI has studied so many pictures of cats that it can generate a new, original picture of a cat that has never existed.
An AI agent uses generative AI to create new, helpful, human-like answers for users.
What is an LLM brain?
A Large Language Model (LLM) is the brain of an AI agent. At its core, it’s an autoregressive system, which is a very fancy way of saying it does one thing, and one thing only: it predicts the next word (or token) based on all the words that came before it. It generates text word by word, just like we do. It only feels instantaneous because of the powerful GPUs (processors) it runs on.
It can do this because it was pre-trained on a massive snapshot of the internet. It learned the probability of which words are likely to follow other words.
How it understands:
Tokenization: First, the LLM breaks our text into sub-word pieces. “Paris by Bike” isn’t three words; it might be five tokens like
[”Par”, “is”, “ by”, “ B”, “ike”]. This is how it handles any word, even ones it’s never seen.Embeddings: Next, it converts each token into a massive list of numbers (a vector). This isn’t random; it’s a semantic coordinate. The vectors for “King” and “Queen” are close to each other in this high-dimensional space. In fact, the model learns vector math:
vector(King) - vector(Man) + vector(Woman)is statistically very close to thevector(Queen). This semantic space is how the model reasons about concepts.The attention mechanism: This is the real secret sauce, introduced in the 2017 paper Attention Is All You Need. This is what allows the model to handle long-range dependencies, to understand that the “it” at the end of a long paragraph refers to the “bicycle” at the beginning. It learns to “pay attention” to the most relevant tokens for any given context.
What is RAG?
This is the most important concept for building valuable, enterprise-ready AI. RAG, Retrieval-Augmented Generation, is the solution to the LLM’s two biggest problems:
Its knowledge cutoff: It doesn’t know about last week’s news.
Its privacy: it doesn’t know about your private company docs.
RAG is how we give our agent its own proprietary, expert library.
This entire process is captured in the rag_pipeline.py file. You don’t need to be a Python expert to understand it. If you open that file, you can follow along as I describe the two simple phases.
Phase 1: Ingestion, building the library
This is what rag_pipeline.py does before the app even starts.
Load: First, it scans the
/datafolder and loads all the expert-written.mdand.pdffiles.In the code, look for: the
rglobfunctions scanning for*.pdfand*.mdfiles.
Chunk: We can’t give the LLM a 50-page document at once (this is the context window limit). So, we use a smart paper shredder called
RecursiveCharacterTextSplitterto break the text into small, overlapping paragraphs called chunks. The overlap is key: It’s like repeating the last sentence of a page at the top of the next, so no context is lost.In the code, look for: the
text_splitter = RecursiveCharacterTextSplitter(...)line.
Embed: This is where the magic happens. We use an embedding model, in this case,
nomic-embed-text. An embedding model is a translator. It’s a specific type of AI, an encoder-only transformer, whose only job is to read a piece of text and convert it into a semantic coordinate, a long list of numbers, or vector. This vector represents the meaning of the text.In the code, look for: the
EMBED_MODEL = OllamaEmbeddings(...)variable.
Store: We dump all these vectors (and the text chunks they point to) into a magic filing cabinet called a vector store. The “Paris by Bike” project uses
FAISS.FAISS, Facebook AI Similarity Search, is a high-performance library that’s incredibly fast at one thing: finding the closest vectors to a new query vector. It’s super-lightweight and runs locally on a machine.In the code, look for: the
vectorstore = FAISS.from_documents(...)line, which creates the “filing cabinet,” andvectorstore.save_local(...)which saves it to our disk.
Phase 2: Retrieval, using the library
This happens in real-time every time the user asks a question.
Embed query: The user’s query (”What’s a good scenic route?”) is converted into a vector using the exact same
nomic-embed-textmodel.Search: The agent performs a similarity search. It asks FAISS, “Find me the 4 text chunks whose vectors are closest to this query vector.”
In the code, look for:
retriever = vectorstore.as_retriever(...). This retriever is the librarian that instantly searches the filing cabinet.
Augment and generate: The agent retrieves those 4 original text chunks (the context) and augments the prompt. It staples that context to the user’s question and tells the LLM: “Hey, using only this context I’m giving you... answer this question.”
In the code, look for: the
RAG_PROMPT_TEMPLATEvariable. You’ll see the{context}and{input}placeholders. This is exactly where the retrieved text and the user’s query get inserted.
This is how we get expert, citable answers from private data.
What is an AI Agent?
You’ve already used an agent. When you’re in ChatGPT and you ask about a current event, you’ll see a little box appear that says “Browsing the web.” That’s an agent. The LLM (the brain) reasoned that your query couldn’t be answered by its internal knowledge. It decided to use a tool (its web browser). It then read the search results and synthesized an answer for you.
So, an AI Agent is a system that uses an LLM as its brain (or orchestrator) to reason, plan, and interact with tools (like code functions or APIs) to accomplish a complex goal.
This brings up the critical PM question: “Wait, how is this different from a workflow?”
We’ve had automation for years (think Zapier, IFTTT, or simple scripts). A traditional workflow is predefined and brittle. As the PM, you have to map out every single step: IF a user emails “support,” THEN create a ticket in Jira, THEN send a Slack message. It’s powerful, but it breaks the instant the user’s request doesn’t match the exact trigger (e.g., they email “help!” instead of “support”).
An AI agent is fundamentally different. It’s dynamic.
In a workflow, you define the path.
In an agent, you define the capabilities (the tools).
The agent’s brain (the LLM) uses its reasoning ability to create the workflow on the fly based on the user’s unstructured, natural-language request. This is why agents are so powerful. They can handle the messy, unpredictable, and complex queries of real humans, which a rigid workflow could never do.
Instead of building a rigid path, we just give our agent an assistant’s desk with a collection of tools. RAG is just one tool in that collection.
If you look at the “Paris by Bike” project’s agent_logic.py file here, you’ll see I gave the agent a set of 5 tools. Here’s the breakdown. You can follow along in the file to see how simple this is.
📚 A library: The RAG pipeline (
paris_bike_guide). This is the expert encyclopedia. It’s the tool the agent uses to query the private 10-document library.Look for the
@tooldecorator right above thedef paris_bike_guide(query: str)function. You’ll see this function is just a simple wrapper that passes the user’s query to therag_chainwe built in therag_pipeline.pyfile.
🌤️ A window: A live weather API (
get_weather). This tool gives our agent a window to the real, live world. It calls the OpenWeatherMap API to get the current forecast.Look for the
def get_weather_function(location: str). You can see the logic right inside: it checks for anOPENWEATHERMAP_API_KEY. If it can’t find one, it just returns “demo data”. This is a simple, PM-driven fallback.
🕸️ A web browser: A web search API (
web_search_tool). This is the agent’s safety net for any question our private library can’t answer, like “what’s on this weekend?”Look for the
web_search_function(query: str). This function uses theTavilySearchResultslibrary to get results, and then just formats them nicely with clickable links. The most important part for us as PMs is thedescriptionfield in theStructuredTool.from_functioncall. That description is the “manual” the LLM reads to understand when to use this tool.
🧮 A calculator: A simple Python function (
calculate_biking_plan). This is a custom “skill” I built to answer questions like “How far can I bike in 90 minutes?”Look for the
def calculate_biking_plan_function(...). This isn’t a complex API. It’s just a few lines of basic Python math (distance = round(hours * speed_kmh, 1)). This shows that a “tool” can be any simple helper function you can imagine.
🗺️ A map service: A URL generator (
generate_route_map). The tool that makes our agent’s advice actionable. It creates a Google Maps link so the user can start their ride.Look for the
def generate_route_map_function(...). You’ll see it’s not magic. It’s just a Python function that formats a string to build a Google Maps URL with the right parameters (...&travelmode=bicycling). This is a perfect example of how a simple, 10-line function can become a powerful tool for an AI agent.
How does the agent think?
How does the agent know which tool to use, or how to combine them? It uses a framework called ReAct, which stands for Reason + Act. It’s the brain of the agent. This is where Chain of Thought (CoT) comes in.
You can think of CoT as the agent’s internal monologue. Instead of just blurting out an answer, the LLM thinks step-by-step to reason about the problem first. This allows it to break a big, complex problem (like “plan my ride”) into small, manageable pieces.
The ReAct framework combines this thinking with doing. When you ask a complex question like “Is it a good idea to bike to Versailles tomorrow?”, the agent’s internal logic looks exactly like this:
Reason: “The user wants to know about Versailles and tomorrow’s weather. This is a multi-step problem.”
Act: “I’ll use the
paris_bike_guidetool first to find the route.”Observe: (Gets the route info from the RAG tool).
Reason: “Great. Now I need the weather. I’ll use the
get_weathertool.”Act: (Calls the OpenWeatherMap API).
Observe: (Gets the weather data).
Reason: “I have all the info. I will now synthesize them into a single, helpful answer for the user.”

This Reason-Act-Observe loop is what makes an agent feel intelligent. So, how did I build this loop? This is where the LangGraph library comes in. As PMs, we can think of it like this: If LangChain gives us the building blocks (the tools, the RAG chain), LangGraph provides the plumbing or the “smart flowchart” that connects them.
A simple LangChain chain is linear (A → B → C). LangGraph allows us to build graphs, systems that can run in a loop, make decisions, and go back to a previous step. This looping ability is what makes the “Reason → Act → Observe → Reason...” cycle possible.
Code-Curious? This entire complex loop is created with one line of code in the agent_logic.py file here: agent_executor = create_react_agent(llm, tools). This single function from LangGraph takes the LLM and the list of 5 tools and automatically builds this powerful ReAct engine for us.
What is the system prompt?
This is the most important and powerful tool as PMs. The system prompt is the text document where we define the agent’s entire reality.
If you look at agent_logic.py here, you’ll find the SYSTEM_PROMPT variable. It’s not just a prompt; it’s the product spec. It tells the agent:
Who you are: “You are ‘Paris by Bike’ - a knowledgeable and friendly biking assistant...”
What your tools are: (It gets a list of the 5 tools and, crucially, their descriptions).
What your rules are: “CRITICAL RULES FOR TOOL USAGE: 1. MATCH YOUR RESPONSE TO THE QUESTION COMPLEXITY...”
This is how we program the agent’s logic in plain English. The agent’s skill at picking the right tool is completely dependent on how well we (as PMs) write the description for that tool.
Recap
Okay, let’s pause. That was the briefing, and I know that was a lot of theory. If your head is spinning a bit with terms like autoregressive, embeddings, RAG, and ReAct, that is completely normal.
We’ve just put a name to the concepts we’re using in this project:
RAG is the private library (which we’ll see is built in the
rag_pipeline.pyfile).The agent, its tools, and its system prompt make up our assistant (defined in the
agent_logic.pyfile).The ReAct Loop is the thought process (powered by LangGraph) that the AI agent uses to choose those tools.
Here’s the most important part: you do not need to be a master of these concepts to start building. My own deep understanding didn’t come from reading definitions; it came from seeing it work in practice and then coming back to the theory, which suddenly made sense.
Learning this stuff is an iterative loop. You see the practice, and the theory gets clearer. You revisit the theory, and the practice becomes more powerful.
The good news is, the heaviest theory part is over. From here on, we’re focused on the practical, step-by-step build. We’re going to move from the “what” to the “why:” How to frame this entire project as a simple product brief you can write in an afternoon.
Part 3: The mission, the product brief
Alright, let’s be honest. My core motivation for this project wasn’t just to solve my sofa-to-bike problem. As a product manager, I saw “RAG” dominate the conversation last year, and now, “AI Agents” are the new buzzword. I felt that if I couldn’t actually build one and explain how it worked, I was falling behind, a PM fraud in the new age of agentic AI.
So, I set myself a challenge: Could I build a single assistant that combined both? A system that was smart enough to have its own expert, private knowledge (RAG) and smart enough to use tools to take real-world actions (the “agentic” part)?
My “Paris by Bike” idea was the perfect use case. The real challenge was figuring out the requirements. As PMs, our job is to define the problem so well that the solution becomes obvious.
It turns out, designing an AI agent is just a new, high-leverage way of doing product discovery. You don’t need to talk about “RAG” or “tools” with your stakeholders or users. You just need a framework to find the friction points.
Here is the 3-step “agent design” framework I used. This is a simple, non-technical way for any PM to define the requirements for an AI agent, just by mapping out a user’s real workflow.
Step 1: Define the Job-to-be-Done (JTBD)
First, what is the single, high-level job the user is trying to do?
My project’s JTBD: “When I have a free afternoon, motivate me and help me plan and execute a great bike ride, from initial idea to final route, all in one place.”
Step 2: Map the leaky funnel, find the friction points
Next, map the user’s current workflow for this job. Where do they leak from your platform? Where do they open a new tab? Each leak is an opportunity for a tool.
My leaky funnel:
I get an idea from a blog post.
Leak 1: I leave to open my Weather app. “Is it sunny?”
The weather is good.
Leak 2: I leave to open Google Maps. “How do I get there? How long will it take?”
I find a route.
Leak 3: I leave to open Google Search. “What’s even happening in that neighborhood today?”
I find an event.
Leak 4: I get distracted by other links, lose momentum, and stay on the sofa.
Step 3: Define the toolbelt, the capabilities to plug the leaks
This is the final step. Each leak you identified in Step 2 now becomes a clear, obvious requirement for your agent. You’re not building features; you’re building capabilities to plug the leaks.
This framework writes the product brief for you. When I ran my “Paris by Bike” idea through it, my agent’s toolbelt became crystal clear:
User: “I need ideas for a route.”
📚 Tool 1: A “private library” of expert-written routes.
User: “Should I go now or later?”
🌤️ Tool 2: A “window” to check the live weather.
User: “How long will that take?”
🧮 Tool 3: A “calculator” to estimate time/distance.
User : “What’s happening this weekend?”
🕸️ Tool 4: A “web browser” to find current events.
User: “How do I actually get there?”
🗺️ Tool 5: A “Map Service” to provide navigation.
That’s it. That’s the entire product brief.
The 5 tools you see listed in the agent_logic.py file aren’t just random Python functions. They are the direct technical implementation of the 5 user needs I identified. This (JTBD → leaky funnel → toolbelt) framework is how you can design any AI agent for any use case, and you can explain it to any stakeholder.
Now, we just need to build it. And for that, I’m not going to open a code editor, I’m going to open a chat with Gemini.
Part 4: The action, the build process
Now for the “how.” I hope you’re not disappointed, but I didn’t write the 500+ lines of Python for this project from scratch. I read them, tested them, debugged them, and directed them.
My job as the PM wasn’t to be an engineer. It was to be the “taster.” I was the one judging the results at every step, asking “why does it do that?” or “can we make it do this instead?” I felt a bit like Steve Jobs in the early Macintosh days, talking to the engineers. I was demanding, incredibly curious, and pushed my AI partner, Gemini 2.5 Pro, to build things I couldn’t, all without worrying about the technical obstacles. I just wanted to see my product vision come to life, and I wanted to understand every single piece.
This is the exact, step-by-step process I followed.
Step 1: The “what if?” prompt, asking for a plan
I didn’t start by writing a 10-page PRD or a complex code prompt. My very first prompt to Gemini was simple, high-level, and focused on a plan:
I’m a PM and I’ve heard a lot about RAG and AI Agents. I want to build my first agent to really understand them. Can you give me a step-by-step plan for a total beginner? My idea is a “Paris by Bike” assistant. It should have its own knowledge (RAG) but also tools (like weather or maps).
Crucially, I need to test this a lot without paying for API calls. Can you design the plan so it works locally with a free tool like Ollama, but also has an option to switch to a fast cloud LLM like Groq for speed?
I just need the plan to get started, from creating the GitHub repo to having a local app I can test. I use VS Code as my IDE.
Gemini didn’t give me code. It gave me a plan. It suggested the 3-file structure (app.py, agent_logic.py, rag_pipeline.py), recommended LangChain and LangGraph as the plumbing, and Chainlit for the UI, because they all work well together.
Step 2: The conversational build, my AI dev team
With this plan, I opened my tools: VS Code for the editor, GitHub for version control, and a chat window with my AI partner.
I followed the plan, step-by-step, with Gemini as my “junior dev” partner. My process was a simple, iterative loop:
Me: “Okay, I’m on Step 3 of the plan: ‘Create the RAG pipeline.’ Can you give me the complete code for the
rag_pipeline.pyfile based on our plan?”Gemini: (Generates the code).
Me: “This is great. Now, can you walk me through this file, line-by-line, and explain what each part does? What is ‘
FAISS’? What is ‘RecursiveCharacterTextSplitter’?”Gemini: (Explains the concepts).
Me: (I copy, paste, and run the code). “Okay, it’s working. Now for Step 4: ‘Create the agent logic’...”
I repeated this for all three files. When I hit a really hard bug, I discovered an amazing multi-AI strategy. I’d switch to Claude. I see Gemini as a brilliant junior dev: It gets me 90% of the way there with code that is clear and easy for me to understand. I see Claude as the senior dev: It’s incredibly powerful at spotting complex debugging issues from a simple file upload, even if its final code is sometimes a bit harder for me to read.
Step 3: A PM’s tour of the final codebase
After this process, I had my working MVP. You don’t need to read all 500+ lines in the repo to understand it. As a PM, you just need to understand the architecture and what each component does.
Here are the three files that matter:
rag_pipeline.py: the librarian (here).Job: This file’s only job is to build the expert library. It scans the
/datafolder and turns the 10 guides into a magic filing cabinet (aFAISSvector store) that the agent can search instantly.Key components:
PyPDFLoaderandTextLoader(to read files),RecursiveCharacterTextSplitter(the “smart shredder”),OllamaEmbeddings(the “translator”), andFAISS(the “filing cabinet”).
agent_logic.py: the assistant’s brain (here).Job: This is the core of the project. It defines the agent’s logic, its collection of 5 tools, and its job description (the system prompt).
Key components: The
llmswitcher (to flip between fast Groq and private Ollama), the 5@tooldefinitions (the collection), and the all-importantSYSTEM_PROMPTstring.
app.py: the user interface (here).Job: This file creates the chat window using Chainlit, the UI library.
Key components: The
@cl.on_chat_startfunction (which loads the agent into memory) and the@cl.on_messagefunction (which takes the user’s message, runs the agent, and streams the final answer back).
Step 4: My “PM refinement” loop (this was my real job)
Getting the first version running was just the start. This is where I, as the PM and “taster,” really added value.
Refinement A: Curating data as a product
Gemini built the RAG pipeline (rag_pipeline.py), but it was empty. I first tried to find existing PDFs online, but they were low-quality or badly formatted. So, I realized my agent’s expert knowledge was the product. I used Gemini’s Deep Research feature to generate 10 high-quality, expert-level guides on topics I knew a rider would need, like paris_scenic_bike_routes.md, paris_bike_rental_guide.md, paris_biking_rules_and_safety.md, and paris_bike_friendly_cafes.md. This 10-document library, which you can see in the /data folder, became my proprietary secret library that makes the agent smarter than a generic chatbot.
Refinement B: Iterating on the job description, the system prompt
This was the most critical loop. My real job was to be the “taster” and “debugger” of the agent’s logic.
Temperature: I asked Gemini to play with this parameter. The temperature is a setting from 0.0 to 1.0. A low value (like 0.3, which I used) makes the agent focused and predictable. A high value (like 1.0) makes it creative and random. For an assistant, I wanted helpful and predictable.
Testing: I created a formal test suite: 5 questions for each of the 5 tools (”What’s the weather?”), plus 10 complex multi-tool questions (”Plan a 2-hour ride for beginners from the Louvre, but only if it’s not raining.”).
Debugging: I ran these tests locally (with Ollama, so it was free). At first, I couldn’t see why the agent was picking the wrong tool. So, I asked Gemini, “How can I see the agent’s ‘thinking’ in my Chainlit UI?” It told me how to configure the
app.pyfile to show the “Thinking...” dropdown. This debug view was my most valuable tool for refining the system prompt.Iterating: After a test run, I’d go back to Gemini and say, “The agent is using the web search for route questions. That’s wrong. Please update the
SYSTEM_PROMPTto be more inclined to use theparis_bike_guidetool first.” We iterated until the logic was sharp.
Refinement C: GitHub as a PM’s change-log
Every time I had a new, stable version, I’d make a commit to GitHub. This wasn’t just backing up code: It was product versioning. My commit history became my PM changelog, letting me track progress and roll back if a test failed.
Pro-tip: Here’s a powerful PM hack I discovered. Once my project was on GitHub, I’d start a brand new chat with Gemini or Claude. I’d provide the public link to my repo and ask, “Please review my project and give me 10 ideas for improvement.”
The feedback was always incredible: New tool ideas, logic refinements, and tech suggestions. But this comes with a classic PM warning: It’s tempting to improve forever. The AI will always find new things to add. At a certain point, I had to declare my “MVP” and stop, otherwise, I would have never finished! It’s the perfect tool for generating a backlog, but you still have to be the one to prioritize and say “stop.”
Refinement D: The Final UX Polish.
Finally, I did the “last 5%” of product polish. I designed a logo and configured the chainlit.md file and app.py to add starters, those prompt suggestions that help the user get started. These are the small touches that make a project feel like a product.
Part 5: The debrief, analysis and trade-offs
So, the “Paris by Bike” agent works. It can answer complex, multi-step questions.
But as PMs, our job isn’t just to ship a feature; it’s to understand why it works, what its limitations are, and what’s next. This is the debrief, where we look at the results and build the backlog for the next sprint.
The critical PM trade-off: Speed vs. privacy
The agent_logic.py file has a simple if/else switch for the LLM brain. This isn’t just a technical detail; it’s a core product strategy decision:
If a
GROQ_API_KEYexists: The AI agent uses the cloud-basedChatGroq.Pro: It is blazing-fast. This is a massive UX win for a live, user-facing product.
Con: It costs money (per API call) and user data is sent to a third-party API.
If no key exists: The AI agent defaults to a local
ChatOllamamodel (like Llama 3.1).Pro: It’s 100% free to run and 100% private. No data ever leaves the user’s machine. This is a critical feature for any enterprise use case (like an HR bot) or for any PM who wants to test extensively without running up a bill.
Con: It can be slow and requires a more powerful computer to run.
This switcher logic is a powerful pattern. It lets you build one product that can serve both a fast, consumer-facing need (with Groq) and a secure, on-premise enterprise need (with Ollama).
My choice to use Ollama and Groq was a local-first decision. It was perfect for my goal: to test, iterate, and debug hundreds of times for free. The downside? When I wanted to deploy a public version (e.g., on a Hugging Face Space), it became a nightmare. These non-standard models are complex to host. Gemini gave me a plan, but it meant redoing a lot of work.
The Lesson: If my goal from Day 1 had been a live, public-facing app, I would have just used the standard OpenAI API. It’s a classic PM trade-off: my free and flexible dev choice created a high friction production path.
My backlog: What’s next
No project is ever done. This is where my role as PM kicks back in. Here are three key items I would tackle next if I were to continue, but there are many more:
Performance: Cache the RAG index.
The problem: The expert library (
FAISSindex) is rebuilt from scratch every time the app starts. This is slow and inefficient.User story: As a user, I want the app to start instantly.
Fix: I’ll modify
rag_pipeline.pyto save the index to disk (faiss_store/) and only rebuild it if the files in the/datafolder have changed.
Personalization: Add a memory.
The problem: The agent is stateless. If a user says “I have my own bike,” the agent will forget by the very next new conversation and offer rental shop info.
User story: As a user, if I say “I have my own bike,” I never want to be offered rental shop info again.
Fix: I’ll use the
cl.user_session(which is already inapp.py) to store user preferences (e.g.,“owns_bike”: true). Then, I’ll dynamically add this to theSYSTEM_PROMPTinagent_logic.pyon every turn:“USER CONTEXT: This user owns their own bike.”
UX/retention: Embed the UI elements.
The problem: The Google Maps link leaves the app. This is a “leaky funnel” and bad for retention.
User Story: As a user, when I ask for a map, I don’t want to be sent to a new browser tab; I want to see the map in the chat.
Fix: Instead of just sending a URL, I’ll have the
generate_route_maptool return a Chainlit UI element likecl.Embedto display an interactive map inside the chat window.
Is an agent even the right product?
This is the biggest question I’m left with. As PMs, we have to ask: Is the chat interface a brilliant, universal solution, or is it sometimes a lazy one?
The blank slate problem: When you open the app, you’re faced with a chat box. You don’t know what the agent is capable of. You don’t know what’s in its “private library” or what its 5 tools are. The “Starters” I added feel like a lazy fix. The UI forces the user to “discover” the agent’s skills over time, like making a new friend and slowly learning what they’re good at. This takes time and can be awkward.
The “Better App” Question: For my “sofa-to-bike” problem, would a traditional app be a better, more straightforward UX? Imagine a non-AI app: you open it and see a beautiful map, a menu of “Scenic Routes,” and clear buttons for “Check Weather” or “Find Events.” For this specific JTBD, that might be a superior, more discoverable product.
The Honest Answer: In my case, this was a “solution in search of a problem.” My primary goal was to learn the technology and understand how RAG and agents work. From that perspective, this project was a massive success.
But this raises a critical question for all PMs: are we choosing an agent because it’s the best solution, or because it’s the trendiest one? It’s something we need to ask ourselves. Even I will probably forget exactly what’s in my 10 RAG documents in six months, making the discoverability problem real even for the builder. This leads me to my final, actionable lessons.
Part 6: The lessons, your turn
So, what’s the high-level takeaway for your own AI product strategy? My goal was to demystify this new “agent” buzzword, and I hope seeing the journey from idea to a working app has done that.
It all comes down to a few key lessons.
Your first AI agent is one master prompt away. You don’t need to be a Python expert to build one. You need to be a requirements expert. My master prompt to Gemini was just a clear, well-structured product brief. You can partner with an AI to write the boilerplate code, which frees you up to focus on the logic and the user experience, the parts that actually create product value.
The system prompt is the job description. This was my biggest a-ha! moment. The most critical code I wrote for this project was the SYSTEM_PROMPT in agent_logic.py. This is where you, as the PM, get to be the architect. You define the persona, the rules, the failure modes, and the business logic in plain English. A well-written prompt is a well-defined product.
Curate your data as your secret library. An AI agent is only as good as its tools, and the RAG tool is only as good as its data. My agent’s expert knowledge didn’t come from the public web; it came from the 10 high-quality guides I generated and put in the /data folder. Your proprietary, high-quality, curated knowledge base is your single biggest competitive advantage.
Build a toolbelt, not just a chatbot. The framework (JTBD → leaky funnel → toolbelt) is your new best friend for agent design. From day one, stop asking “What can it answer?” and start asking “What can it do?” Map your user’s leaky funnel. Every time they have to open a new tab, that’s an opportunity for a new tool in your agent’s collection.
Your new PM superpower: spec writing for an AI partner. This entire project changed my view of my own role. The build process wasn’t “code, test, debug.” It was: 1. Write a master prompt (the PRD). 2. Get the code from Gemini. 3. Test it. 4. Find the flaws. 5. Refine the prompt logic (not the code). This is a new and incredibly fast way to build. The “Paris by Bike” repo is the result of that loop.
Now, go build yours!
What’s your Job-to-be-Done? What’s the user problem you’re going to solve by building an agent? Let me know your idea or your finished project in the comments, I’m curious to see what you build!