
How to ship AI-generated code on GitHub
Bridge the gap between idea and execution: get started with GitHub. Use this step-by-step guide to publish and edit your first HTML project. Elevate your career by becoming a builder who ships code.

For years, product people lived in a world of requirements and mockups. You wrote tickets. You designed in Figma. Then you waited. You waited for engineers to bring those ideas to life. But the rules have changed. With AI tools like Claude and Cursor, you can now build.
This isn’t about replacing engineers or writing production code. It’s about extending your capabilities. It’s about unblocking yourself to test prototypes, communicate complex ideas, and speak the same language as your technical team. You are no longer just a manager of ideas; you are an AI builder.
This shift is already happening at the highest levels. Take Shubham Saboo, an AI PM at Google Cloud. As highlighted by Aakash Gupta, Shubham made 484 GitHub contributions last year alone. That’s more than one a day.

New-age product leaders don’t just write documents. They ship prototypes, frameworks, and perspectives. As Gupta says:
GitHub speaks louder than titles.
This is the new standard. To break into AI or simply grow in your career, you need proof of work.
You might have already played with vibe coding. You described an app to an AI, and it wrote the code. That feels magical, but something is missing. That code is trapped in a chat window. To move from a fleeting experiment to a shareable product, you need a home for your work. You need GitHub.
This might sound intimidating if you have never downloaded a code editor. But we will strip away the complexity. By the end of this guide, you will take a raw idea, generate it with AI, and publish it to a live URL that anyone on the web can see. You won’t just learn a tool; you will claim ownership of your creations.
So, let’s build!
The use case: an “LLM explainer” website
Let’s start with the destination. Before we write a single line of code, click this link to see exactly what we are going to build: https://adamfaik.github.io/llm-explainer/

This is not a static document. It’s not a video recording. It’s an interactive website that explains how Large Language Models work. I built this to explain the concepts. Instead of writing a long memo or recording a loom video to explain “Tokens” or “Embeddings” to a stakeholder, I created this living experience.
The application breaks down the black box of LLMs into four interactive steps. It starts with Tokenization, where the user can type their own text and see how the machine chops it into numbers. It moves to Embeddings, visualizing words on a 2D map where “King” and “Queen” live near each other. It demonstrates Attention, showing how an AI connects words like “animal” and “it” across a sentence. And finally, it lets you play with Prediction, using a “Temperature” slider to see how the AI decides which word comes next.
I didn’t need to know complex mathematics or JavaScript to build this. I simply asked Gemini to “build a website to explain how LLMs work with interactive examples.” The best part? The entire process, from the first prompt to the live URL, took less than 15 minutes. Personally, I now prefer creating an interactive website to explain complex ideas rather than building yet another slide deck.
This project is our excuse to learn GitHub. We are taking a generated artifact and giving it a permanent home on the web. Here is exactly how. Each step builds on the last, but if you already have your tools installed, feel free to jump straight to step 3.

Step 1: Set up your environment. We will install the “trinity” of tools: VS Code (your editor), GitHub Desktop (your sync tool), and your GitHub account (your identity). We will do this without touching the command line.
Step 2: Translate the jargon. We will demystify the scary terms. You will learn why a “repo” is just a folder, a “commit” is just a save point, and a “branch” is just a safe space to experiment.
Step 3: Run the vibe loop. We will take the raw code generated by the AI and move it into your local project. You will learn the core workflow of creating files, saving changes, and preparing them for the cloud.
Step 4: Publish to the web. We will turn your local code into a live, shareable URL using GitHub Pages. This is the magic moment where your project becomes accessible to the world.
Step 5: Iterate safely. We will learn how to update your live website without breaking it. You will use “branches” to test new features safely before merging them into the main product.
Ready?
The method: your AI team
Before we start installing tools, I want to be honest about how I actually work. I didn’t learn this by memorizing documentation. I learned it by treating AI as my co-worker. Even before I started using advanced coding agents like Cursor or GitHub Copilot, I developed a simple workflow using standard chat windows.
When I started, I opened Gemini and wrote a prompt like this:
I would like to build an HTML website about [Topic] and publish it with GitHub Pages. I am a beginner. Can you give me a plan? We will do the steps one by one.
The magic happens in the execution. I follow the first step. If it works, I ask for the next. If I see an error or a weird button, I don’t panic. I simply take a screenshot, paste it into the chat, and ask, “Is this right?” or “I see this error.” Gemini analyzes the image and helps me debug. It feels like having a developer looking over my shoulder.
I use Gemini for the bulk of my work. Gemini creates the plan, writes the initial code, and explains things simply. It has a superpower: GitHub integration. You can connect Gemini to your GitHub account:

Then “attach” your project repository to the chat, just like you would attach a PDF:

This is incredible for getting feedback on your whole project or fixing a bug that involves multiple files.
Sometimes, code gets tricky. If Gemini starts struggling (suggesting the same failed fix twice or going in circles), I switch to Claude. I treat Claude like a senior developer. I paste the code (or the GitHub repo link) and the context and say, “The junior developer is stuck. Can you fix this logic?” Claude is exceptional at solving complex logic problems.
I work with them as a team. I don’t code alone; I manage this small team of coding LLMs. Now, let’s get your environment ready so you can do the same.
Step 1: Set up your environment
Before we click any buttons, we need to understand the tools. If you just want to install them and skip the theory, scroll down to “Your action plan.”
The Tools
1. Git vs. GitHub: the engine and the garage These two names sound similar, which causes endless confusion. Let’s clear it up with a little history.
Git is the engine.
Who and when: Created in 2005 by Linus Torvalds, the legendary creator of Linux. He needed a tool to manage the massive Linux project, so he built Git in a weekend.
What it is: Git is open-source software that lives locally on your computer. It’s a version control system. Think of it as a time machine that tracks every single change you make to a file.
Ownership: Open source, it belongs to no one and everyone.
GitHub is the garage:
Who and when: Founded in 2008 as a startup. In 2018, it was acquired by Microsoft.
What it is: GitHub is a for-profit service (SaaS) that lives in the cloud. It’s a website where you upload your Git files. It adds a visual interface and social features, allowing teams to collaborate.
Ownership: Owned by Microsoft.
Git is like the MP3 format (the technology). GitHub is like Spotify (the platform that uses the technology to let you share and stream music). You can use Git without GitHub, but nobody really does.
2. Why GitHub? There are other “garages” like GitLab or Bitbucket. They are great platforms, similar to how Vimeo is a great video platform. But we choose GitHub because it’s YouTube. It’s where the entire open-source world lives. If you want to use the latest AI tools or see how others are building, you need to be on GitHub.
3. Why VS Code? You might have heard of new AI-native editors like Cursor, Windsurf, or Antigravity. These are amazing tools that integrate AI directly into the interface. So why are we installing Visual Studio Code (VS Code)? Two reasons:
VS Code is the absolute reference. It’s the most popular editor in the world. Most of the new AI editors (like Cursor) are actually built on top of VS Code. If you learn VS Code, you already know how to use the others.
To truly understand vibe coding, it helps to start with the standard environment. It’s like learning to drive on a standard car before buying a Tesla with full self-driving.
4. The terminal vs. GitHub Desktop. Usually, to use Git, developers use a terminal (or command line). This is a text-only interface where you type commands like git push origin master. It feels like hacking into a mainframe in a 90s movie. It’s powerful, but it’s unforgiving. If you make a typo, it fails.
So, GitHub Desktop is the tool that saves us from the matrix. It gives you buttons. Instead of typing a code to save your work, you click a button that says “Commit.” It handles the translation for you.
While we will use GitHub Desktop to make life easy, don’t be afraid of the Terminal. It’s just a chat window where you talk to your computer using text commands. If you ever need to run a command in the future, you can open a terminal directly inside VS Code and paste the command. It’s not magic; it’s just instructions.
Your action plan
We are going to install the “trinity” of development. And we will do this without opening a terminal.
1. Create a GitHub account. Go to github.com and sign up. It’s free. Tip: Choose a professional username. This profile will likely end up on your resume.
2. Install VS Code. Download and install it from code.visualstudio.com. Note: When you open it, don’t be overwhelmed by the buttons. We only need one or two of them.
3. Install GitHub Desktop. Download and install it from desktop.github.com. Once installed, open GitHub Desktop and sign in with the account you created in Step 1.
Once you have these three installed and logged in, you are technically ready to code. Let’s put it to use.
Step 2: Translate the jargon
The hardest part of learning GitHub isn’t the technology; it’s the vocabulary. As a product manager or designer, you already know the concepts, you just call them by different names in Jira, Figma, or Google Docs. Let’s translate.
1. Repository (Repo)
Definition: A central location for data storage.
Translation: A project folder.
Concept: It’s simply a folder that contains all the files for one specific product. In our use case,
llm-explaineris the repo. It holds the HTML, the images, and the history.
2. Commit
Definition: An operation which sends the latest changes of the source code to the repository.
Translation: A save point (with a sticky note).
Concept: In Google Docs, saving happens automatically. In Git, saving is intentional. You take a snapshot of your work and attach a message explaining what you changed (e.g., “Added the logo”). This creates a timeline you can scroll back through.
3. Push
Definition: Uploading local repository content to a remote repository.
Translation: Sync / upload.
Concept: When you “Commit,” you are only saving on your laptop. If your laptop explodes, the work is gone. “Pushing” sends those saved commits up to the cloud (GitHub.com). It makes the work safe and shareable.
4. Branch
Definition: A parallel version of a repository.
Translation: A Sandbox / draft copy.
Concept: This is the most powerful feature. Imagine you want to redesign the homepage, but you don’t want to break the current live website. You create a “Branch.” It creates a safe, parallel universe. You can break everything in the branch, and the main user experience remains perfect.
5. Merge
Definition: Integrating changes from one branch to another.
Translation: Approval / ship it.
Concept: You finished your experiment in the Branch. It works. You “Merge” it into the main codebase. This is the moment the “Draft” becomes the “Final Version.”
To check if you are fluent, here is a message a developer might send you on Slack, and what they actually mean.
The developer says:
I set up the repo. I’m working on a branch to try out that new feature. I just committed the fix and pushed it. If it looks good, we can merge into main.
The translation:
I set up the Project Folder. I’m working in a Sandbox to try out that new feature safely. I just Saved the fix and Synced it to the cloud. If it looks good, we can Ship it to the final product.
Now that we speak the language, let’s run the loop.
Step 3: Run the vibe loop
Now we combine the tools. We are going to create the empty project, ask the AI for the code, and save it to the cloud.
1. Create the repository in GitHub Desktop
First, we need a folder on your computer that GitHub is watching.
Open GitHub Desktop.
Action: Click the button “Create a New Repository on your hard drive...” (or go to File → New Repository).
Fill in the details:
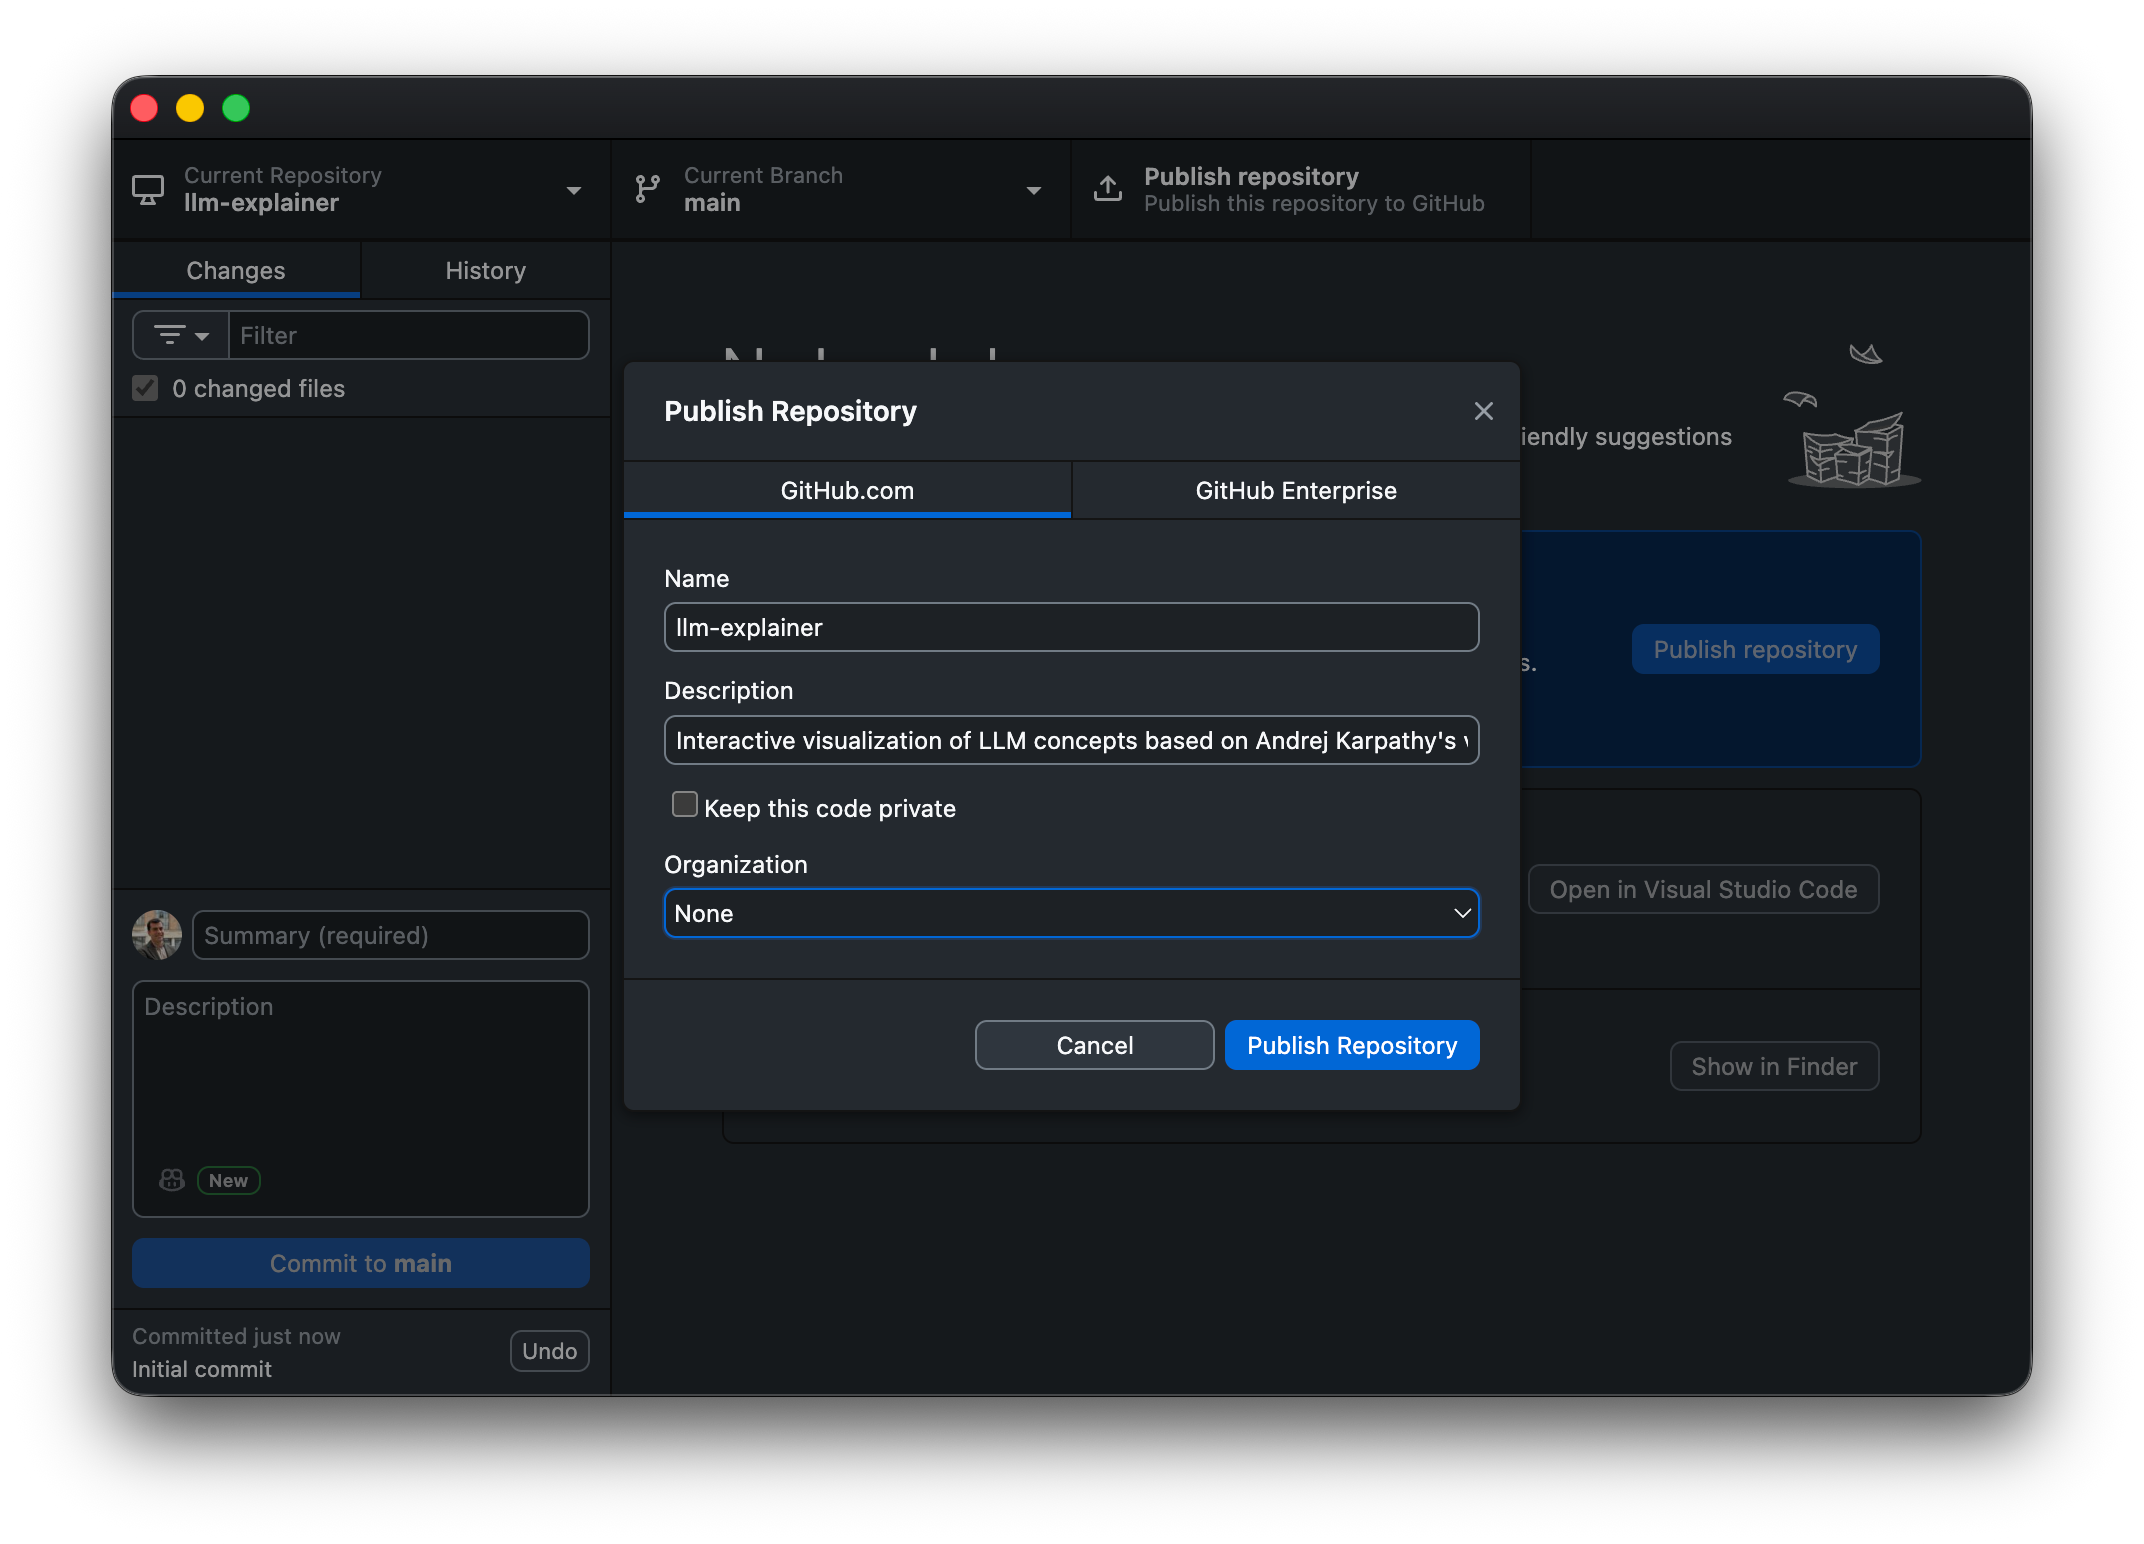
Name:
llm-explainer(No spaces, use hyphens).Description: “An interactive visual guide to understanding how LLMs work, developed by Gemini.”
Local path: Choose where you want it to live (e.g., your Documents folder).
Click: “Create Repository.”

Right now, this is just an empty folder on your laptop. To verify this, click the button in GitHub Desktop that says “Show in Finder” (Mac) or “Show in Explorer” (Windows). You will see a normal folder. It’s not magic.
2. Generate the code on an LLM tool
Now, let’s get the code.
Open your LLM of choice. I use Gemini.
Copy and paste this prompt. If you are on Gemini: activate the “Canvas” tool.
Create a single HTML file that explains how LLMs work using interactive examples. It should have 4 sections: Tokenization, Embeddings, Attention, and Prediction. Make it colorful, modern, and interactive. Use standard HTML, CSS, and JS inside the single file.
The LLM will generate the code:

Click the Share → Copy contents button in the Canvas.

3. Inject the code into VS Code
We need to put that code into the repository.
Go back to GitHub Desktop.
Action: Click the button “Open in Visual Studio Code.”
Why this is cool: It opens your specific project folder directly in the editor.

In VS Code:
Look at the sidebar on the left. It’s empty.
Right-click in the empty space and select New File (or click on the tiny file creation icon that appears only when you hover over it).

In VS Code, click the “New File” icon and name it index.htmlName the file:
index.html(must be exact).Paste the code you copied from the LLM.

Paste the AI-generated code into the file and hit save Save the file (
Cmd+SorCtrl+S).


4. Commit on GitHub Desktop
Now, watch the magic.
Switch back to GitHub Desktop.
Observation: You will see your
index.htmlfile listed on the left with a green+icon. GitHub has detected a change!

The Action:
Go to the bottom left box.
Type: “Create index.html”.
Click the blue button: Commit 1 file to main.
Congratulations. You have just taken a snapshot of your code locally.
5. Push on GitHub Desktop
Right now, your code is safe on your laptop. Let’s send it to the cloud.
Action: Click the big blue button that appears: Publish Repository.

Check: Uncheck “Keep this code private” if you want to share it easily (or keep it private if you prefer). Click Publish.
6. Check what happened
Before we move on, let’s stop and verify what actually happened. This is where the mental model clicks.
Check your computer: the local side.
Open your computer’s file manager (Finder on Mac / Explorer on Windows).
Go to your Documents folder and find the llm-explainer folder.
Look: Inside, you will see
index.html. This is a real file. You can open it with Chrome, you can email it, you can delete it. It exists physically on your machine.

Check the Internet: the cloud side.
Go back to GitHub Desktop.
Click the button “View on GitHub.”
Look: This opens a website. You will see
llm-explainerand inside it,index.html.

Think of this exactly like Google Drive. You put a file in a folder on your computer, and it magically appeared on the website. The only difference is that with GitHub, you had to click “Commit” and “Push” to confirm you wanted to sync it.
You have now successfully moved code from an AI chat window, into a local file on your hard drive, and up to the GitHub cloud servers. You are an AI builder, ready to publish to the web.
Step 4: Publish to the web
Right now, your code is safely stored on GitHub.com. But if you send the link to a friend, they will just see a list of files. They won’t see the app. We need to turn those files into a live website.
We will use a feature called GitHub Pages. It’s free hosting, built right into GitHub.
Open the repository:
Go to GitHub Desktop.
Click the button “View on GitHub.”
This opens your browser to your project page on GitHub.com.
Go to settings:
Look at the top menu bar of your repository (Code, Issues, Pull requests...).
Click on Settings (the gear icon on the far right).
On the left-hand sidebar, scroll down until you see Pages. Click it.

Go live:
Under the “Build and deployment” section, look for Branch.
Click the dropdown menu that says
None.Select main.
Click Save.
Wait:
Nothing happens instantly. Look at the top of the Pages screen. You will see a yellow bar or a message saying “GitHub Pages is currently being built...”
Wait 60 seconds. Refresh the page.
The bar will turn Green.
Test the link:
GitHub will give you a URL that looks like this:
https://your-username.github.io/llm-explainer/Click it.
Congratulations! Your AI-generated code is now a live website on the public internet. You can send this link to anyone, your team, your friends, or your LinkedIn network. You didn’t just write a spec; you shipped something.
Step 5: Iterate safely
You have a live website. It works perfectly. Now, you want to add a new feature, like a “Dark Mode” button. You are afraid that if you paste new code from the AI, you might break the whole site. The screen will go white, and you won’t know how to fix it.
The Solution: You need a Branch. Think of a Branch as a “Safe Mode” or a parallel universe. You can do anything you want in this universe (delete files, break code, make a mess) and your main website (the main branch) stays untouched.
Create the branch, your safe space:
Go to GitHub Desktop.
Look at the top where it says “Current Branch: main”.

Start by identifying your current branch (usually “main”) in the top header Click it and select New Branch.

Click the branch menu and select “New Branch” to create your safe experiment zone Name it:
experiment-dark-mode(or whatever feature you are building).Click Create Branch. Note: Nothing changes on your screen, but you are now in the parallel universe.

Give your branch a descriptive name like experiment-dark-modeand click “Create Branch”
Update the code with the LLM tool:
Go to your same LLM conversation.
Prompt: “Refine the previous code. Add a ‘Dark Mode’ toggle button in the top right corner. Keep everything else the same.”

Ask Gemini to refine the code by adding a specific feature, like a Dark Mode toggle Copy the new code.
Go to VS Code, open
index.html, select all, and Paste the new code.Save.
Test the result with the local preview:
Open the
index.htmlfile in your browser from your computer folder.Test it: Does the Dark Mode work? Did the rest of the site break?
If it’s broken: No problem. You are on a branch. Your live user users still see the old version. Share a screenshot with the LLM tool and ask it to correct it.
If it works: Great! Let’s ship it.
Commit and push:
Go to GitHub Desktop.
You will see the changes.

Paste the new code, verify the green additions in GitHub Desktop, and commit to your experimental branch Summary: “Added dark mode toggle”.
Click Commit.
Click Publish Branch.
Create the pull request:
You could just merge it locally, but we are going to do it the pro way. This is how teams work.
After publishing, GitHub Desktop will show a button: “Create Pull Request”. Click it.

Click “Create Pull Request” to propose merging your experiment into the main product A browser window will open.
Look at the bottom: You will see red lines (what you removed) and green lines (what you added). This is called a Diff. It shows you exactly what changed.
Click the big green button: Create Pull Request.
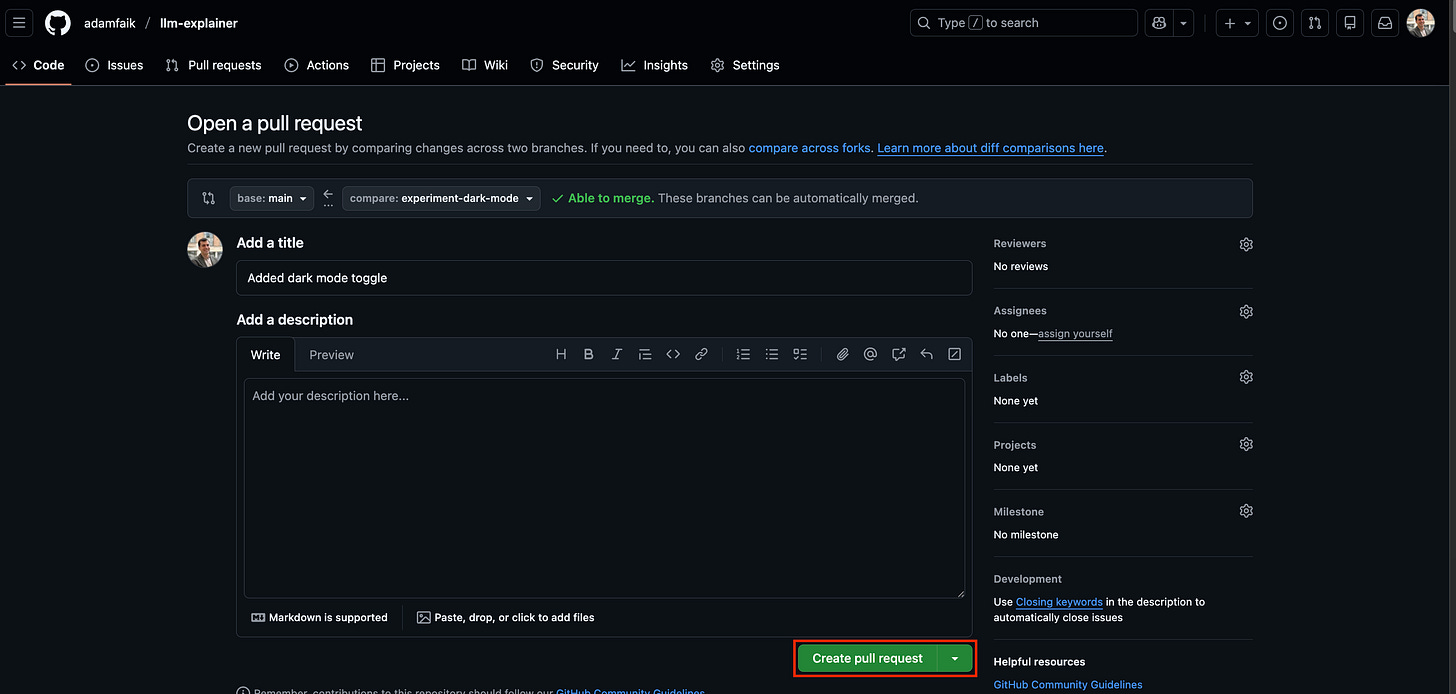
On GitHub.com, confirm the details and click the green “Create pull request” button Merge the pull request:
You are now on a page that asks for approval. Since you are the boss, you approve yourself.
Click Merge Pull Request.

The final approval: Click “Merge pull request” to ship your feature to the live website Click Confirm Merge.


The result: GitHub takes the code from your experiment-dark-mode universe and combines it into the main universe. Your live website updates.

Cleanup: GitHub will ask if you want to Delete the branch. Say yes. You don’t need the experiment anymore; it’s now part of the product.

This is the ultimate freedom of software development: the ability to break things in safety, knowing your main product is never at risk.
If you have followed these steps, take a moment to look at what you have accomplished.
You started with a blank screen. You used an LLM tool to generate code. You used VS Code to edit it. You used GitHub Desktop to manage it. You used GitHub Pages to broadcast it to the world. And you did it all without writing a single line of complex code or typing a cryptic command in a terminal.
This isn’t just about learning a new tool. It’s about removing the friction between your ideas and reality.
Next time you have a product idea: Don’t just write a PRD. Build a prototype.
Next time you need to explain a concept: Don’t make a slide deck. Build an interactive explainer.
Next time you talk to engineers: Don’t just describe the feature. Send them a GitHub link.
Remember, you are not coding alone. You have a junior developer (e.g., Gemini) to write the code and a senior architect (Claude) to fix the logic. You now have the infrastructure (GitHub) to ship it.
The barrier to entry has never been lower. The only limit now is your imagination. So, go build something. And when you do, drop the link in the comments. I’d love to see what you build.