
How to vibe code an agent to query your data
Generate two Python files using Gemini and the LangGraph framework. Ask Claude to review your code to ensure it's robust. Deploy a Streamlit interface to let users query the data in plain English.

If you only have seven minutes, watch this quick video recap to get a complete overview of everything covered in this article!
I built a small AI agent that turns plain English questions into SQL queries. It doesn’t just write the code. It executes the query, finds the answer, and explains the result in plain text. You’re basically talking to the data.
Here is what it looks like in action. You just type a question and the agent does the heavy lifting to find the exact answer.

You might think this sounds incredibly complex. I’ll let you in on a secret. It’s mostly just two Python files that Gemini Pro generated for me. You’d be shocked to see how easy how easy it is to build a proof of concept. Anyone can do it in a few hours. It isn’t some high-level engineering magic. It’s really about following a clear process and understanding a few core agentic concepts. It’s the kind of project that makes you look incredibly smart at the office.
You might ask why we bother building an AI agent when business teams can just use Gemini, or any other LLM, to write SQL. The reason is that AI tools are great at writing code, but copying and pasting queries is a terrible experience for decision-makers. This AI agent handles the execution automatically. It also manages security, reliability, and costs. It interprets the user’s intent, writes the query, and shows a nice table or a chart. It’s much smoother than jumping between different tools. I design it as a complete experience to make life easier for the decision-makers. They won’t have to worry about the boring technical details. It acts exactly like a very fast data analyst working right on their screen.
We don’t need to debate the value of a text-to-SQL agent. In our jobs, we see the same problem every day: product teams and business leaders have plenty of data but never enough time. We have customer feedback, web analytics, and sales numbers scattered everywhere. Most decision-makers don’t know how to write SQL. They also don’t want to wait three days for the data team to pull a simple revenue report. This creates a massive dependency bottleneck that slows down every decision. LLMs democratize data access for everyone. Business users get their answers directly without bothering the data engineers. This allows the whole company to make decisions much faster.
I’m going to show you exactly how I built this using a pro plan of an LLM. I used an e-commerce dataset from Kaggle for my project. You can use any data you want, like a customer feedback file or your own web logs. Here is the plan:
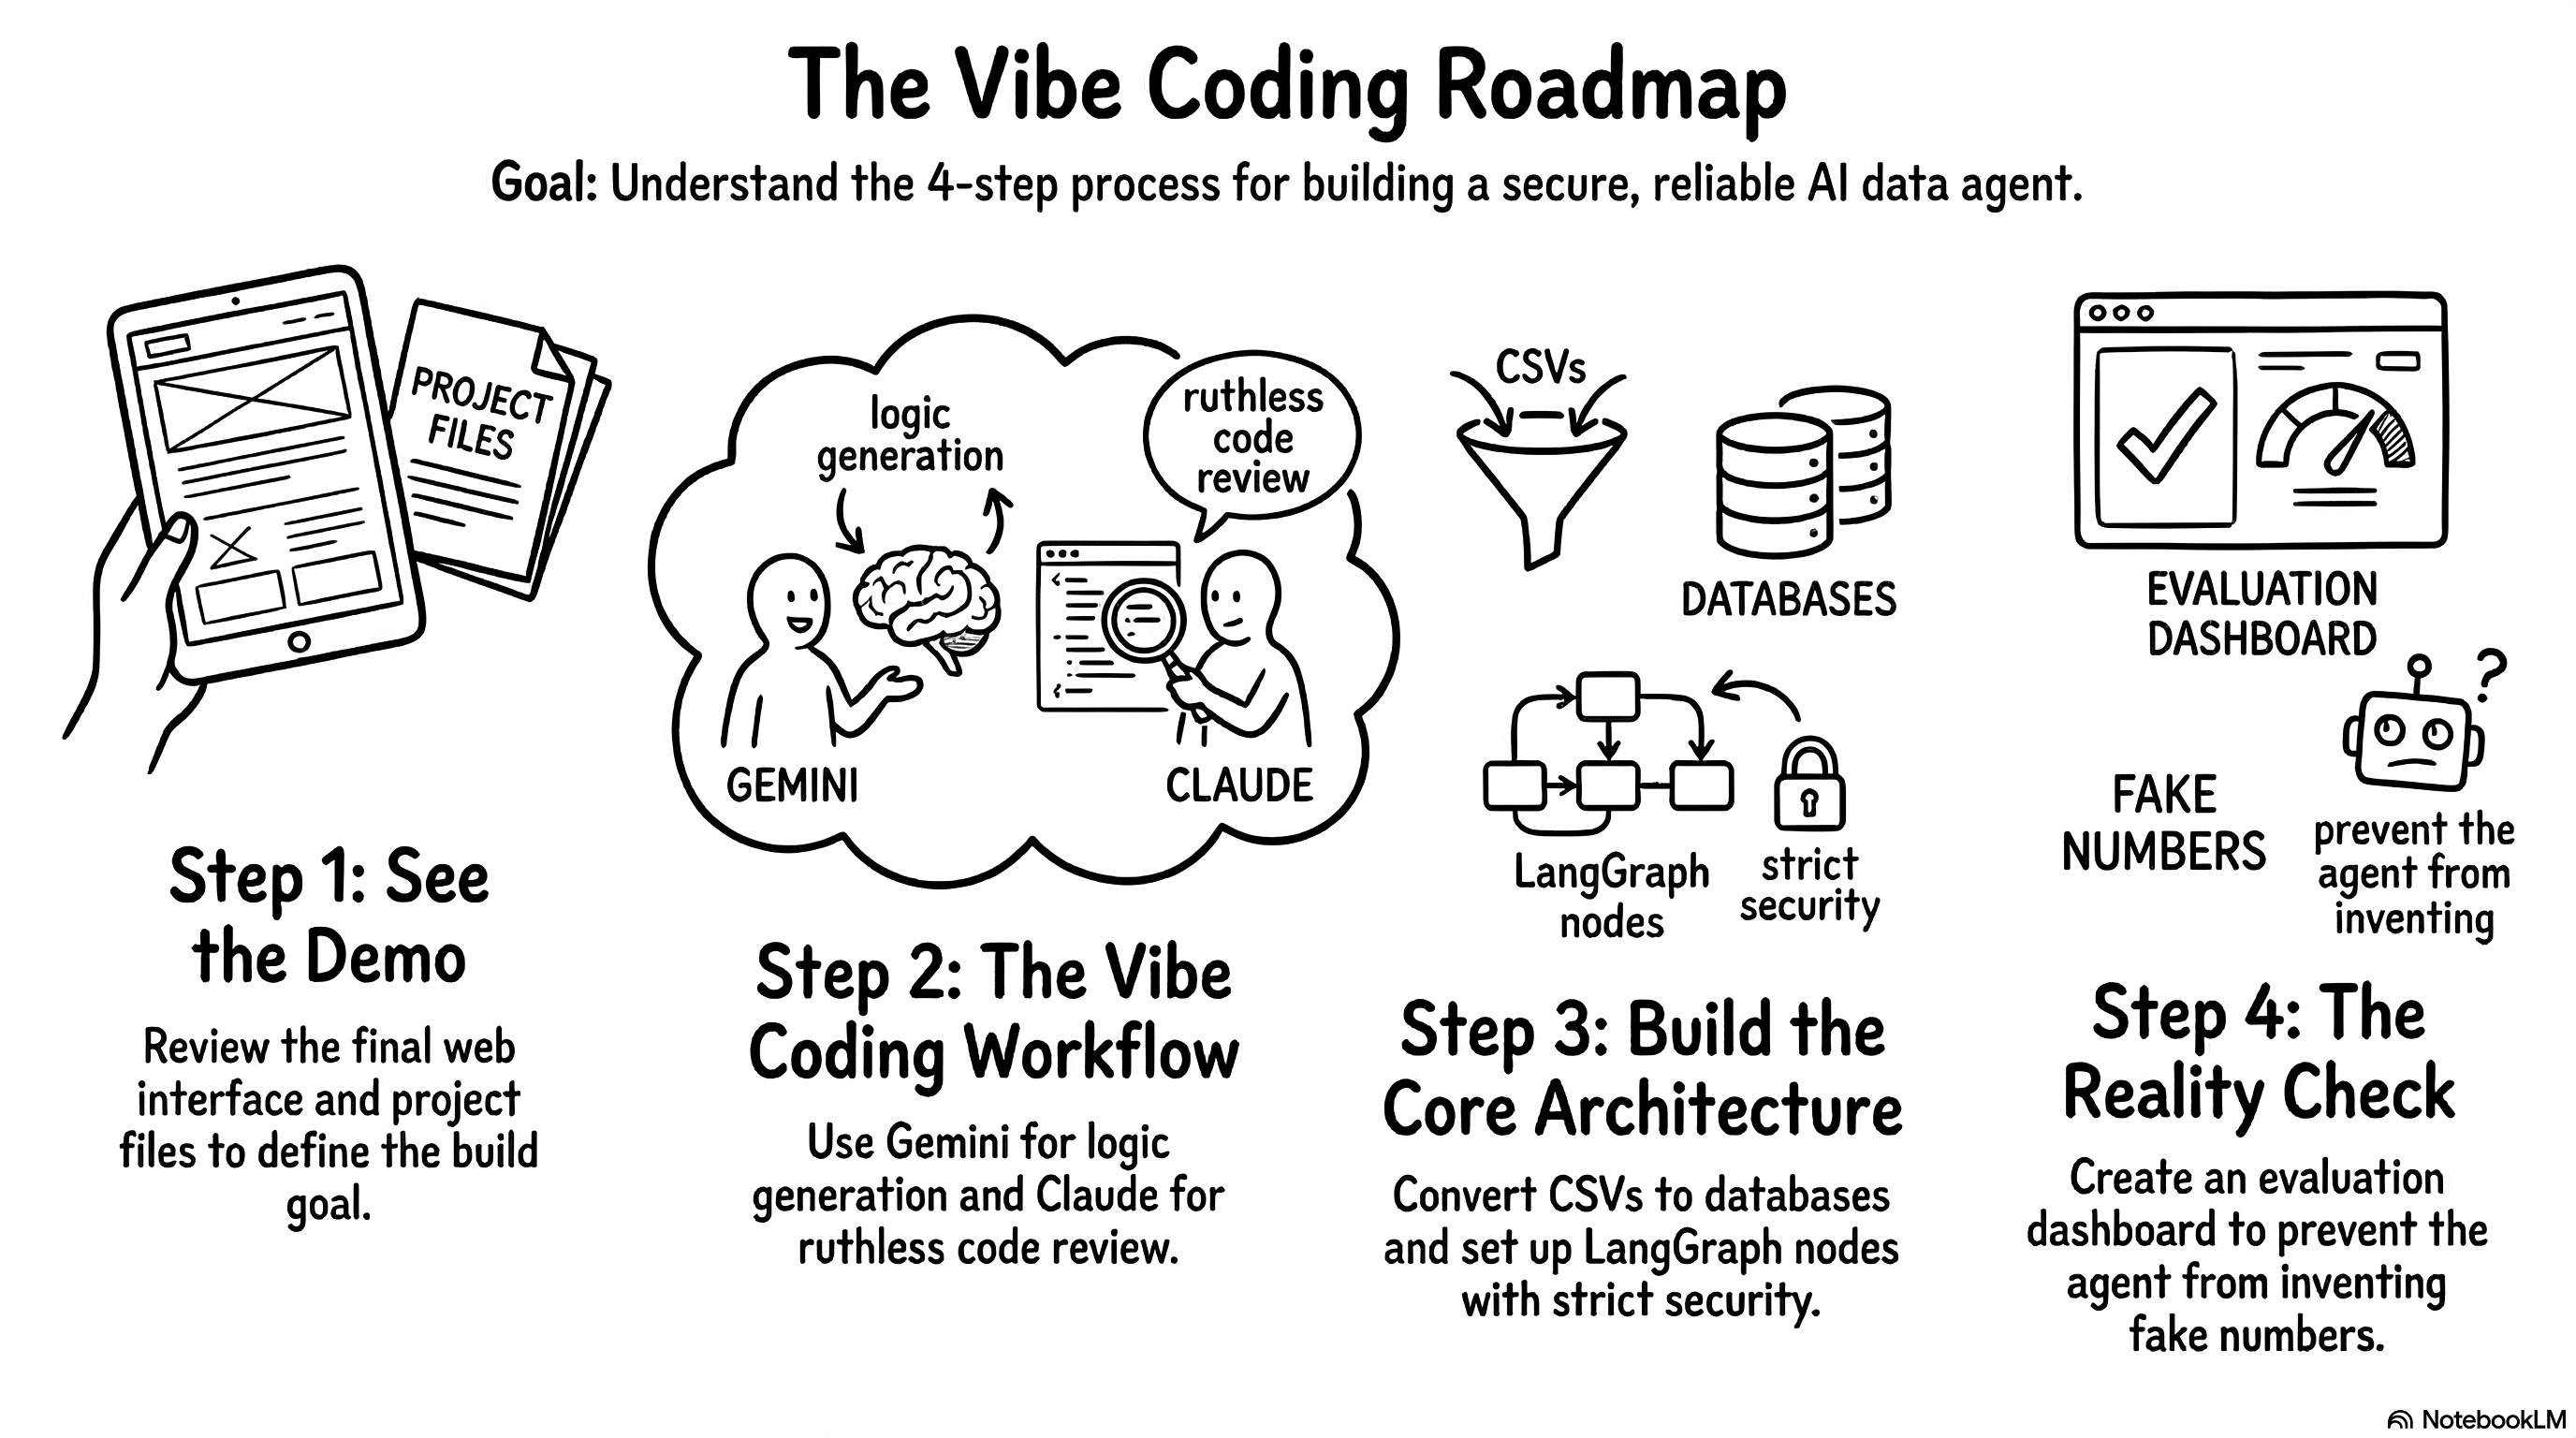
Demo: First, we’ll look at the final web interface and the project files to understand exactly what we’re trying to build.
Workflow: Next, I’ll show you my slightly chaotic vibe coding process using Gemini to write the logic and Claude to ruthlessly review it.
Architecture: Then, we’ll break down the core engine. We’ll look at how to turn CSVs into a database, map out the LangGraph nodes, and set up strict security guardrails.
Reality check: Finally, we’ll cover the most important part of the entire project: building an eval dashboard to ensure the agent doesn’t invent fake numbers.
Most of us have some old CSV file sitting in a folder somewhere. You just need to follow a few simple steps to bring it to life. You’ll ask your LLM to produce two Python files and you’ll be ready to go. It’s a fun project that feels like a shortcut to becoming an AI-native builder. You’ll realize that you don’t need to be an SQL expert to create something truly useful. Grab your coffee and let’s do it!
Demo: what we are actually building
Before we dive into the build process, let me show you the final result again. You open a web interface, you see a search bar, and you type a question in natural language. Here is what you get back.

The agent processes your question and gives you a direct answer. It also generates a chart automatically when it makes sense. This makes the data much easier to read at a glance.

I designed the interface to show what happens behind the scenes. You can expand several sections to see the agent’s internal monologue. You can check how it reasoned through the problem. You can see the exact execution plan it created before writing any code.


You can also inspect the actual SQL query it generated and executed. Finally, you can look at the raw data table it pulled from the database.


I keep all these details visible because I built it. It helps me debug and understand the agent’s behavior. You would obviously hide all these technical panels if you deployed this for a business team. To an end-user, this interface feels exactly like a Custom GPT or Gem. It answers questions, but only within a strictly defined scope. If you ask it about the weather in São Paulo, it will reject the question. If you ask it for the May 2018 revenue, it gives you the exact number.
So, what does the codebase look like? I will show you my code editor.

I lied a little bit earlier. The project has more than two files. But my original point stands. Only two main files hold the core structure of the app: agent.py and app.py. The rest are just small utility scripts. I also didn’t lie about writing the code. I didn’t write a single line of this myself. I used the Pro version of Gemini to generate everything. Gemini writes much better Python code than I do anyway.
You probably want to click a link and test this application right now. I totally get it. It’s a fun agent. Unfortunately, I didn’t deploy it to the public web. Every time you ask a question, the app sends a request to OpenAI. That costs money. I used OpenAI for the reasoning and set a strict five-euro budget for this entire project. I generated a secret API token and stored it locally on my machine. I didn’t use a free open-source model. But I put all these files in a public GitHub repository. You can explore the code directly.
Publishing the app would be very easy. The code is on GitHub and the Streamlit framework makes web deployment trivial. But my five-euro budget might disappear in few days. So, if you want to play with it, you can clone the GitHub repository and run it locally on your computer. The README.md (read on GitHub) file helps you run the agent locally.
Now that you know what the final agent looks like, let’s talk about how to actually build it. Let me walk you through my exact, slightly messy process for vibe coding this entire project using two LLMs.
Workflow: vibe code with two LLMs
Let’s dive into my process. People call it vibe coding today. Honestly, it’s often a very chaotic experience. You fight the code constantly. You hit errors, you don’t understand everything immediately, and it gets frustrating. Then suddenly it works, and you only remember the good parts. I didn’t take screenshots of every single error I encountered. I struggled a lot. But I’m very happy with the final result. You just need to be extremely persistent. You will struggle, but it always works in the end if you don’t give up.
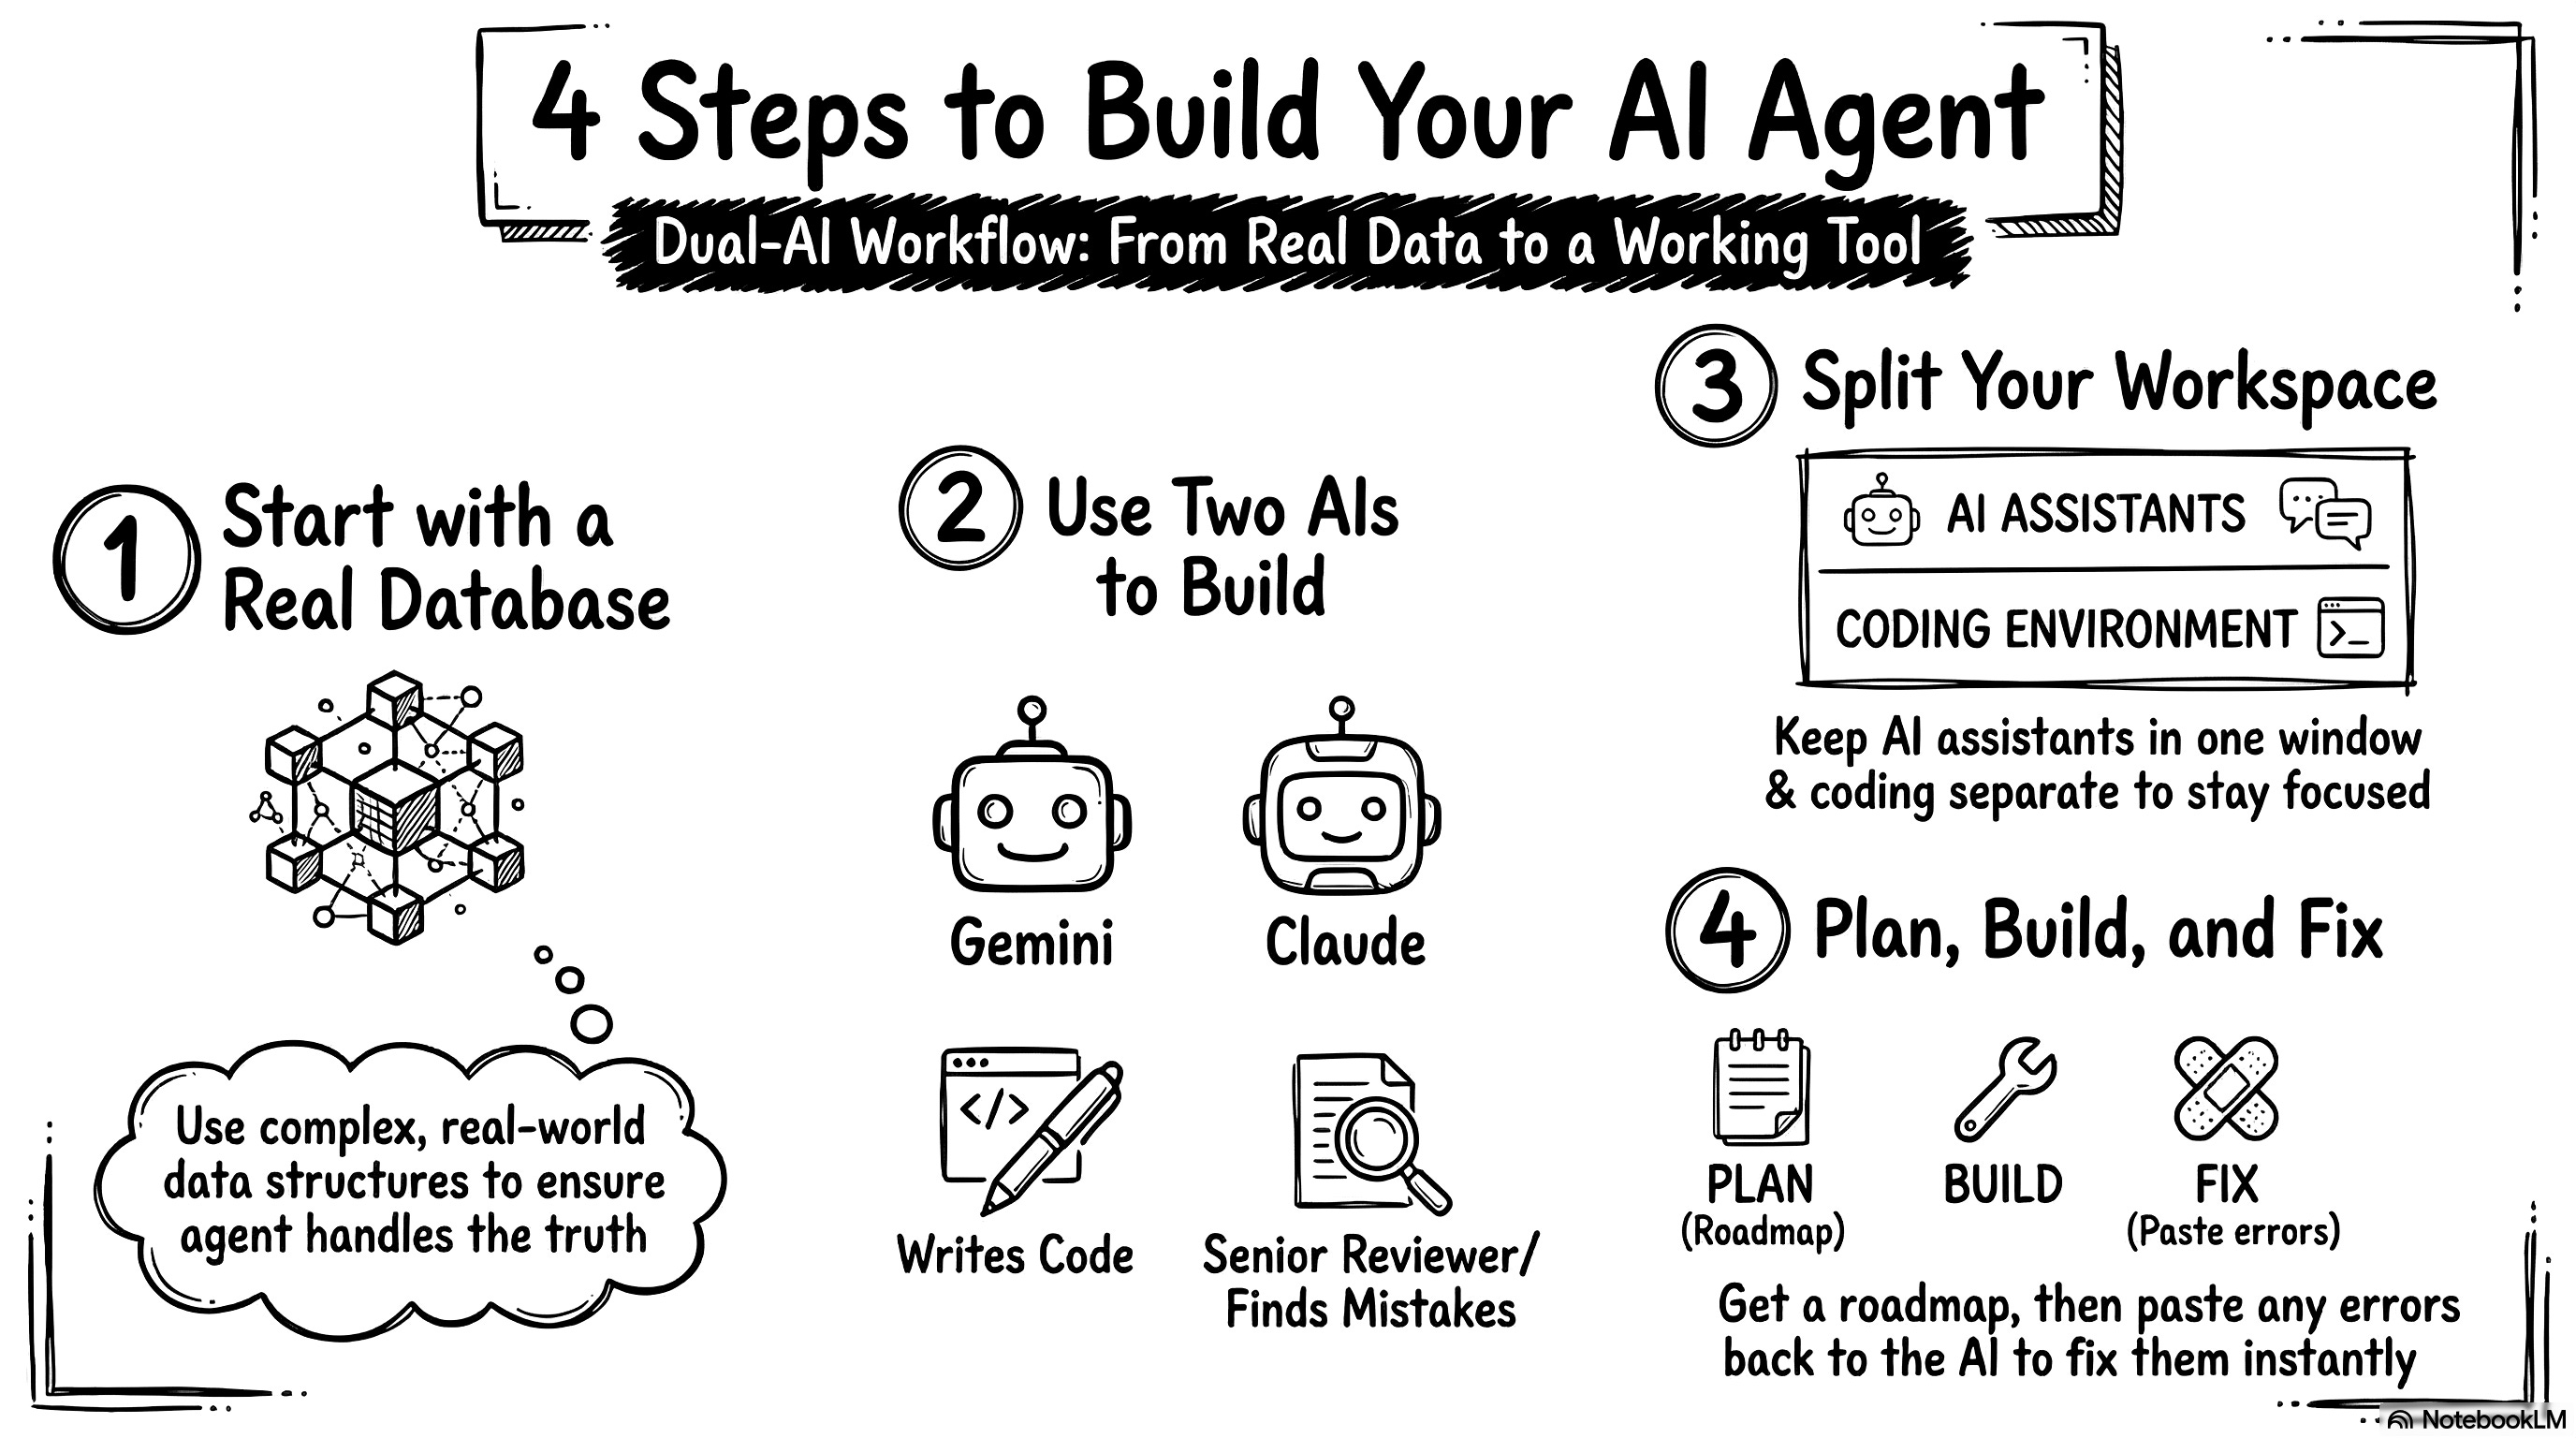
1. Pick a real database to start building
First, I needed some data to test my idea. I went on Kaggle and found the Olist e-commerce database. I downloaded it to my Mac.

This dataset looked very solid. It has massive tables and a lot of data points. I figured if I can handle this complex database, I can handle any simple CSV file later. I wanted to start with a tough challenge. Just to give you an idea of what we are dealing with, here is the structure of the database. It connects customers, orders, payments, and products across multiple interconnected tables.

You can pick any data you want for your own project. You can use fake data or real feedback logs from your product. You just need some basic CSV files to start.
2. Use Gemini to write code and Claude to review it
Next, I opened two browser tabs. I opened one tab for Gemini and one tab for Claude. I treat Gemini like a junior developer. Gemini writes reasonable code and handles the logic well. The best part is that I can actually read its code. I ask Gemini to write very detailed comments so I understand everything. I read the code line by line. I just explain my goal to Gemini, and it writes honest, clean code for me.
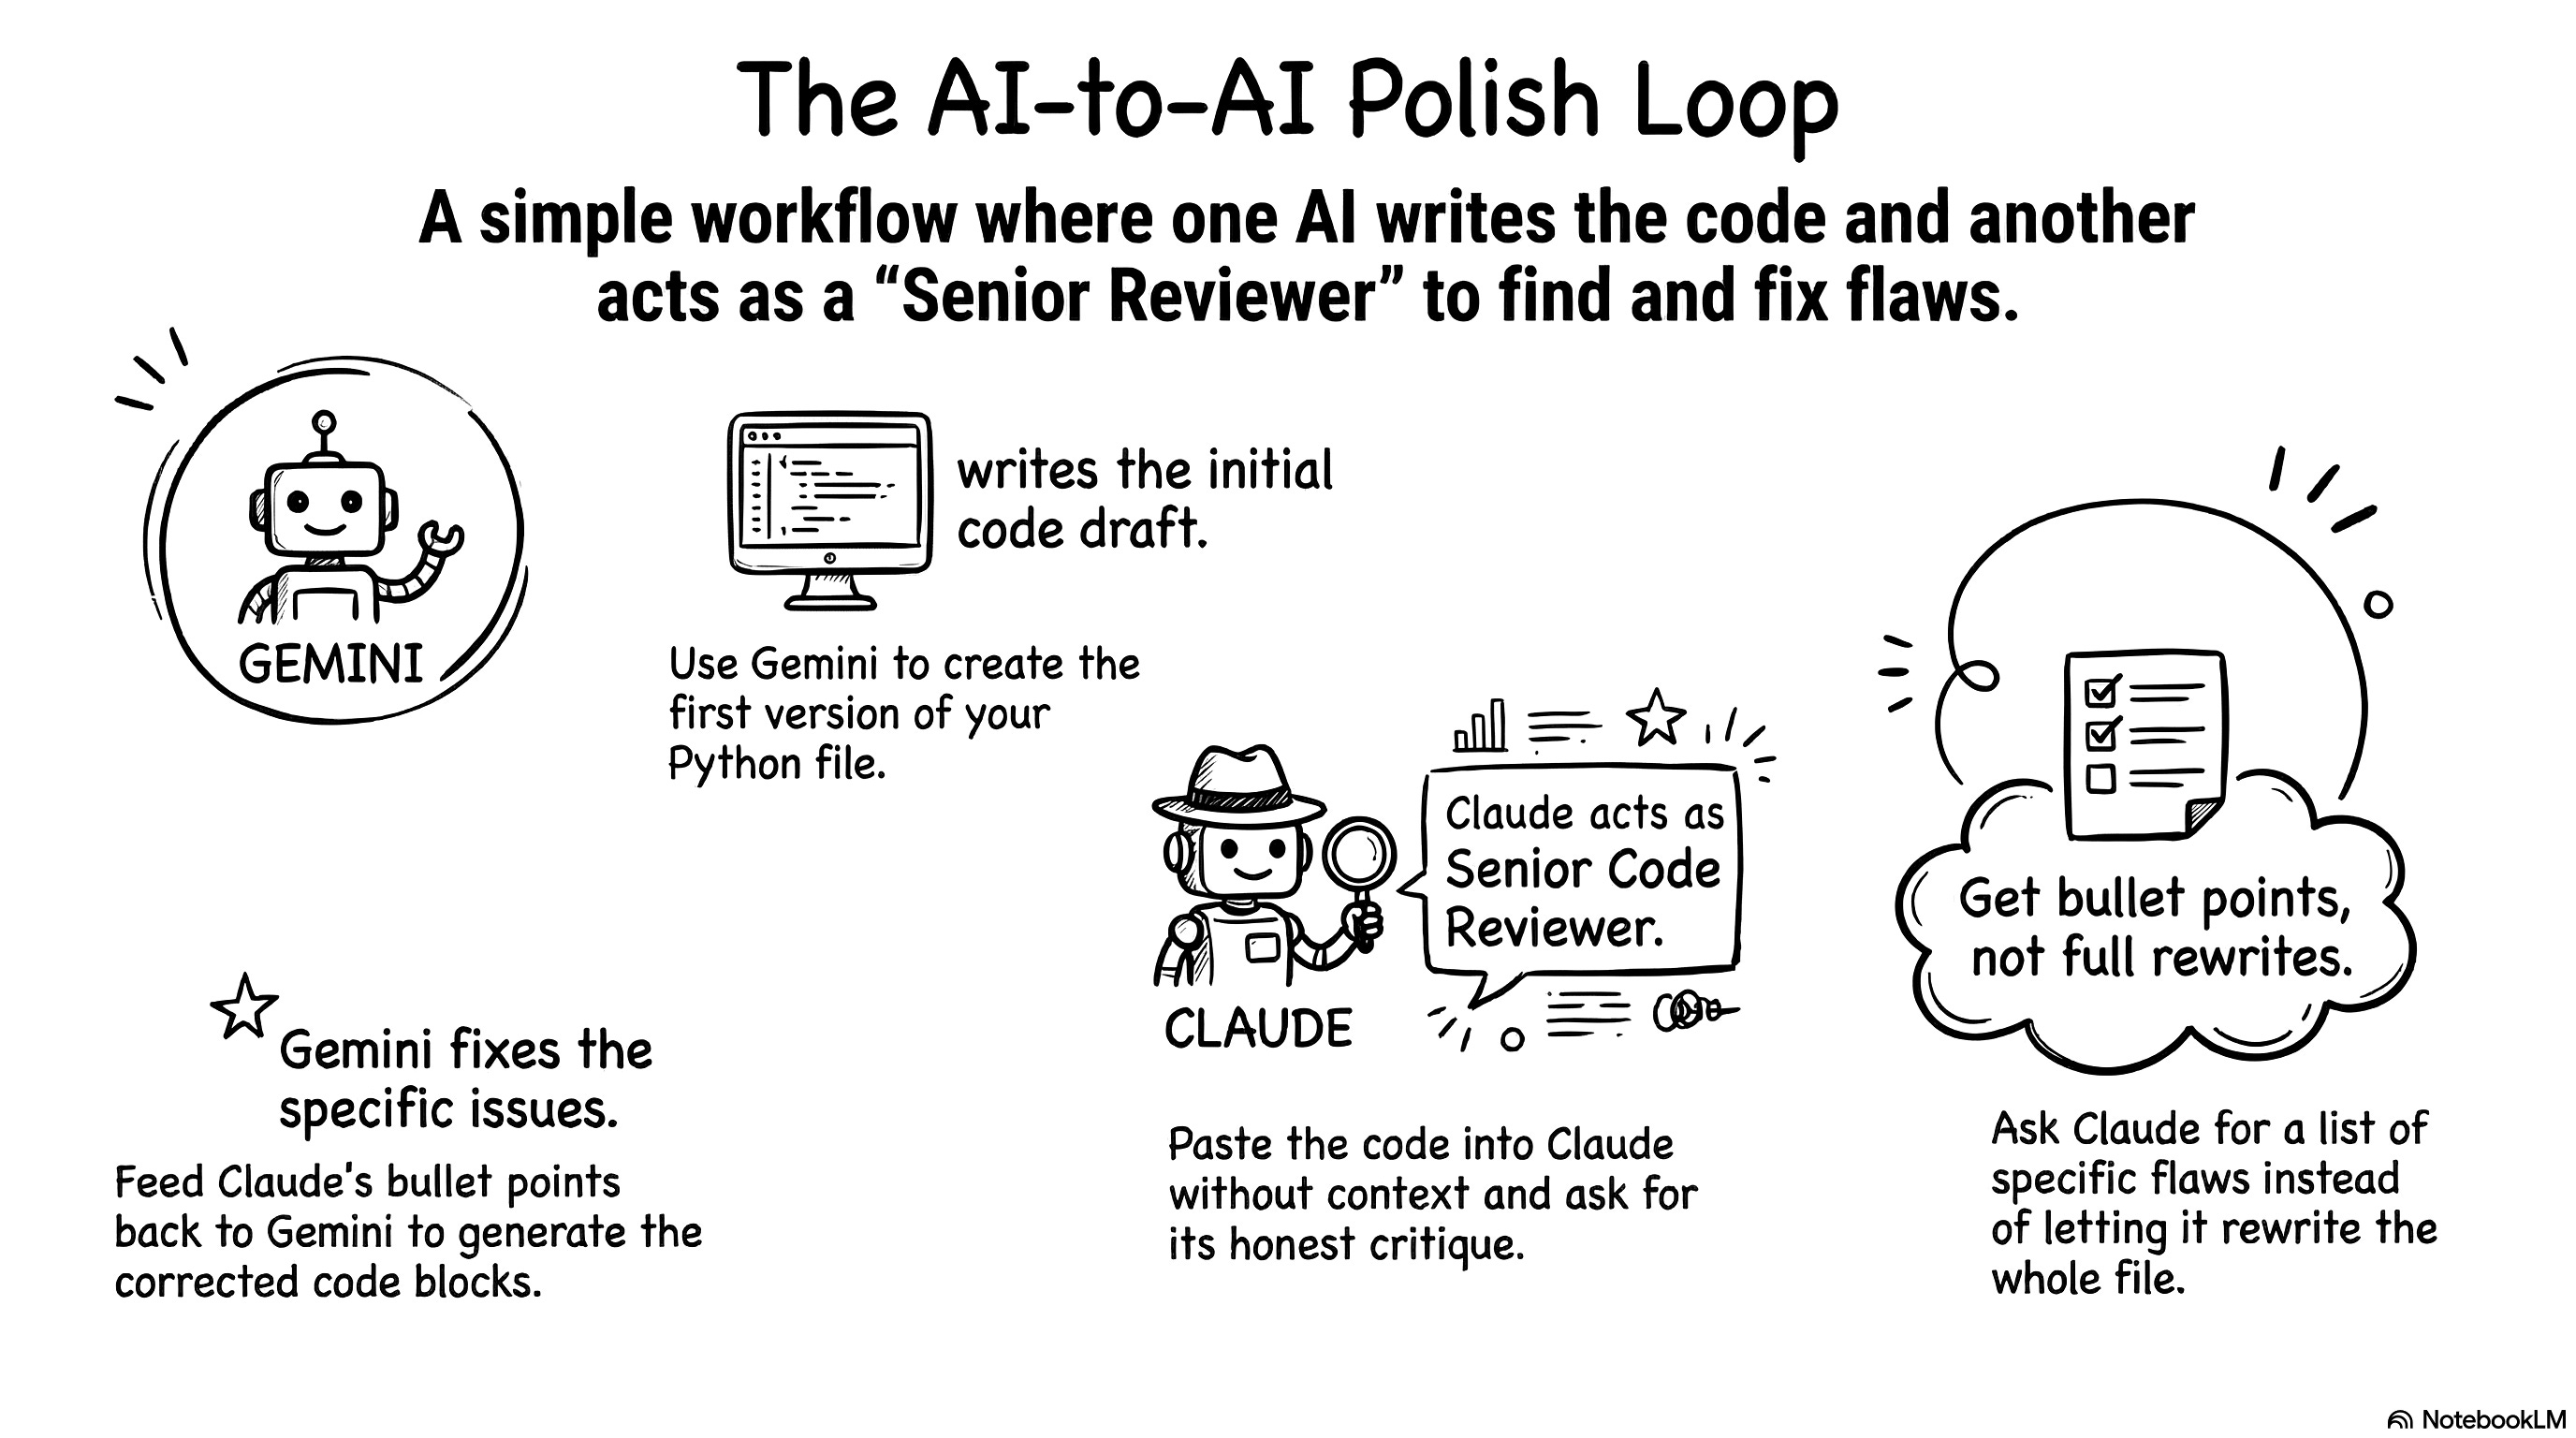
I use Claude as a senior code reviewer. I don’t explain any context to Claude. I don’t tell it the project story or my goals. I assume Claude has done this exact project ten times already. I take the Python file Gemini wrote and paste it directly into Claude. I just ask, “What do you think of this?” It’s actually really funny. Claude immediately generates a massive backlog of things to fix. It points out every single flaw.
Claude always offers to rewrite the whole file to make it cleaner. I always say no. I tell it to just give me the bullet points. I take those bullet points back to Gemini. I tell Gemini to write a new block of code to fix the specific issue. I copy that new block and paste it into my file.
You are probably thinking this sounds like a lot of copying and pasting. You’re absolutely right. I copy and paste constantly. But this is exactly how I learn Python right now. It forces me to understand how every single line contributes to the application. It keeps me moving forward.
3. Organize your screens for efficient coding
So, I keep my two LLM assistants in one window. In another window, I open the code editor. I use VS Code. I also keep GitHub open. I like to create a checkpoint every time I make a successful change. It helps me track my progress.
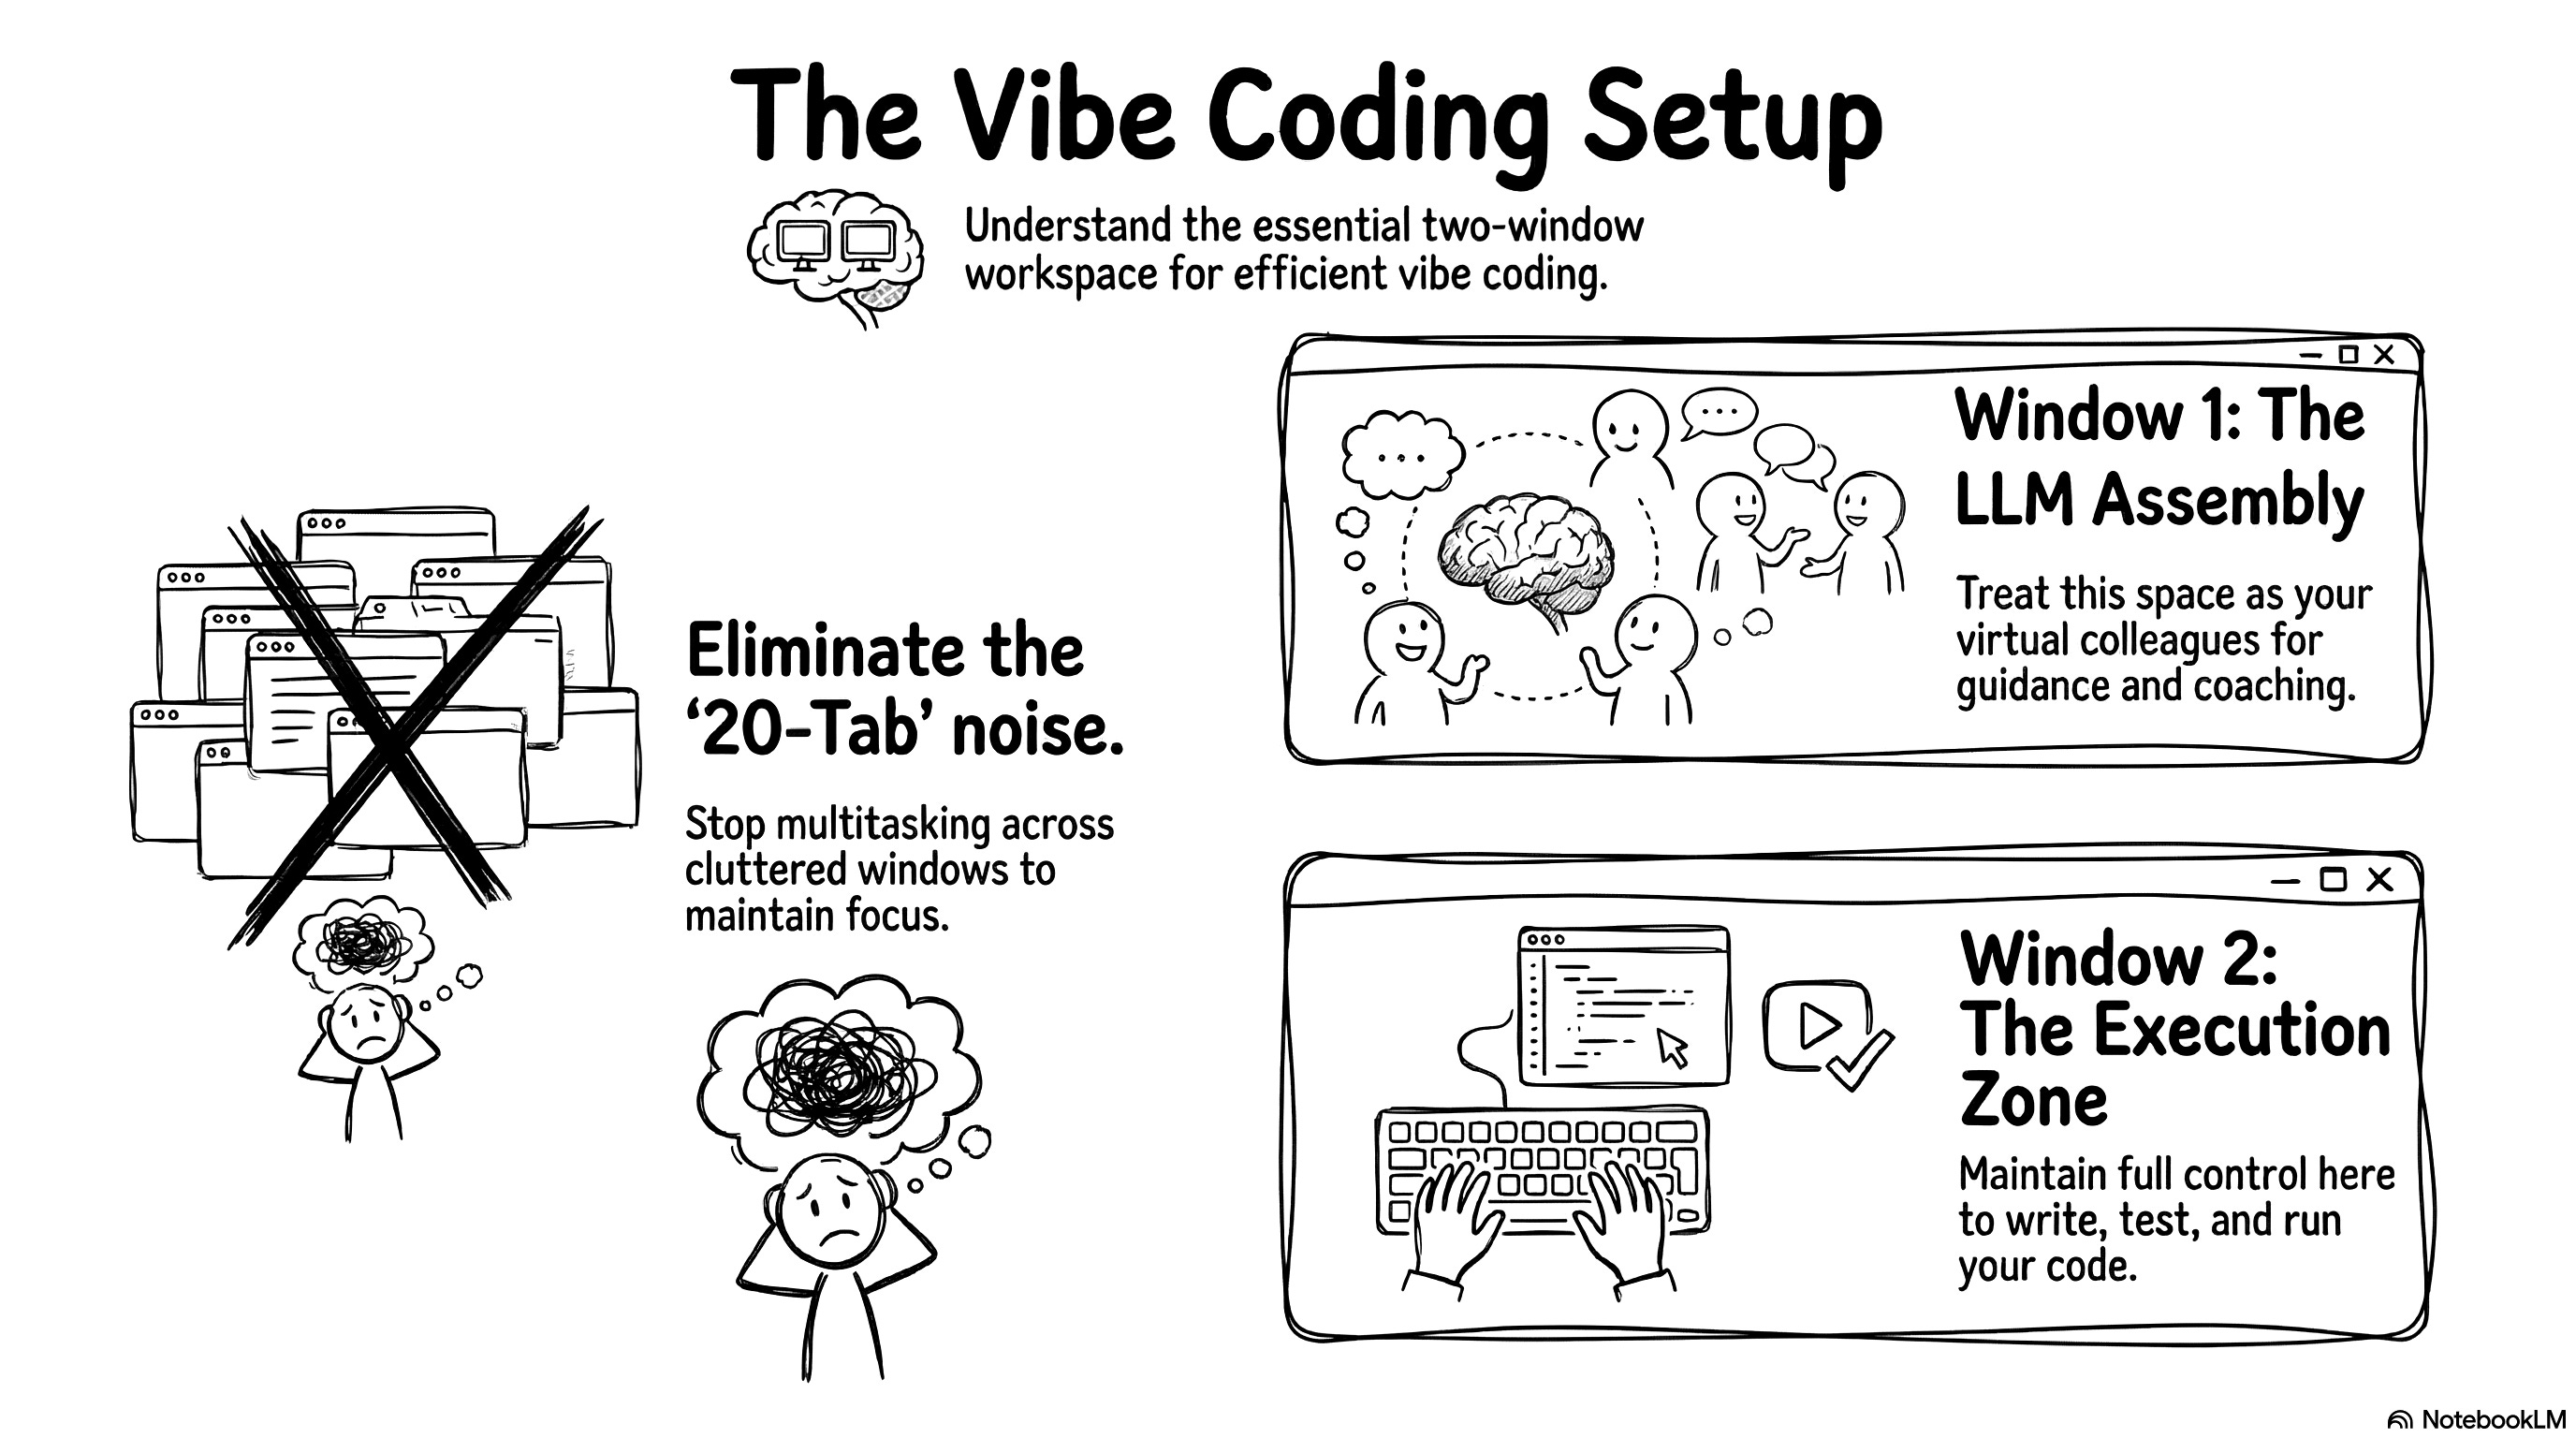
I see a lot of people vibe coding with twenty tabs open at once. They have a very noisy setup. I don’t hate multitasking. But for vibe coding efficiently, you need a strict visual separation. You need one window for your LLM assembly. These are your colleagues guiding and coaching you. You need a second window for execution. This is where you write code and test things. I like to keep full control of the execution window for now.
4. Ask for a plan, then iterate and fix errors block by block
Let’s go back to the start of the project. I discuss my goal with Gemini first. I ask it to write a detailed plan. It gives me a simple step-by-step list. I tell Gemini I am a beginner and I need very detailed instructions. I copy and paste the entire Kaggle page description directly into the prompt so it understands the data. I also tell Gemini to include GitHub save points in the plan. It gives me a beautiful roadmap to follow.
Once I have the plan, I execute it with Gemini. Gemini guides me to create the first two files. I run a quick test to see if the app opens. Then, we iterate. I hit roadblocks. I paste the terminal errors back to Gemini. We fix them together. Once the app works nicely, I push a save to GitHub. Then, I show the working code to Claude. Claude gives me security and performance tips.
I do a few rounds of this back-and-forth between the two models. Eventually, Claude starts suggesting extremely complex features. The suggestions become too theoretical and don’t matter for my simple agent. I stop listening to Claude at that point.
Avoid coding agents when you want to learn
You might wonder why I used Gemini Pro for this. Why didn’t I use Claude Code or another dedicated coding agent? People talk about Claude Code constantly. It’s a fantastic tool. If I asked Claude Code to build this text-to-SQL app, it would do it in under a minute. I would close my eyes, click a button, and the app would be finished. But Claude Code would generate a massive, complex, industrial-grade architecture. I would stare at dozens of files and have absolutely no idea how they work. Unless you are a senior software engineer with a free week to read code line by line, you won’t understand it.
I want to actually learn what happens behind the curtain. I use Gemini so I can work block by block. I talk with the LLM. We build the logic step by step. We construct something reasonable together. I understand every piece of it. I can test it easily. I push the final save to GitHub, and the project is done. I have a working AI agent that talks to my data.
This process might sound like a chaotic mess, but it actually produces a working result. Now, let’s look at the agent architecture. We will break down the agent file by file so you can understand exactly how the engine works under the hood and how all these pieces fit together.
Architecture: build the core engine
If you follow the workflow I just shared, you can easily build this exact same engine, or probably something even better! So why am I explaining the code if the LLMs wrote it? Because you still need to be the director. The goal of this section is to teach you the fundamental concepts of agent architecture. When you understand how the engine actually works under the hood, you can guide the LLMs, challenge their complex suggestions, and ensure they don’t skip some steps. You can rely on LLMs to write the Python syntax, but you still need to be the one steering the ship.
In this section, I might get a little too enthusiastic and say things like “I built this” or “I designed that,” but keep in mind that this entire architecture is simply the result of my deep and long conversations with Gemini and Claude.
1. Prepare the data and extract the database schema
The very first thing we need to tackle is data ingestion and schema creation. Here is the high-level view of the method.

We start with nine massive CSV files from Kaggle. We absolutely don’t want to query these raw files every time a user asks a question. That would slow the execution to a crawl and cost a fortune in API tokens. The LLM needs a standardized, organized base to work efficiently. I asked Gemini to help me write a few preparation scripts to handle this.
I organized my workspace to keep things clean. I have a data folder for the incoming CSV files. I have a scripts folder for my Python preparation files. You have to be very careful when pushing projects to GitHub. It’s a common rule to never publish raw business data online. I used a .gitignore file (read on GitHub) to block the CSV files and the database from uploading. I also hid my .env file containing my OpenAI API key. Gemini walked me through setting up these security measures.
The first script is build_db.py (read on GitHub). This script reads all the raw CSV files and creates a simplified SQL database. We use SQLite for this. SQLite is a super lightweight database engine. It stores everything in a simple local file on your computer. You don’t need to spin up a complicated external server or manage credentials. It’s the perfect tool for fast prototyping.
Next, the agent needs to understand the architecture of the new database. The extract_schema.py file (read on GitHub) connects to the SQLite file. It queries the internal system to extract the raw structure. It isolates the technical instructions and saves this text to map out the model. This gives a basic list of columns and tables.
But a raw list of columns isn’t enough. The LLM needs to understand the actual content. This is where build_schema.py comes in (read on GitHub). This script generates a much richer, semantic version of the schema.
# Extract from build_schema.py: The Schema Linking trick
if col_type.upper() in ["TEXT", "VARCHAR"]:
    try:
        cursor.execute(f"SELECT DISTINCT {col_name} FROM {table_name} WHERE {col_name} IS NOT NULL LIMIT 4;")
        samples = [str(row[0]) for row in cursor.fetchall()]
        if samples:
            formatted_samples = ", ".join([f"'{s}'" for s in samples])
            comment = f" -- Examples: {formatted_samples}"
    except Exception:
        pass
This code uses a powerful technique called schema linking. For every text column, the script grabs four real values directly from the database. It connects the theoretical structure to factual content. The agent now understands the exact format it needs to search for. Instead of just seeing a column named “product_category_name”, it sees real examples like “cama_mesa_banho” or “beleza_saude”.
You can see exactly how this enriched structure looks in the generated text file schema.txt.

Finally, the agent accesses the Olist database via the SQLite connection. The system injects this massive, enriched text directly into every instruction sent to the model. We call this a full context injection. It guarantees absolute visibility for the agent. In the past, developers had to use clever tricks to filter data and bypass memory limits. Today, context windows are huge. We can feed the LLM everything at once. The model has all the context it needs to shine and give us highly accurate SQL queries.
2. Build the agent logic with LangGraph nodes
Let’s look at the core of the agent. Everything happens inside the file called agent.py (read on GitHub). It’s about 500 lines of code. That might sound like a lot. But I built it iteratively step by step with Gemini and Claude. It’s actually very simple to read. We use a framework called LangGraph.
LangGraph is an open-source framework built by the LangChain team. You have probably heard of other agent frameworks like AutoGen or CrewAI. Those frameworks give AI agents a lot of freedom to think and act autonomously. That is cool for experiments, but terrible for production. Highly autonomous agents often hallucinate, loop infinitely, or completely forget the user’s original request. LangGraph is different. It treats your agent like a state machine. You build independent workstations called nodes. You connect them with strict traffic rules called edges. The agent can only move exactly where you allow it to go. I chose it because it gives me absolute control over the execution flow.
Before we write the logic, we connect the LLM. I used the OpenAI API. I generated a secret key, pasted it into my project, and set a hard five-euro limit to test things safely. My code includes a simple configuration variable model_name = "gpt-4o-mini". This makes the system completely independent. I can swap to a different model just by changing one word in the code.
The very first thing we define in the code is the AgentState. Think of this as the shared memory of the agent. It uses strict typing to track exactly what happens at every step. It stores the user’s question, the SQL plan, the raw data, and any errors. It also stores the entire conversation history. It never overwrites previous messages. It just appends new ones. This allows the agent to remember everything you discussed.
I created six specific nodes to handle the workflow. Here is a map of how the data flows through them.

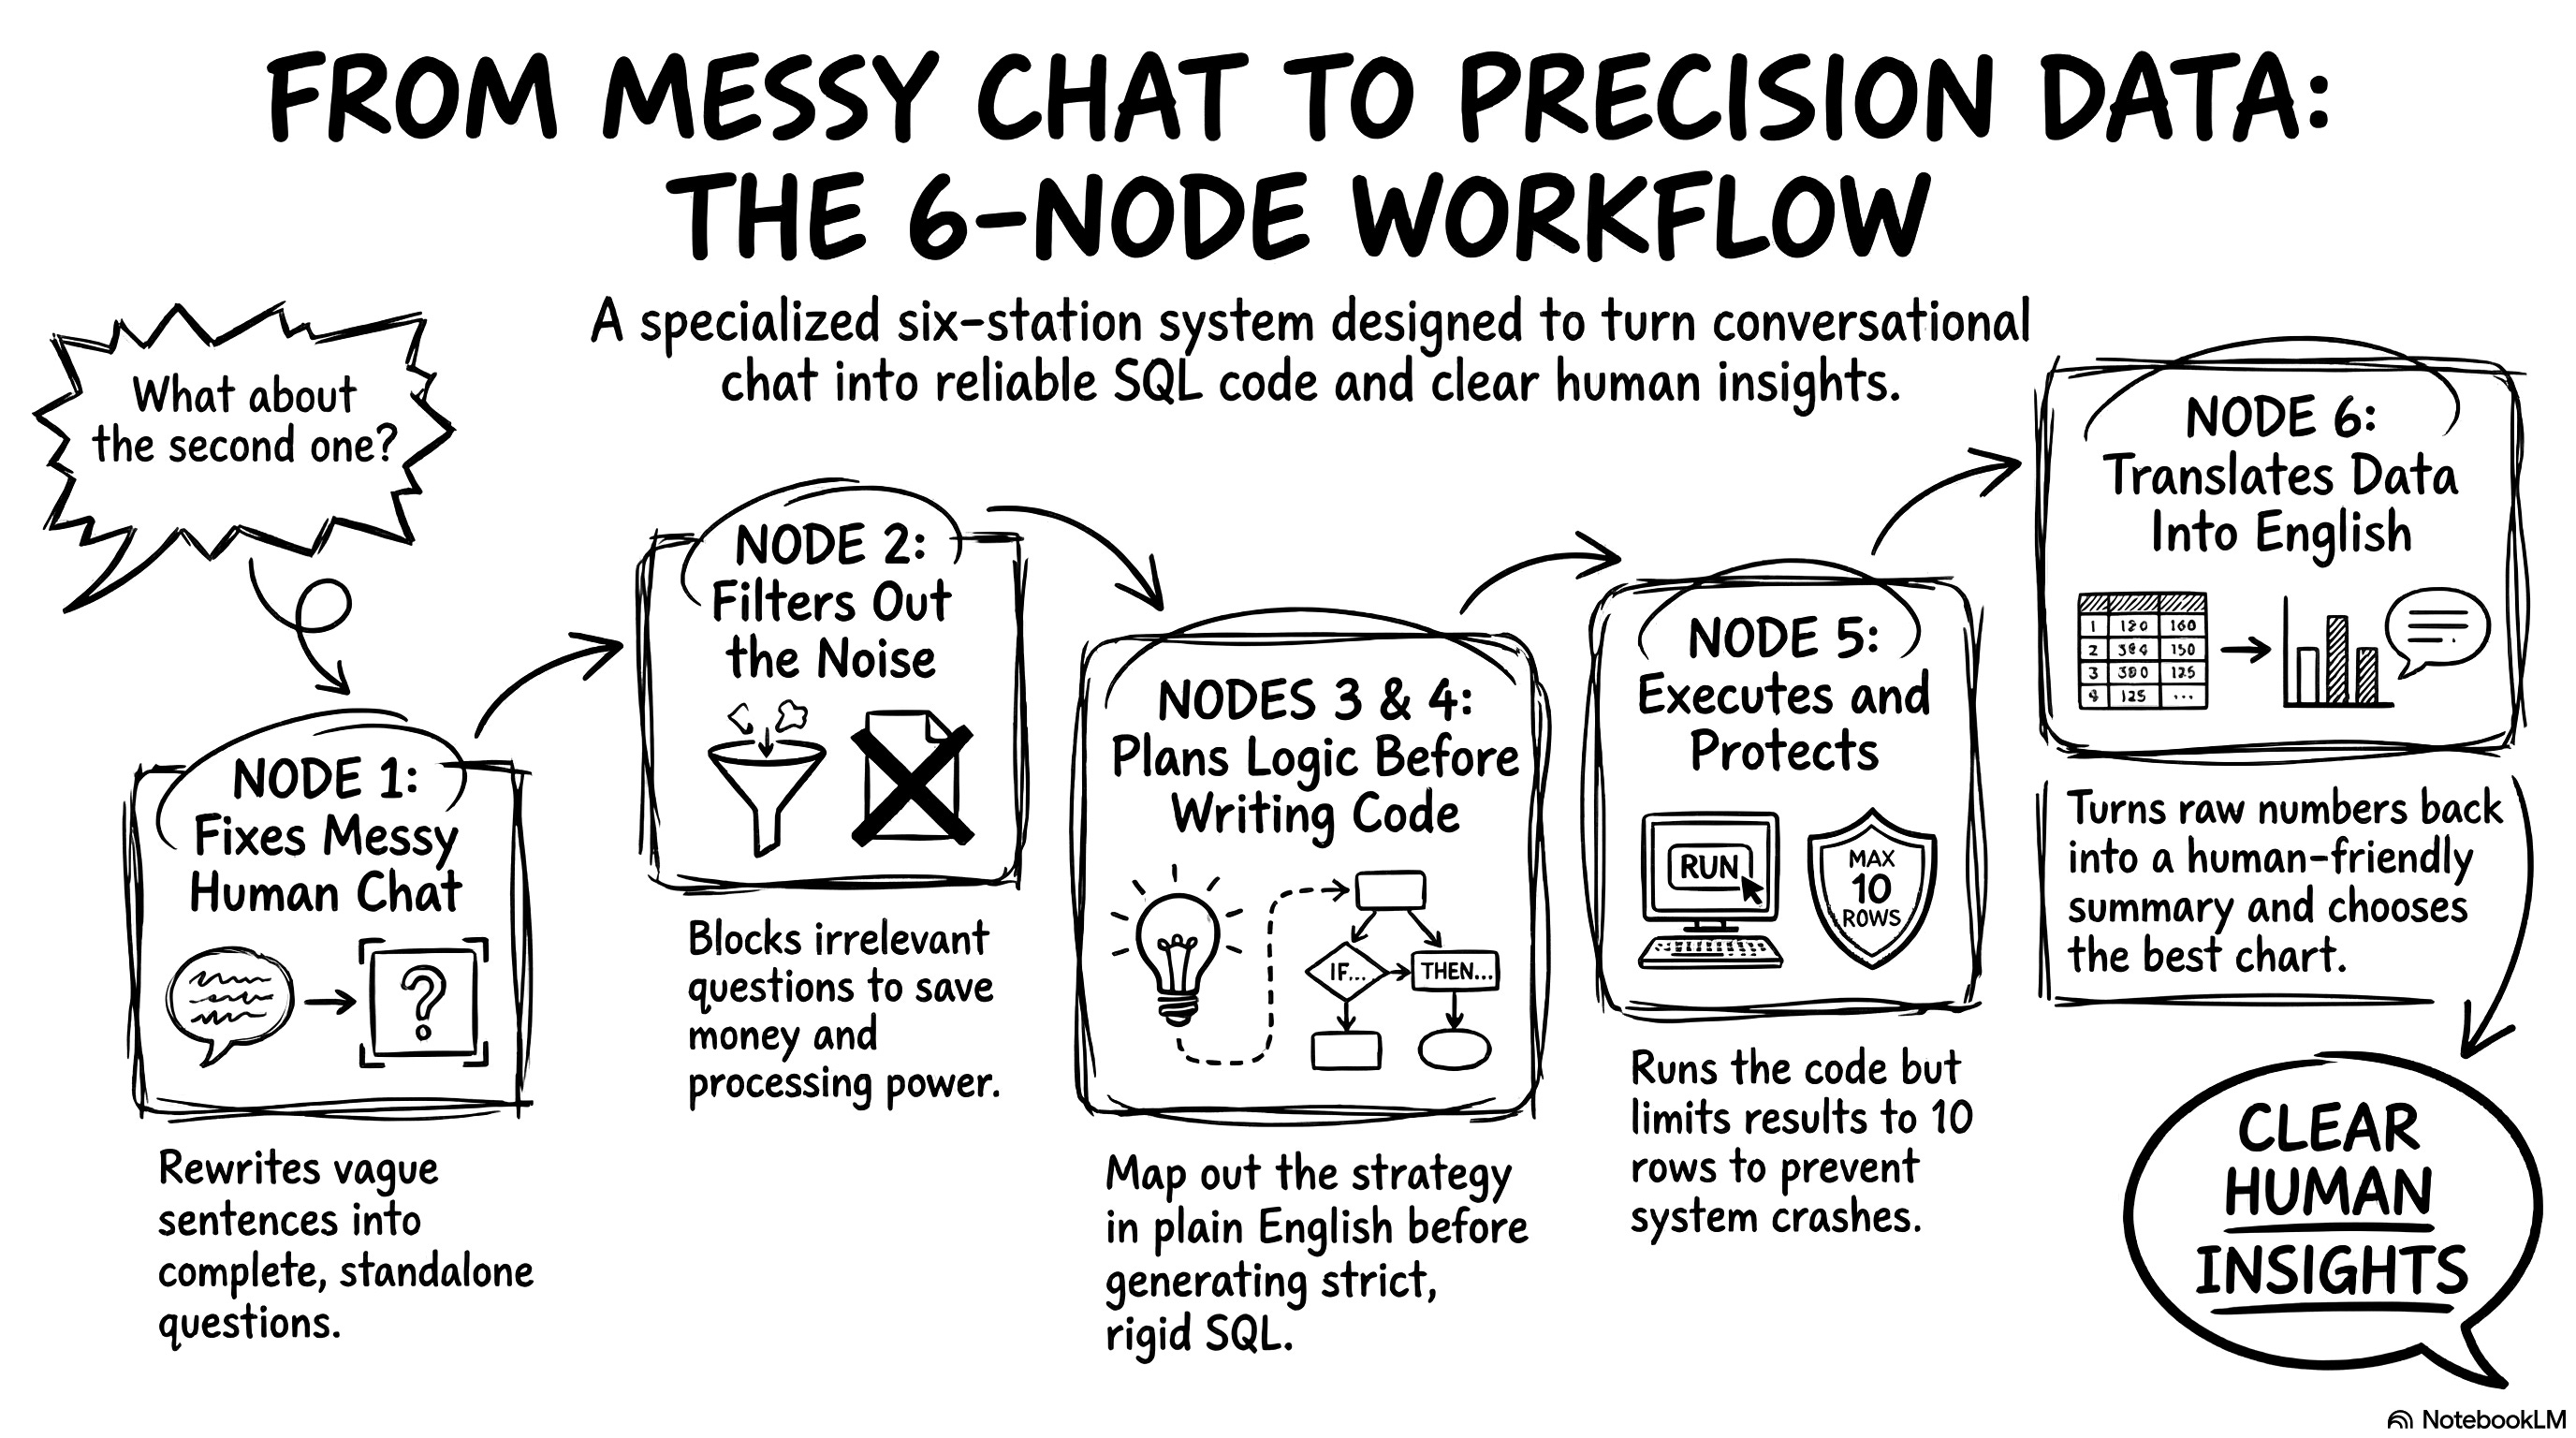
Let’s break down exactly what happens at each of these six workstations.
Node 1: Reformulate query. Users never ask complete questions. They say things like “What about the second product?”. The LLM cannot write SQL for that. This node acts as a context barrier. It reads the chat history and rewrites the user’s input into a standalone sentence. It changes “What about the second one?” to “What is the total revenue for beauty products in 2018?”. This is incredibly useful. The downstream nodes don’t have to worry about chat history. They only focus on a perfectly clear question.
Node 2: Classify query. This is the semantic router. It analyzes the question and assigns it a complexity level: simple, complex, or out of scope. If a user asks about the weather in São Paulo, this node blocks it immediately. This saves money. We don’t waste compute power trying to write SQL for an irrelevant question. For this node, I force the LLM to output a strict JSON format. LLM models love to chat. I don’t want a conversational answer here. I just want a structured category and a reason.
Node 3: Plan SQL query. This node only activates for complex questions. We use a famous technique called chain of thought. We ask the model to plan its join strategy in plain English before writing any code. It lists the required tables and foreign keys. Separating the architectural thinking from the syntax writing massively reduces hallucinations on hard questions.
Node 4: Generate SQL. This node translates the plan into real SQL code. I use a technique called in-context learning. I inject three perfectly written examples of SQL queries directly into the initial instructions. The LLM mimics the style of those examples. I also set the model’s temperature to exactly zero. A high temperature makes the LLM creative and varied. We are writing database code. We demand strict, rigid accuracy, not creativity.
Node 5: Execute SQL. This is where Python takes over. The script takes the generated SQL and runs it directly against the local SQLite database. It extracts the raw data. The LLM has a limited context window. If the user asks for a table of 50,000 customers, the app will crash and burn our budget. My Python code specifically truncates the results. It limits the data sent back to the LLM to a maximum of 10 rows. It also adds a warning note to tell the model that the data was truncated. We show the user a preview, but we protect the system.
Node 6: Summarize results. This final node translates the raw database output back into a human-friendly text. It explains the numbers clearly. It also analyzes the data shape and decides on the best chart type to display in the user interface.
After building the nodes, I had to define the traffic rules. I wrote conditional edges to control the flow. The most important rule is the self-correction loop. When node 5 executes the SQL, it might hit a syntax error. If that happens, the routing logic catches the error message. It sends the error back to Node 4 (Generate SQL). It tells the LLM, “You made a mistake, here is the error, fix your code.” The agent tries to fix itself automatically. I capped this loop at three maximum retries to prevent infinite loops.
Finally, I wrapped the whole graph in a MemorySaver. This acts as a long-term checkpoint system. It records the exact position and state of the agent after every single action.
Every single node relies on a highly specialized system prompt. Writing good prompts is key to a stable agent. You have to give the LLM extremely explicit constraints. Let me show you the full prompt construction for node 4 (Generate SQL) as an example:
# Craft the main system prompt
system_prompt = f"""You are an expert SQLite data analyst.
Your task is to translate the user's question into a valid SQLite query.

Here is the schema of the database:
{schema}

Rules:
1. Return ONLY the raw SQL query.
2. Do not wrap the SQL in markdown formatting (e.g., no ```sql).
3. Do not add any explanations or text.
4. Use JOINs correctly based on the provided schema.
5. CRITICAL LANGUAGE & FORMAT RULE: The database only stores category names in Portuguese (product_category_name) and English (product_category_name_english). Furthermore, the English names are ALWAYS formatted in lowercase with underscores instead of spaces (e.g., 'health_beauty', 'watches_gifts'). If the chat history mentions categories in French, translate them to English AND format them with lowercase and underscores for the WHERE clause.
"""

# Inject Few-Shot examples ONLY if enabled
if use_few_shot:
    system_prompt += f"\n{few_shot_examples}\n"

# Self-correction logic: inject previous errors
if error:
    system_prompt += f"\n\nWARNING: Your previous query failed with this error: {error}. Please correct your SQL."

# Inject the architectural plan for complex queries
if plan:
    system_prompt += f"\n\nCRITICAL: Follow this architectural plan to write your SQL:\n{plan}"
This prompt is structured and highly specific. I don’t just ask the LLM to “be careful with languages”. I tell it exactly how the database formats strings. I explain the exact lowercase and underscore rules. Then, the code dynamically injects the few-shot examples, the execution plan, and even the exact error message if the LLM messed up the previous try. This dynamic context is exactly what prevents your application from crashing when a user types a category name with a capital letter.
3. Create the web interface with Streamlit
Now we need a user interface. We only need one file for this: app.py (read on GitHub). I used a framework called Streamlit to build it. A brilliant startup created Streamlit a few years ago, and Snowflake recently bought them. It’s completely open-source. It lets you build interactive web applications using only Python. You don’t need to write a single line of HTML, CSS, or JavaScript. It’s incredibly liberating for product builders. You just write your Python logic, and Streamlit renders a beautiful UI instantly. It’s the ultimate tool to turn a quick script into a professional product you can actually share.
The interface needs a memory system. A chat app is useless if it forgets your last message. I use a built-in feature called session_state to store the conversation history. I also generate a unique thread_id for every user session. I pass this ID directly to our LangGraph agent. This guarantees the agent remembers exactly what we discussed five minutes ago. You can ask follow-up questions naturally without repeating yourself.
Let’s look at the actual user experience. When you type a question, the interface doesn’t just freeze and make you wait in silence. It shows you exactly what the agent is doing in real-time. I built a glass box interface. You can literally watch the agent think.

I built this transparency using a Streamlit component called st.status. The LangGraph agent streams events back to the interface as it moves from node to node. I catch these events in a simple loop. I check the node_name and display the corresponding information inside an expandable menu using st.expander.
# Catching the agent's events to display intermediate steps
for event in st.session_state.agent_graph.stream(initial_state, config=config):
    for node_name, node_state in event.items():

        if node_name == "plan_sql_query":
            status.write("⏳ Élaboration du plan de jointure...")
            with st.expander("📋 Voir le plan d'exécution", expanded=False):
                st.markdown(node_state.get("sql_plan"))

        elif node_name == "generate_sql":
            status.write("⏳ Traduction en SQL...")
            with st.expander("🔍 View Generated SQL", expanded=False):
                st.code(node_state.get("sql_query"), language="sql")
This code snippet shows exactly how I pull the agent’s internal thoughts and put them on the screen.
4. Secure the database and prevent execution errors
We have a working app, but we can’t just hand it to the business team and hope for the best. We need serious security mechanisms. You don’t want someone to accidentally destroy your database or run up a massive API bill. Let’s look at exactly how I implemented these guardrails in the code. It’s actually much easier than it sounds.
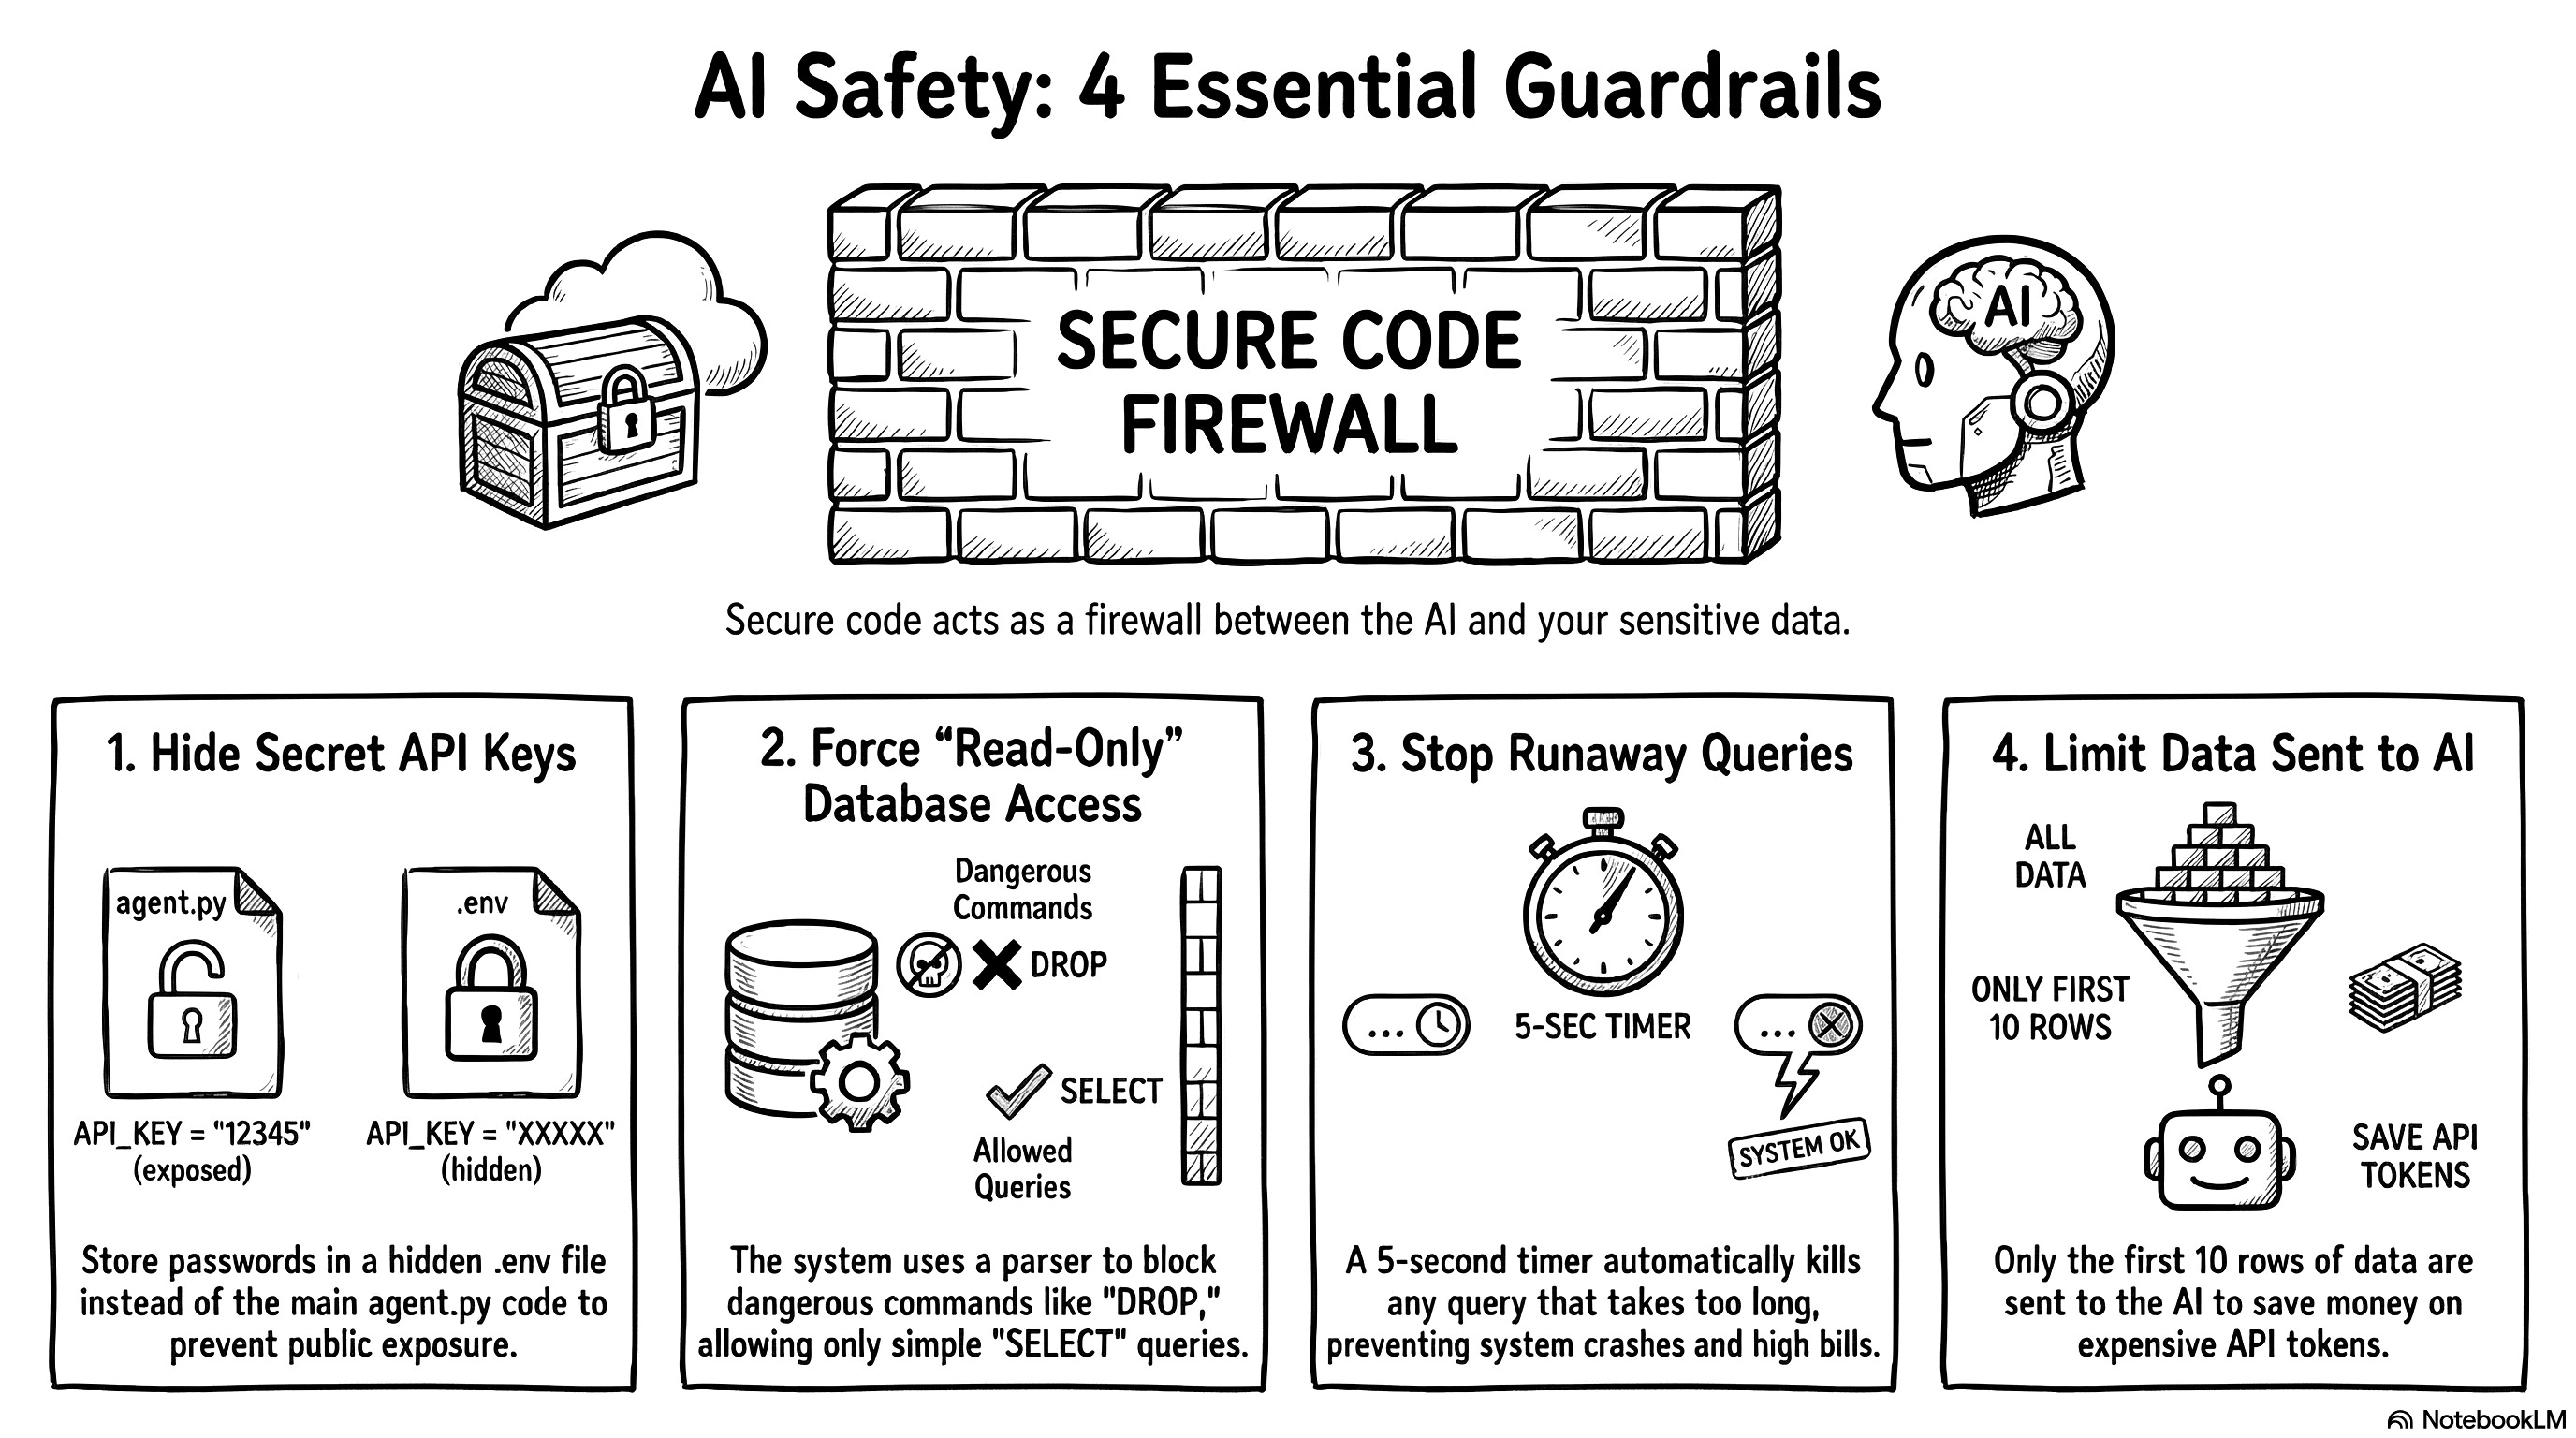
First, we have to protect the API keys. We never write passwords directly in the Python code. We store them in a hidden file called .env. In the agent.py file, we just add two lines at the very top:
from dotenv import load_dotenv
load_dotenv() # This loads your secret keys safely
This simple step ensures we never accidentally publish our private keys to GitHub for the whole world to see.
Next, we must protect the database itself. What happens if the AI hallucinates or a user intentionally tries to execute a DROP TABLE command? We build a firewall right before the execution step. Many developers write a lazy rule to block specific words like if "DROP" in query. This is a terrible method. Users can easily bypass simple word filters. Instead, I used a library called sqlparse to build an Abstract Syntax Tree (AST) parser. It breaks the query into logical blocks and checks the exact core command.
# STRICT SECURITY GUARDRAIL
import sqlparse

parsed_statements = sqlparse.parse(sql_query)
for statement in parsed_statements:
    if not statement.is_whitespace:
        stmt_type = statement.get_type().upper()

        # Only SELECT statements are allowed
        if stmt_type != 'SELECT':
            return {"error": f"Security Violation: '{stmt_type}' operation detected."}
If the command is anything other than a simple SELECT statement, the program blocks the execution instantly. It’s an incredibly robust way to guarantee a strict read-only environment.
We also have to prevent compute overloads. Sometimes, the LLM writes a bad query and forgets to link two tables correctly. This creates a massive cartesian product. A simple question suddenly tries to return millions of rows. This will crash the application and burn your API budget. SQLite doesn’t have a simple timeout parameter, so I used a trick with set_progress_handler.
import time
start_time = time.time()
TIMEOUT_SECONDS = 5.0

def progress_handler():
    # If execution takes more than 5 seconds, abort it
    if time.time() - start_time > TIMEOUT_SECONDS:
        return 1
    return 0

# Check the time every 10,000 database instructions
conn.set_progress_handler(progress_handler, 10000)
cursor.execute(sql_query)
If a query takes more than five seconds to run, the system kills it automatically.
Finally, we need to protect the LLM’s memory. If a query succeeds but returns 50,000 rows, sending all that text to the LLM will cost a fortune in API tokens. I strictly truncate the results in Python before sending the data back to the agent for the final summary.
llm_row_limit = 10
formatted_results = ""

# Send only the first 10 rows to the LLM
for row in results[:llm_row_limit]:
    formatted_results += str(row) + "\n"

if len(results) > llm_row_limit:
    formatted_results += f"\nWARNING: {len(results) - llm_row_limit} additional rows hidden to save tokens."
We give the user a clear preview of the data in the UI, but we protect the system’s memory and our wallets. This is exactly how you build a secure agentic system.
As you can see, the core architecture really just relies on two main files. One file holds the agent’s logic, and the other holds the user interface. You will obviously write a few extra helper scripts along the way to ingest data or manage your GitHub repository. But fundamentally, the project remains very basic and simple. But having a simple architecture is meaningless if the AI hallucinates, which is why we must now build a rigorous evaluation framework to prove the system actually works.
The eval: prove the system actually works
I could have stopped right there and called it a day. The agent works, it looks great, and it answers questions. But building the agent is actually only half the job. Building a robust evaluation framework is the most important thing you will do. You might wonder why we need to spend time on this. The answer is simple. AI models change constantly. OpenAI, Google or Anthropic might release a new update tomorrow that completely breaks my carefully crafted system prompts. If that happens, my entire agent logic might need a rewrite. But a solid evaluation system never changes. It acts as an anchor. It tells you instantly if a new model makes your agent smarter or dumber. If you invest your time anywhere, invest it here.
1. Build the test plan and SQL dataset
Everything for this phase happens inside an eval folder (view on GitHub). I started by creating a benchmark dataset of 60 test questions. You might ask why I chose exactly 60. Don’t look for a deeply scientific reason. I originally wanted to write 50. Then I found a few more interesting edge cases to add. If this were a real enterprise product, I would probably use 1,000 questions to be safe. But remember my strict five-euro budget! Running an evaluation test costs money because you send dozens of prompts to the API at once. A suite of 60 questions costs me about 50 cents per run. A massive dataset would bankrupt my little experiment in an hour.
I created a file called benchmark.json (read on GitHub) to act as the ultimate source of truth. It works just like a classic software testing file. It contains the question, the difficulty level, and the perfect gold SQL query we expect the agent to generate. Let’s look at what these categories mean in practice.
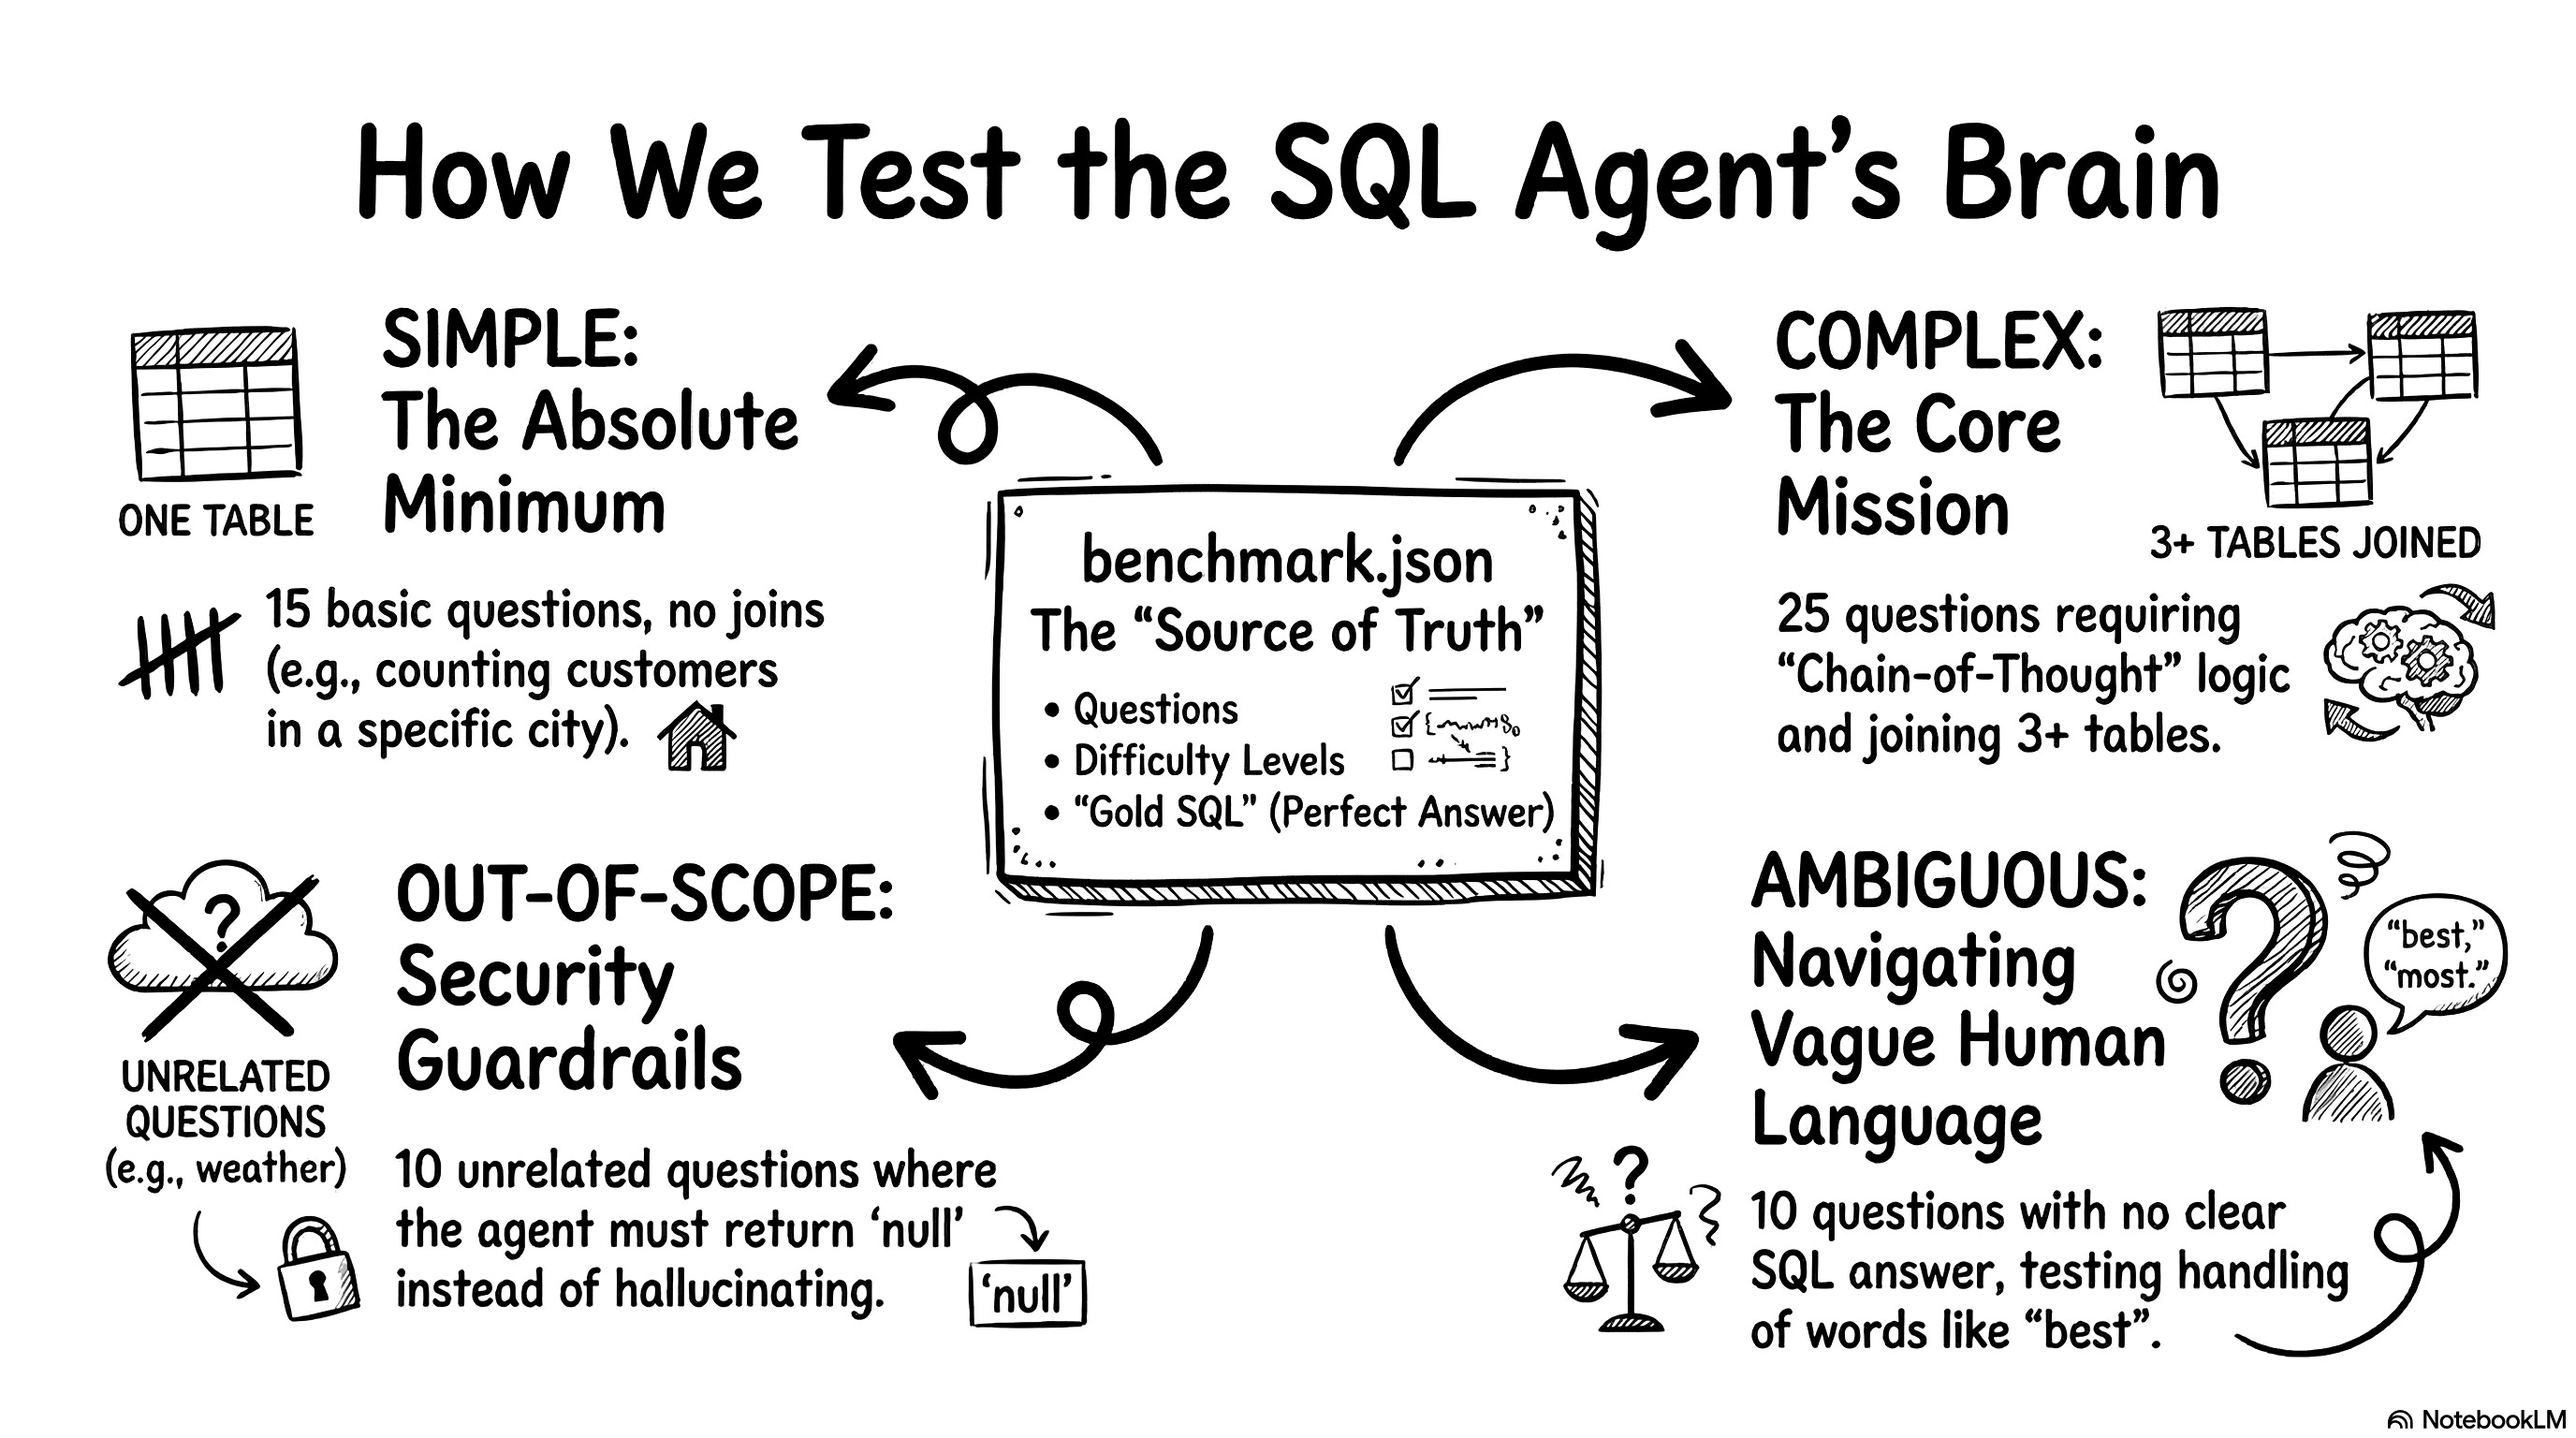
First, we have 15 simple questions. These test the absolute minimum performance baseline. They usually target a single table and require no joins. For example, a simple question looks like: “Tell me how many customers live in São Paulo.” The expected gold SQL is SELECT COUNT(*) FROM customers WHERE customer_city = 'sao paulo';.
Second, we have 25 complex questions. This is the core function of the agent. These questions force the LLM to use its chain-of-thought planner. They involve three or more tables, dates, and heavy aggregations. A complex question looks like: “What are the top 5 product categories that generate the most revenue?” The agent must write a massive query with multiple joins across order items, products, and English translations to get the right answer.
Third, we have 10 out-of-scope questions. These test our semantic router and security guardrails. We ask things completely unrelated to our e-commerce data. For example: “What will the weather be like in São Paulo next week?” The expected gold SQL here is null. The agent must reject the question gracefully instead of hallucinating fake weather data.
Finally, we have 10 ambiguous questions. I actually didn’t plan for these. Claude suggested I add them during a code review. These questions test how the agent handles vague human language. A user might ask: “Show me the best-selling items.” The word “best” means absolutely nothing to a database. Does it mean highest revenue? Most items sold? Highest review score? There is no gold SQL possible here either. The agent needs to navigate the ambiguity safely.
I know how to write SQL, but writing 60 test cases manually is incredibly boring. I let the AI do the heavy lifting. I asked Gemini to generate the entire JSON file based on the database schema. Then, I pasted the file into Claude and asked it to review Gemini’s logic. In a real company, you need an expert to verify these gold queries manually. You cannot trust an AI to grade an AI without a human baseline. But for a fast vibe coding project, this dual-LLM generation method works perfectly.
2. Define the metrics to score the agent
Having a big pile of test questions is a great start. But a test plan is completely useless if you don’t have a way to score it. You need clear indicators. You have to know if your agent is getting smarter or dumber every time you tweak a prompt. I defined four specific metrics to measure the success.
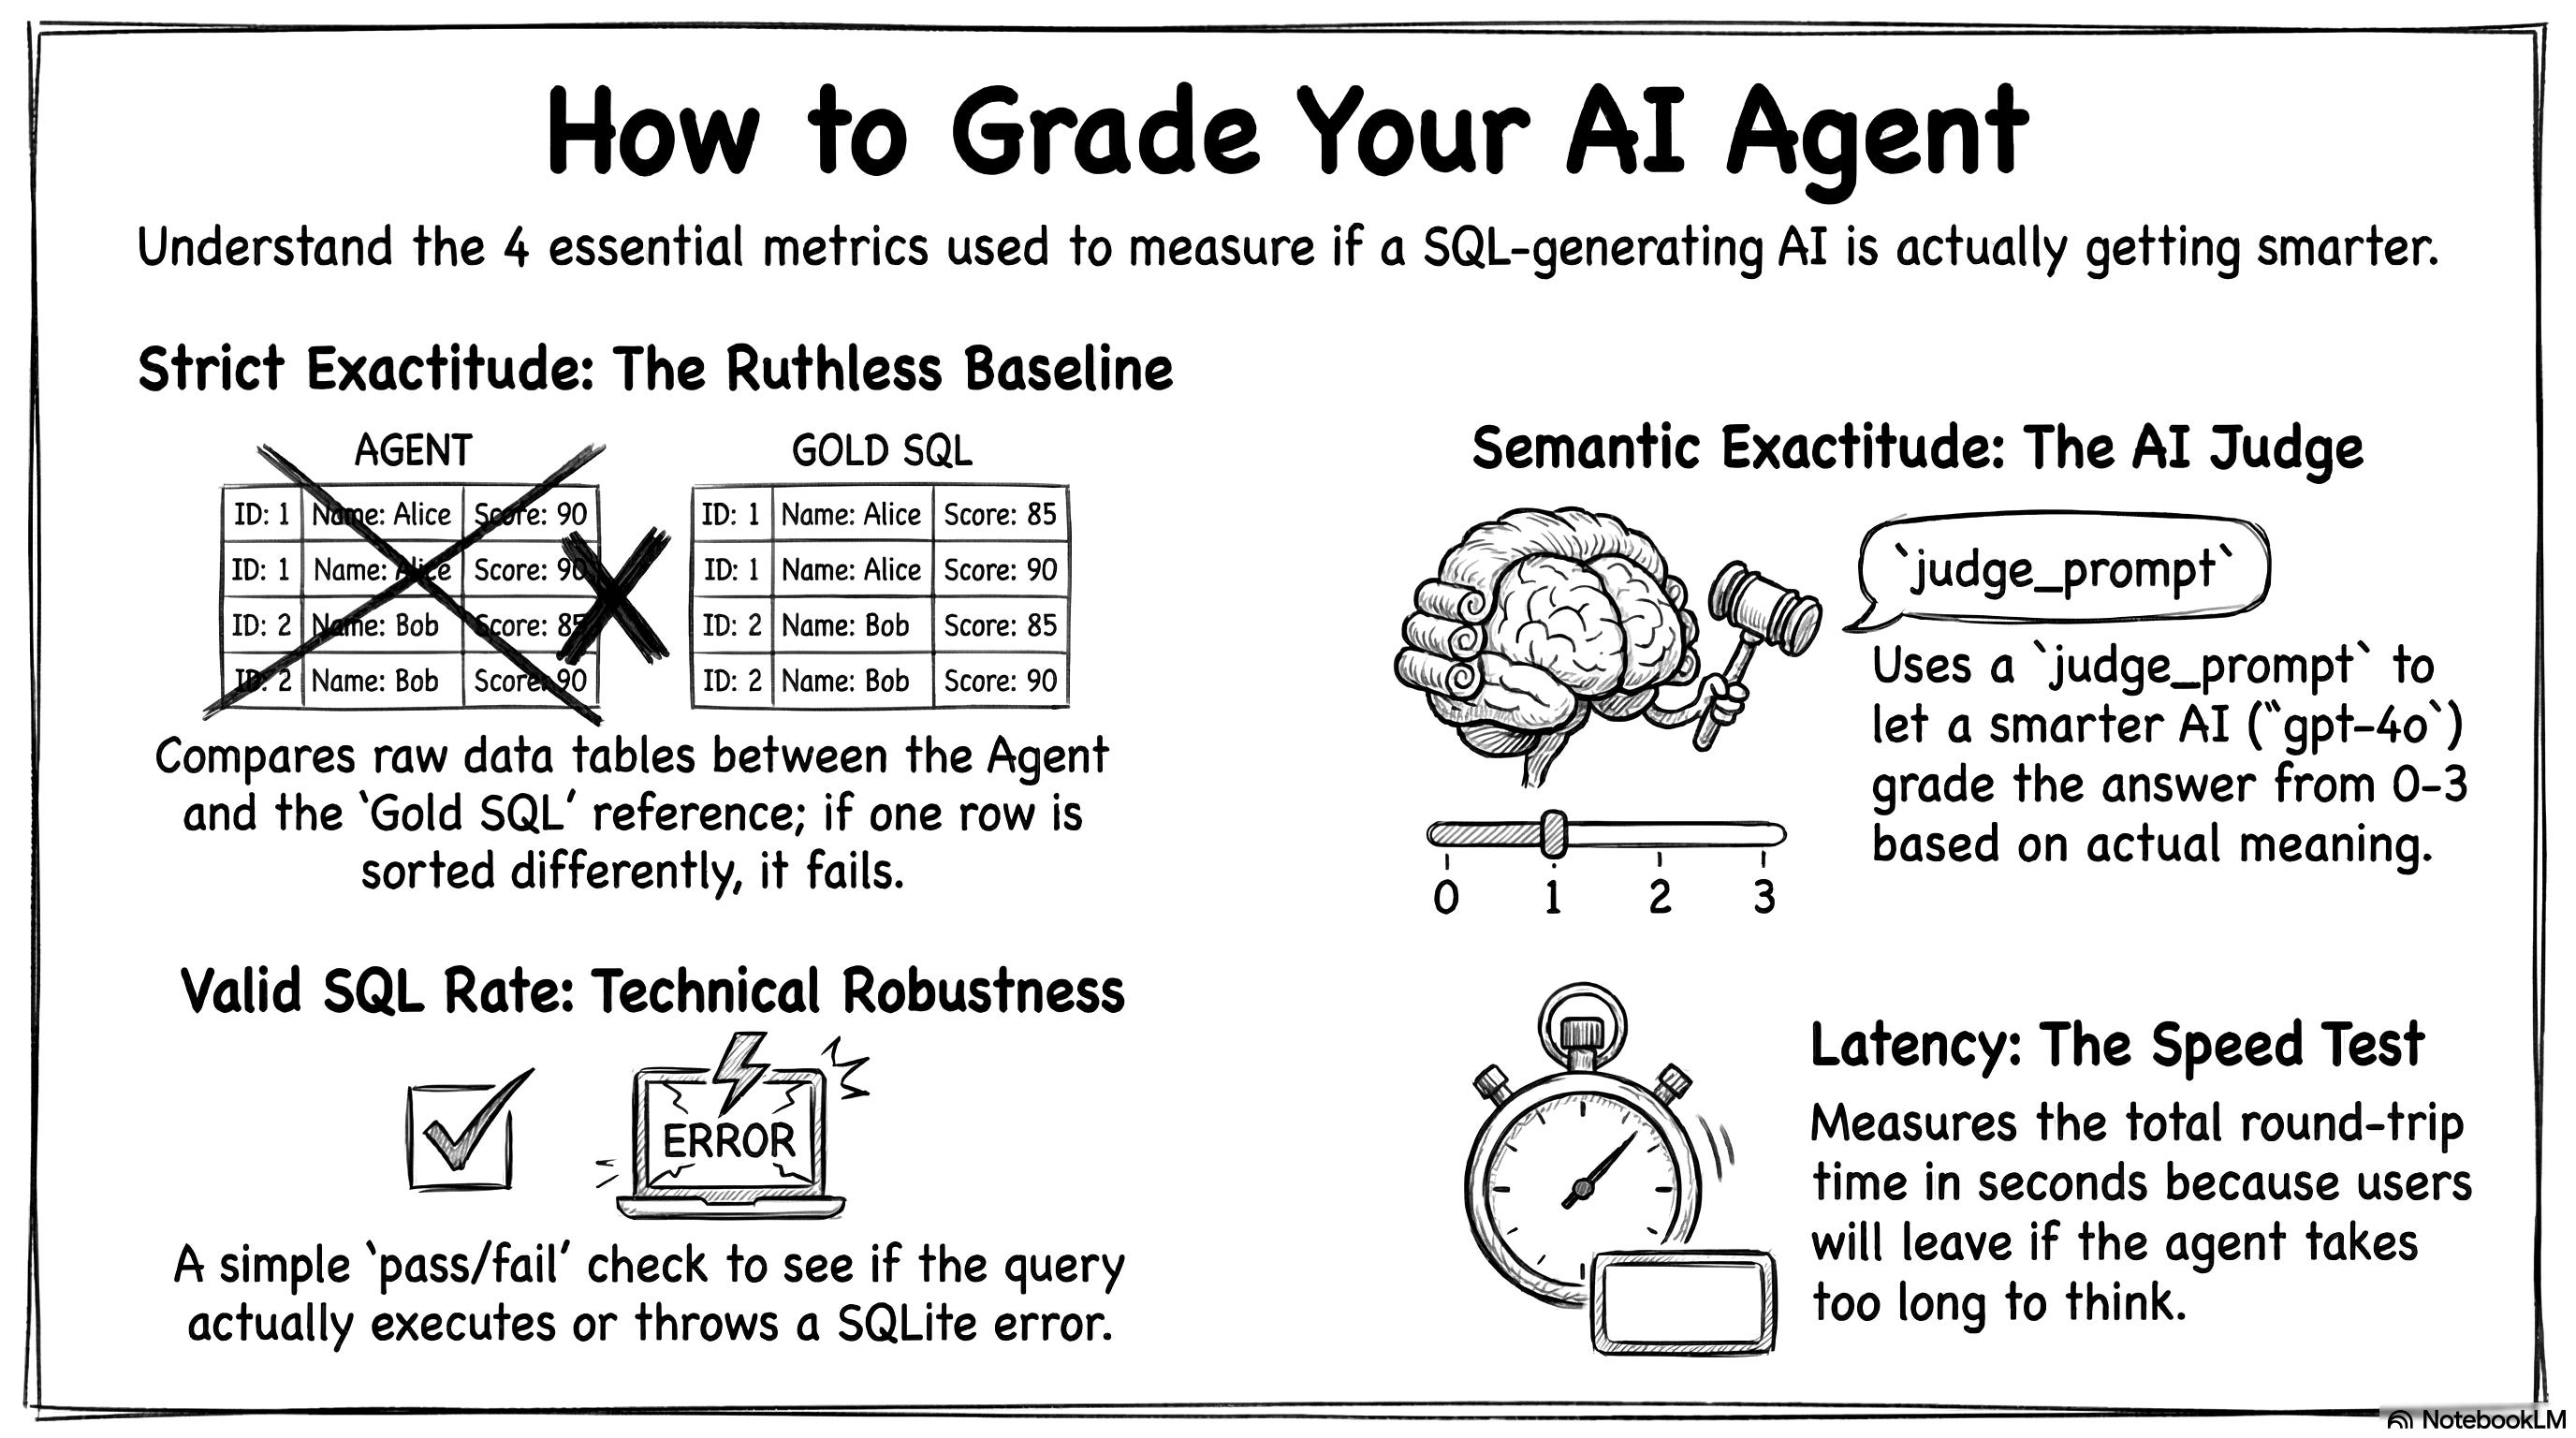
The first indicator is strict exactitude. This metric runs the reference gold SQL, runs the agent’s SQL, and compares the two final data tables. It doesn’t look at the lines of code. It only looks at the raw numbers. It is highly conservative. If the agent finds the exact right answer but sorts the table differently, this metric scores it as a failure. It is ruthless. But it gives you a solid, rigorous baseline that does not rely on another AI.
Because strict exactitude is so rigid, we need a second indicator. This is semantic exactitude. It evaluates the real meaning of the answer. Strict exactitude fails a query for a bad sorting order. Semantic exactitude understands the context. I built an LLM-as-a-Judge system for this. An external AI grades the agent’s answer on a strict scale from 0 to 3. A score of 3 means the data perfectly answers the user’s question. A 2 means it is plausible but has a minor flaw. A 1 means the logic is related but wrong. A 0 is a total failure.
I use OpenAI’s most advanced model, gpt-4o, to act as the judge. You always want a smarter, heavier model grading the homework of your smaller, faster agent. I use a strict Pydantic model to force the judge to output a clean JSON score. Here is exactly how I prompt the judge in the code:
# The strict grading rubric for our LLM Judge
judge_prompt = f"""You are an impartial SQL evaluation judge.
Your task: determine if the agent's SQL answer is semantically correct for the user's question.

User question: {item.get('question', 'N/A')}
Gold SQL result: {gold_str}
Agent SQL result: {agent_str}

Score the agent on a scale of 0 to 3:
- 3: Perfectly correct (same data, possibly different order/format)
- 2: Partially correct (right direction, missing a filter or wrong aggregation)
- 1: Wrong but related (queried the right tables but wrong logic)
- 0: Completely wrong or no SQL generated
"""
The third metric is the valid SQL rate. This indicator simply asks if the database crashed. It counts the proportion of queries that executed without throwing a technical SQLite error. It also gives the agent full points if it successfully rejects an out-of-scope question. This metric measures the pure technical robustness of your system.
The fourth and final indicator is latency. We measure the average execution time per question in seconds. This is crucial if you want to deploy your app in production. The response time dictates the user experience. If your agent writes perfect SQL but takes 45 seconds to think, your users will close the window. This metric calculates the entire round trip. It includes the API calls, the planning phase, and any automatic self-correction loops.
So, we have our framework. We have strict and semantic exactitude to measure the quality of the answer. We have the valid SQL rate to measure technical robustness. We have latency to evaluate operational speed. Now we just need to run the tests and look at the numbers!
3. Build a dashboard to automate the tests
I could have just written a simple Python script to run my 60 questions. I could have just printed the final scores in the terminal. But we saw how incredibly fast Streamlit is for building interfaces. I figured the evaluator deserves a great user experience too! So, I built a dedicated web dashboard just for testing the agent: eval_app.py (read on GitHub). It gives us a clean, visual way to launch the benchmark and analyze the results.

I added a big red button to launch the test. When you click it, the system loops through all 60 questions. It sends them to the agent, waits for the SQL execution, passes the results to our LLM judge, and calculates the scores.

I am naturally curious. I didn’t want to just run the test once and accept the first score. I wanted to play with the parameters. I wanted to see exactly how each feature impacts the agent’s performance. Does the agent really need all those complex nodes? To figure this out, I built a configurator in the left sidebar. This allows us to run an ablation study. An ablation study is just a fancy scientific term for turning features on and off to see what breaks.
First, I added a dropdown to change the core LLM. I limited it to three OpenAI models for this experiment: gpt-3.5-turbo, gpt-4o-mini, and gpt-4o. You could easily plug in open-source models here if you wanted.
Next, I added toggle switches to enable or disable three optional modules in our LangGraph architecture:
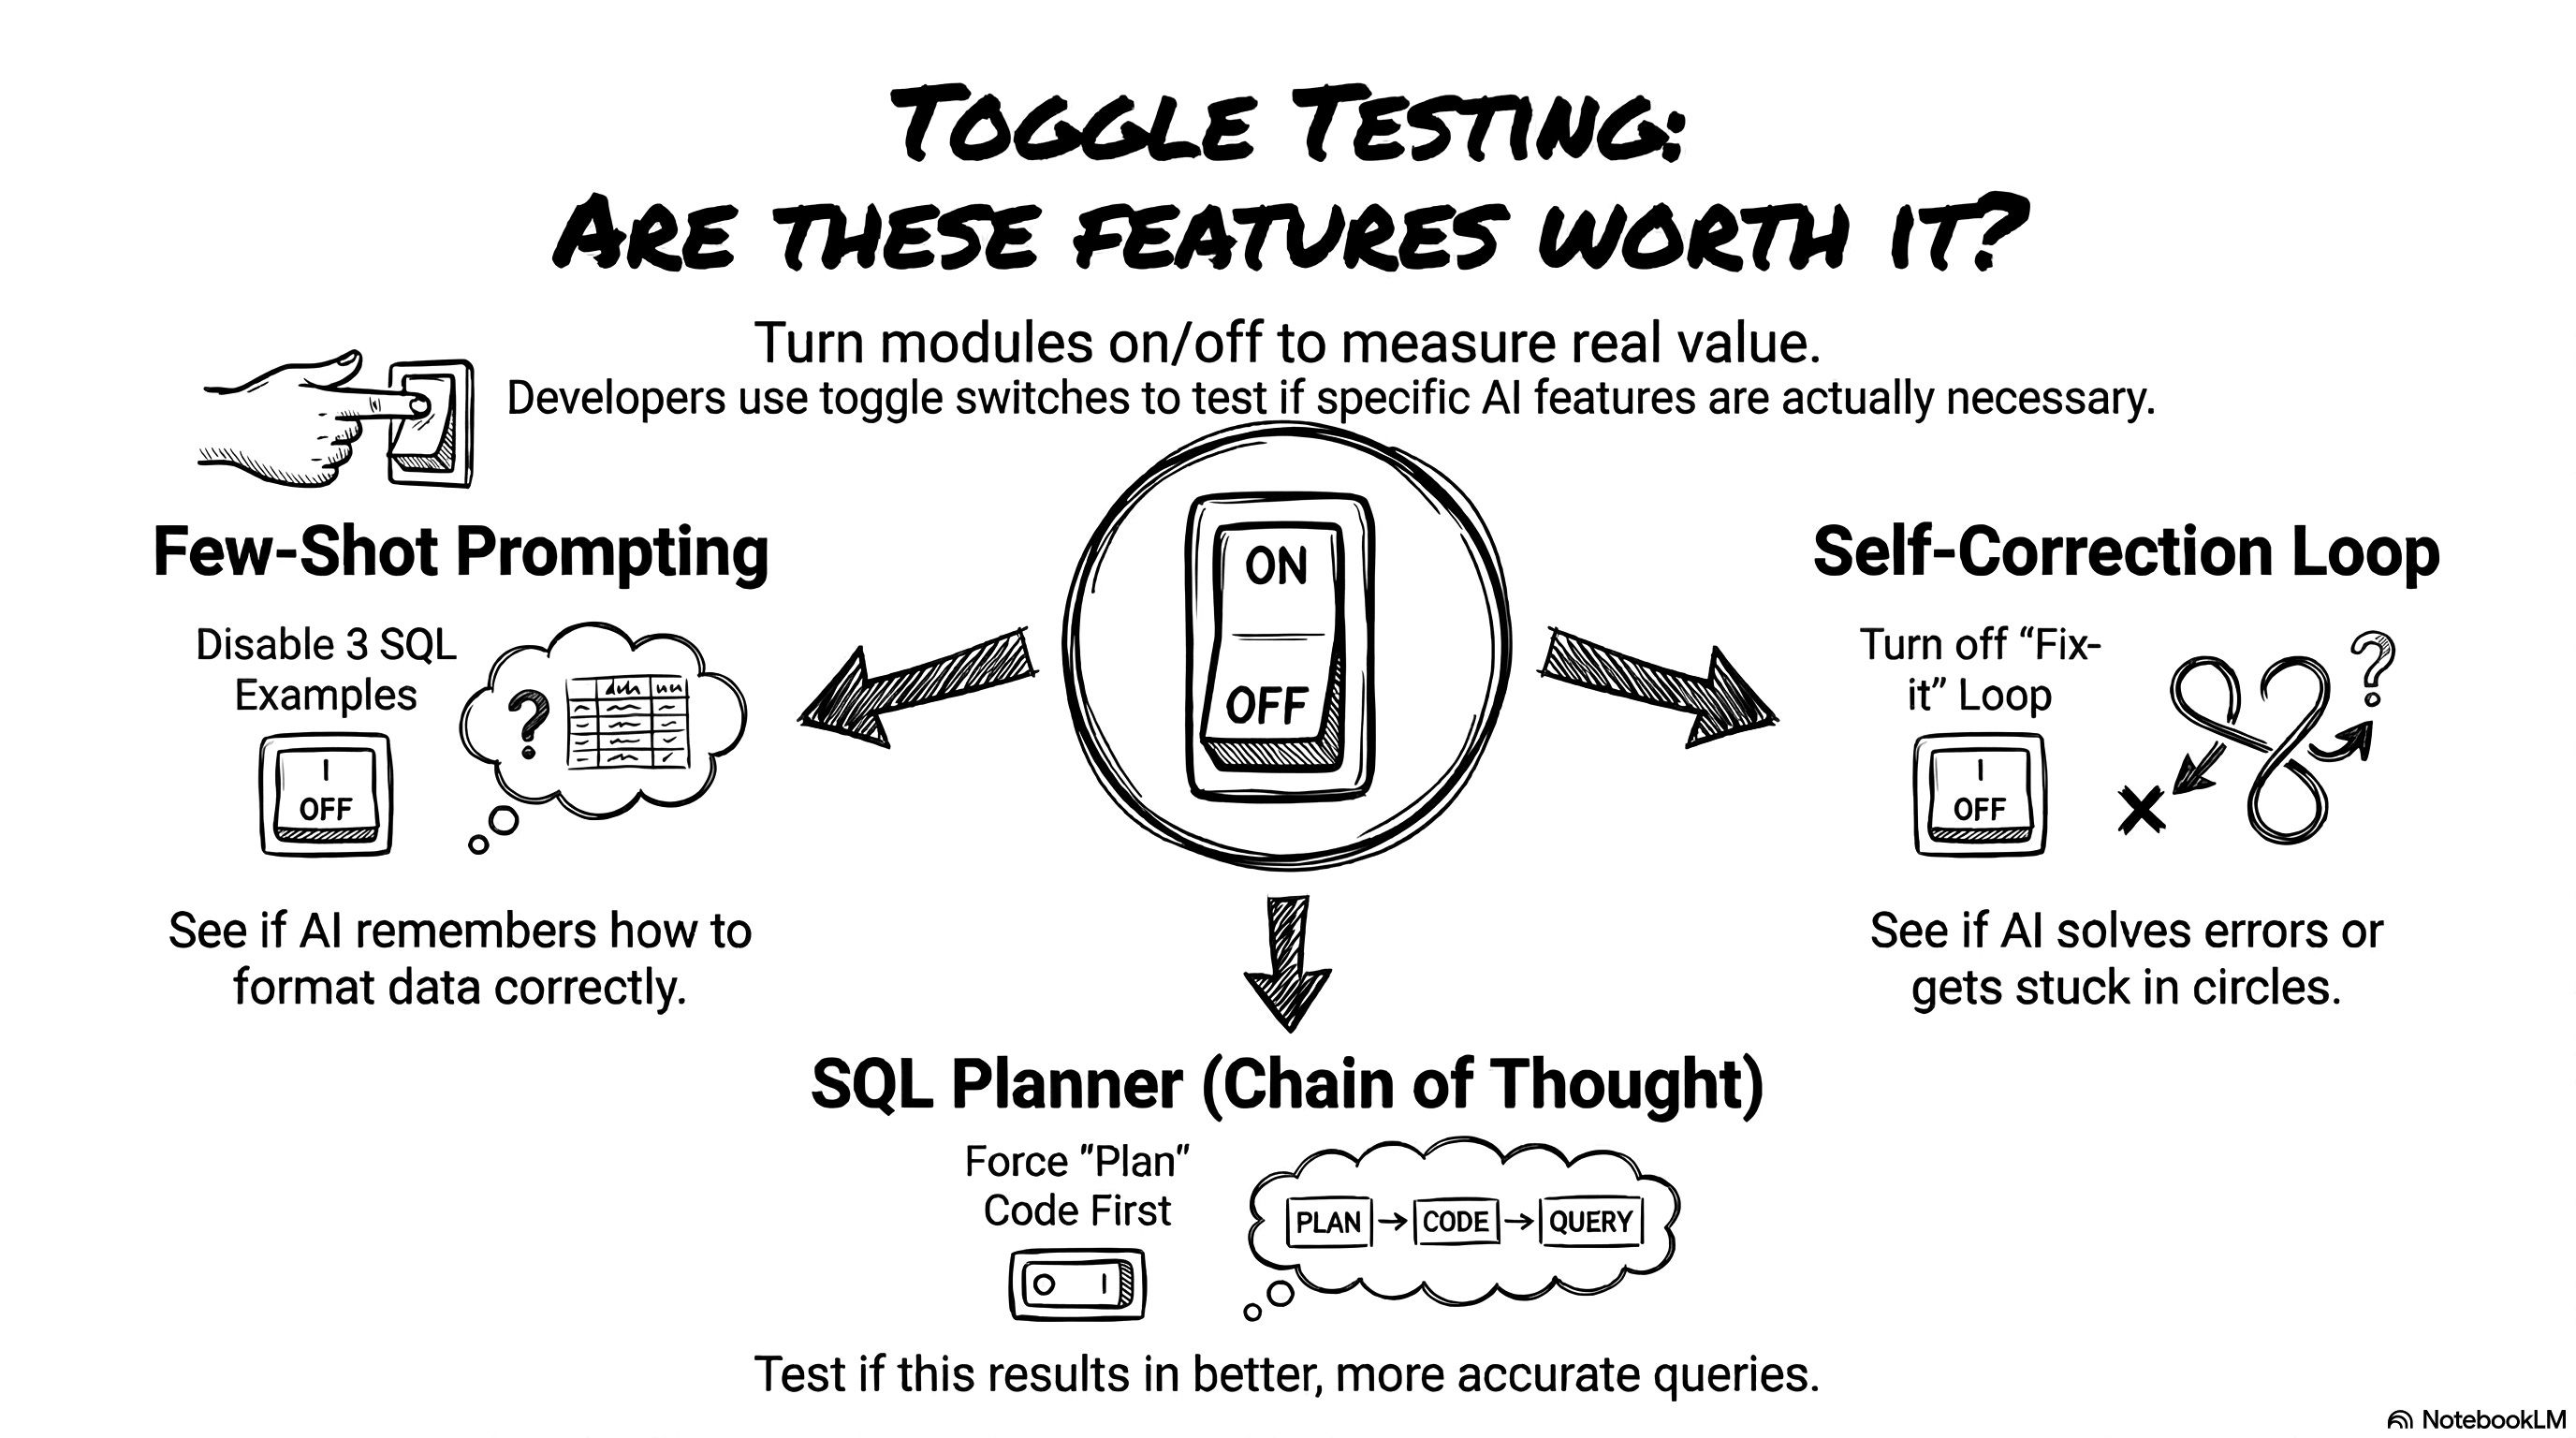
Few-shot prompting: Do we really need to inject the three SQL examples into the system prompt? Let’s turn it off and see if the model forgets how to format the categories.
Self-correction loop: Does the agent actually fix its own SQLite syntax errors, or does it just spin in circles? We can disable the loop to find out.
Chain of thought SQL planner: Does forcing the agent to write an execution plan actually help it write better code for complex queries?
Once the test finishes, the dashboard instantly visualizes our four key indicators.

Looking at global percentages is great, but we also need to see the exact failures. Why did the agent score a 0 on question 42? To debug this, the dashboard generates a detailed log table. It shows the strict match result, the LLM Judge’s score out of 3, the judge’s exact reasoning, and any technical SQL errors encountered.

Running these evaluations costs real money. Clicking that red button burns about 50 cents every single time. It would be a tragedy to run 20 different configurations and lose all the data when you refresh the page. I added a small piece of code to save every single run to a local JSON file: runs_history.json (read on GitHub).

This history table is the most powerful part of the dashboard. It lets you compare different model configurations side-by-side. You can clearly see how swapping from gpt-3.5-turbo to gpt-4o-mini impacts the valid SQL rate. You can see what happens when you turn off the chain of thought planner.
This is obviously a simplified evaluation setup. If you put this in production, you would build a much bigger system. You would test different system prompts, tweak the temperature, and test completely different node architectures. But even with just three toggles and three models, we can gather enough data to find the absolute best configuration for this AI agent. Let’s look at what the numbers actually revealed.
4. Analyze the test scores and identify failures
I ran my tests using the dashboard. I played with the configurations and analyzed the numbers. The results are truly counter-intuitive. The best configuration is not the most complex one. Our instinct tells us to turn on every single feature. However, the data proves otherwise. The optimal configuration, relying solely on few-shot prompting without the extra loops, achieved an impressive 83.9% semantic accuracy. Compare this to the full stack configuration with every complex feature enabled, which only scored 80.0%.
The real magic bullet is in-context learning (few-shot prompting). I inject just three examples of SQL queries into the initial instructions. That simple action pushes the gpt-4o model’s score up to 88.3%. The examples guide the model perfectly. They are absolutely critical for succeeding on complex queries.
Conversely, the SQL planner actually hurts performance. It sounds crazy, right? We add a node to force the agent to think, and it makes more mistakes. Detailed analysis reveals the core problem: the model suffers from an overthinking phenomenon. The planner specifically degrades performance on medium-complexity questions. Instead of writing a straightforward query, it invents unnecessary logical constraints and builds an execution plan that is way too heavy, which ultimately ruins the final SQL query.
Let’s look at a concrete example. I ask the agent to find the ID of the single order with the highest number of payment installments. Without the planner, the agent keeps it simple. It queries the payments table, sorts the data, and returns the exact single ID requested, scoring a perfect 3 out of 3 from the LLM judge. But when we turn the planner on, the agent overthinks it. It creates a convoluted execution plan, misunderstands the basic filtering logic, and returns a massive list of multiple IDs instead of just the top one. The query runs, but it completely fails the strict accuracy test. Too much thinking hurts performance.
Let’s talk about the self-correction loop. When I enable this option, the rate of valid SQL queries increases. That makes sense. The agent reads the syntax errors returned by the SQLite database and fixes its typos. But here is the catch: the overall semantic accuracy does not improve. Why? It’s a self-correction paradox. When you activate few-shot prompting, the provided examples allow the model to generate perfect SQL syntax on the very first try. The self-correction loop becomes practically inactive. The errors that remain are purely logical. The database engine cannot detect a business logic error, so the code runs perfectly and no correction is triggered. But the agent calculates the wrong thing, and the LLM judge spots this semantic error and gives it a zero.
Ultimately, designing an agent is a pure game of trade-offs. A more powerful model gives you more accurate answers, but it completely destroys your wait times. The optimal configuration using the lightweight gpt-4o-mini model took just 4.51 seconds per question. When I upgraded to the heavier gpt-4o model to chase a few extra accuracy points, the latency ballooned to a massive 15.4 seconds per question. A user is not going to wait 15 seconds staring at their screen. Even if you stick to the faster model, adding complex steps like the SQL planner pushes the latency back up to 8.46 seconds.
I also dug into the agent’s recurring failures. Why does it always fail on specific questions? I identified three main traps:
First, business vocabulary ambiguity. The agent doesn’t understand the subtle nuances of this specific company.
Second, percentages. The model calculates ratios very poorly, but this is actually a specific technical limitation of SQLite. SQLite performs integer division by default, and the model frequently forgets to explicitly cast those integers into floats before dividing them. As a result, the fraction always rounds down to zero. The good news is that migrating from a local SQLite database to a modern cloud data warehouse natively fixes this issue without requiring any changes to the agent’s logic.
Third, the translation gap. The database mixes English and Portuguese. The agent sometimes forgets to join the translation table. It tries to filter an English category directly on the Portuguese column.
One final note on evaluation. I use a natural language model as a judge. It’s convenient, but it’s risky. LLMs have proven cognitive biases. They love long answers. They often favor the first option presented to them. The judge is not perfect. You must always keep a critical eye on its grades.
Roadmap: take the prototype to production
If I actually deployed this to the whole company tomorrow, I would definitely add a few serious upgrades.
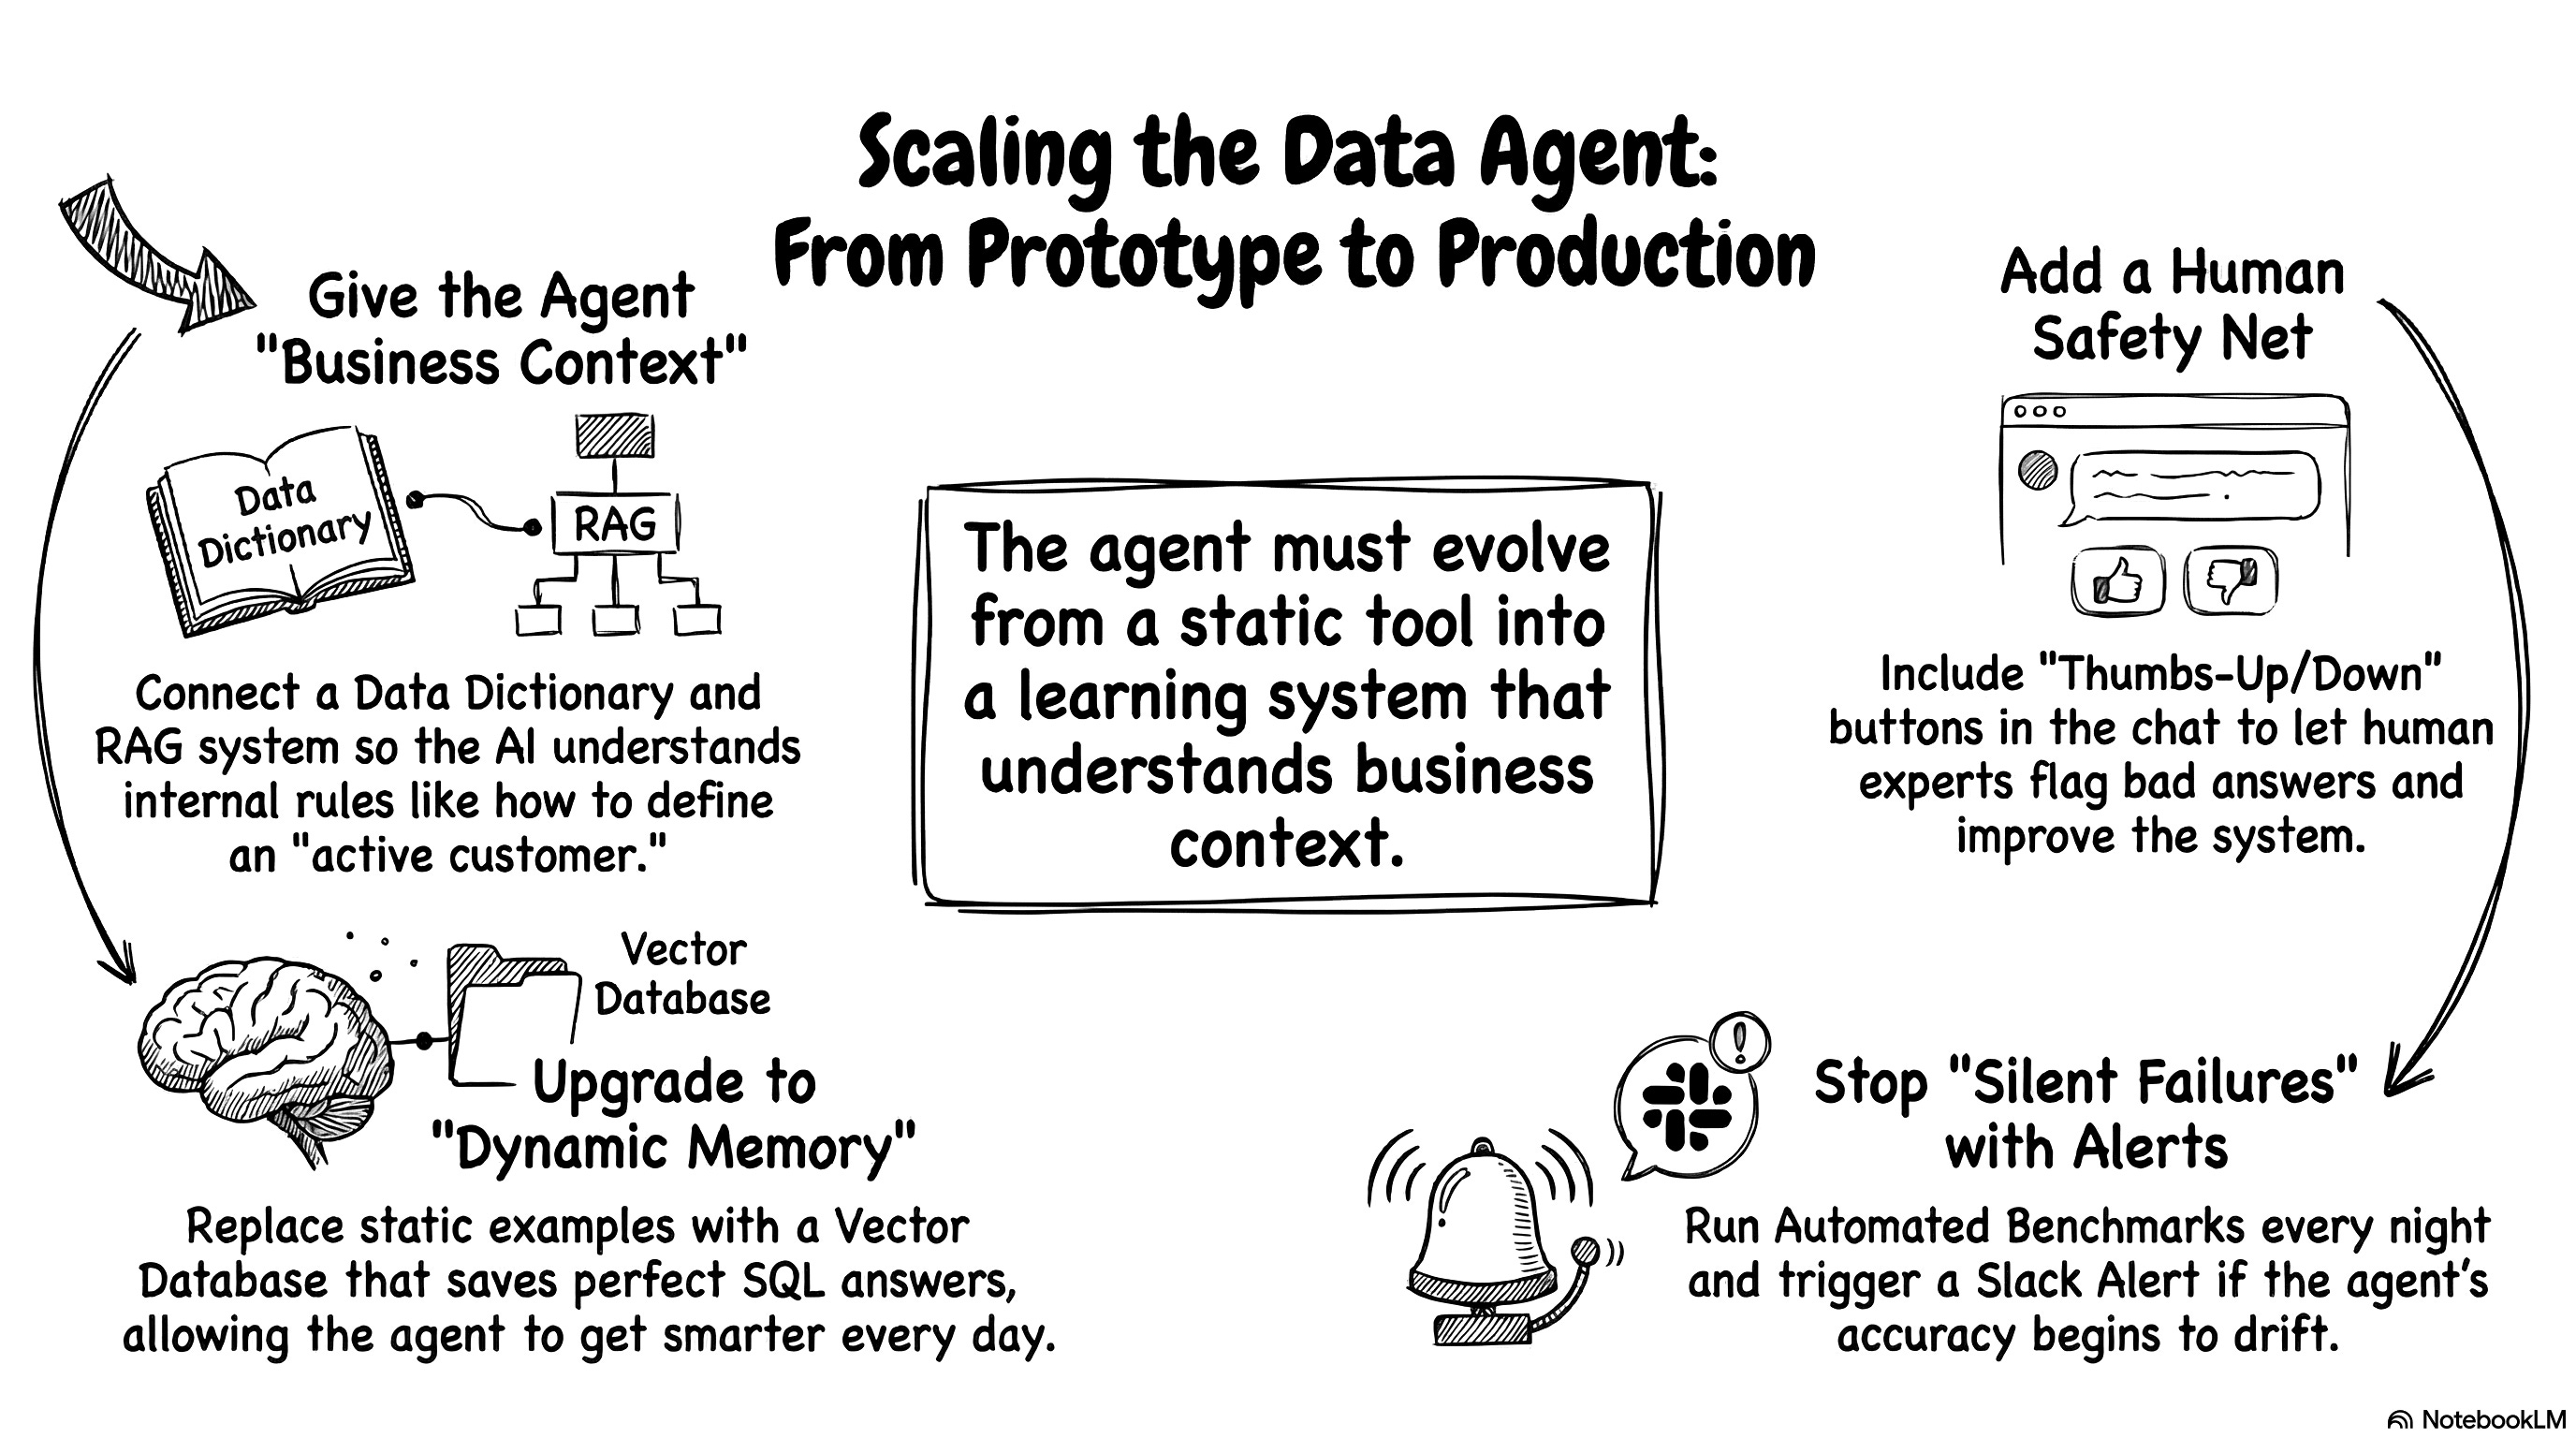
The current prototype is great, but real-world users are chaotic. If I had another weekend to hack on this, I would tackle the business ambiguity first. Right now, the LLM only knows the raw database structure and a few sample values. It completely ignores the weird internal business rules. I would build a much richer data dictionary. I would document every column definition, every possible value, and all the strict business exceptions. I would even connect a RAG system. This would let the agent read the internal company wiki to understand exactly how to define “active customer” before it writes a single line of code.
Relying purely on an AI judge to grade the homework is also a bit risky long-term. We need real humans to spot-check the work. I would add simple thumbs-up and thumbs-down buttons directly to the chat interface. Business experts could randomly test queries and immediately flag bad answers. We would route this human feedback straight back to our evaluation dashboard to improve the system. It’s essentially a lightweight reinforcement learning from human feedback (RLHF) loop. It keeps the AI honest and gives us a much-needed safety net.
If this agent goes live, I would be terrified of silent failures. AI models update behind the scenes, and their reasoning performance drifts over time. We need strict, automated monitoring. I would set up a script to run our evaluation benchmark automatically every single night. If the database reliability suddenly drops, the system should instantly trigger a red alert in Slack. You want to know the agent is broken before the CEO tries to pull a crucial revenue report.
Finally, I would upgrade the agent’s memory. Right now, I hardcoded exactly three static SQL examples directly into the system prompt. That’s perfectly fine for a quick prototype, but it limits the agent’s potential. I would build an automated feedback loop. Every time a user gets a perfect answer, we save that specific question and SQL pair into a vector database. When a new question comes in, the agent would search the database and dynamically fetch the three most relevant historical examples. Instead of relying on a static prompt, the agent would literally get smarter and more adaptable every single day just by talking to your team.
Start building your own data agent today!
So, that’s the whole project. That’s exactly how I built a custom AI agent from scratch. We went from an old folder of CSV files to a smart, conversational database. We didn’t need a massive engineering team or a computer science degree. We just used a couple of LLM colleagues, a clear plan, and some persistence. It’s completely doable for anyone willing to try.
I really hope this inspired you to build your own agent. You don’t have to be a backend expert to create AI-native products anymore. You just need a problem to solve and the patience to fight through a few Python errors. Find a dataset that you actually care about. It could be your user feedback logs, your web analytics, or your sales pipeline. Go grab those files. Open up your favorite LLM and start asking for code. You will be amazed at what you can build in a single weekend. Have fun vibe coding, and let’s get to work!