
How to build your first Claude Code skill
Install Claude Code. Run a skill that searches reviews, forums, and app stores. Understand the building blocks. Build your first skill step by step.

When I first heard about Claude skills, I dismissed them. “Custom GPTs with a different name,” I thought. Anthropic’s version of Gems. I tried one, shrugged, and moved on.
Then something shifted. I saw product people getting genuinely excited. Not about the concept, but about what they were building with it. So I carved out an afternoon, sat down, and actually built one from scratch. And it changed how I think about my work.
The skill I built is called /customer-pulse. It searches the web for what real users are saying about a product (app store reviews, Trustpilot, forums, comparison articles, etc.), then produces a structured report with ranked themes, real quotes, blind spots, and concrete actions. Everything I built is in this GitHub repo. Clone it, explore it, use it for your own product.

A quick definition: a skill is a set of instructions written in plain English that lives in your project folder. When invoked, Claude reads those instructions, reads your files, uses real tools (web search, file creation, page fetching, etc.), and produces real output. Unlike a custom GPT or a Gem, it lives in your repo. You own it. You version-control it. It evolves with your project.
Here’s what we’ll go through in this article:

Level 1: Download the repo and run a skill. Get Claude Code installed, download the project, run the skill, and see a real feedback report.
Level 2: Understand what skills are. Open the skill files and learn the building blocks: SKILL.md, product context, CLAUDE.md. See how skills compare to custom GPTs, NotebookLM, and saved prompts.
Level 3: Build your first skill step by step. The real story: how I described my problem to Claude Code, the review process that caught 5 issues, and the iteration that turned a generic report into an actionable one.
Level 4: Go further. Where to find existing skills, what MCP servers and agents are, and when skills are the wrong tool.
Each level is self-contained. Stop at Level 1 and still walk away with a working tool. Go to Level 3 and walk away knowing how to build your own.
Why this use case
Read the full skill instructions. It’s plain English, no code. That file is the entire skill.
I chose feedback collection because it’s something product people will always do. No matter how much AI disrupts our work, understanding what users actually experience remains a human decision. AI can collect, synthesize, and structure the data faster. But deciding what matters is still ours.
I considered building skills for other PM tasks: PRD generation, user story refinement, sprint review preparation. I dismissed them. Not because they’re bad ideas, but because I’m genuinely unsure those artifacts will exist in the same form much longer. When AI can build a working prototype from a conversation, do we still need a 15-page specification document? Maybe the future is less specifying and more building. And maybe “building” increasingly means creating skills that do the work, which happens to be the topic of this article.
Feedback collection, though, stays. Users will always talk. The question is whether we listen fast enough.
Level 1: Download the repo and run a skill
Allow about 30 minutes for this level. At the end, a full customer feedback report will be waiting in your project folder.

Step 1: Open your code editor
Open VS Code, Cursor, or any code editor that has a built-in terminal. If you don’t have one, download VS Code for free from code.visualstudio.com.
Once it’s open, find the built-in terminal. In VS Code: go to Terminal → New Terminal. A panel appears at the bottom.
One tip that made a big difference for me: move the terminal panel to the right side. In VS Code, right-click the terminal header bar, select Panel Position → Right. This puts your files on the left and Claude Code on the right. Much easier to work with. I spent way too long with it at the bottom before discovering this.

Step 2: Install Claude Code
So what’s Claude Code exactly? It’s an AI assistant that runs inside your terminal. Unlike ChatGPT or Gemini, it doesn’t live in a browser. It lives in your project folder. It can read your files, search the web, create documents, and run skills. Think of it as an AI colleague that sits inside your project and actually does things, not just talks about them.
One thing to know upfront: it requires a paid Anthropic plan. The Pro plan is $20/month and the Max plan is $100/month. There’s no free tier for Claude Code. It’s worth it, but it’s good to know before installing.
To install it, paste this command into the terminal and press Enter:
curl -fsSL https://claude.ai/install.sh | bashThat’s it. One line. This comes straight from the official quickstart guide.

Now here’s something that trips up a LOT of people, and I want to save you the confusion. The terminal has two modes. Right now it’s in bash mode. That means it runs system commands, like the install command you just pasted. But when you launch Claude Code, it switches to conversation mode. In conversation mode, you type in natural language, like talking to a colleague. You invoke skills with the / prefix. So /customer-pulse is a skill. curl is a bash command. Don’t mix them up. Two modes, two purposes.
If you want to get familiar with some Claude Code commands and shortcuts, there’s a nice community cheat sheet that covers the essentials.
Close and reopen the terminal (or open a new one) so it picks up the new command. Then type:
claudeThe first time, a browser window opens to log in with your Anthropic account. After that, Claude Code starts directly.

Step 3: Download and open the project
Exit Claude Code for now (type exit or press Ctrl+C). Go to the product-feedback-skill repo on GitHub. Click the green Code button, then Download ZIP. Unzip the folder wherever you keep your projects (for example, your Documents folder).
Now in your editor, go to File → Open Folder, navigate to product-feedback-skill, and click Open. The left sidebar (the explorer) shows all the project files.

Step 4: Run the skill
Open a new terminal in your editor (Terminal → New Terminal) and make sure it’s inside the project folder. Then launch Claude Code:
claudeThe repo includes product context files for two products: Figma and Slack. Let’s try Figma. Type:
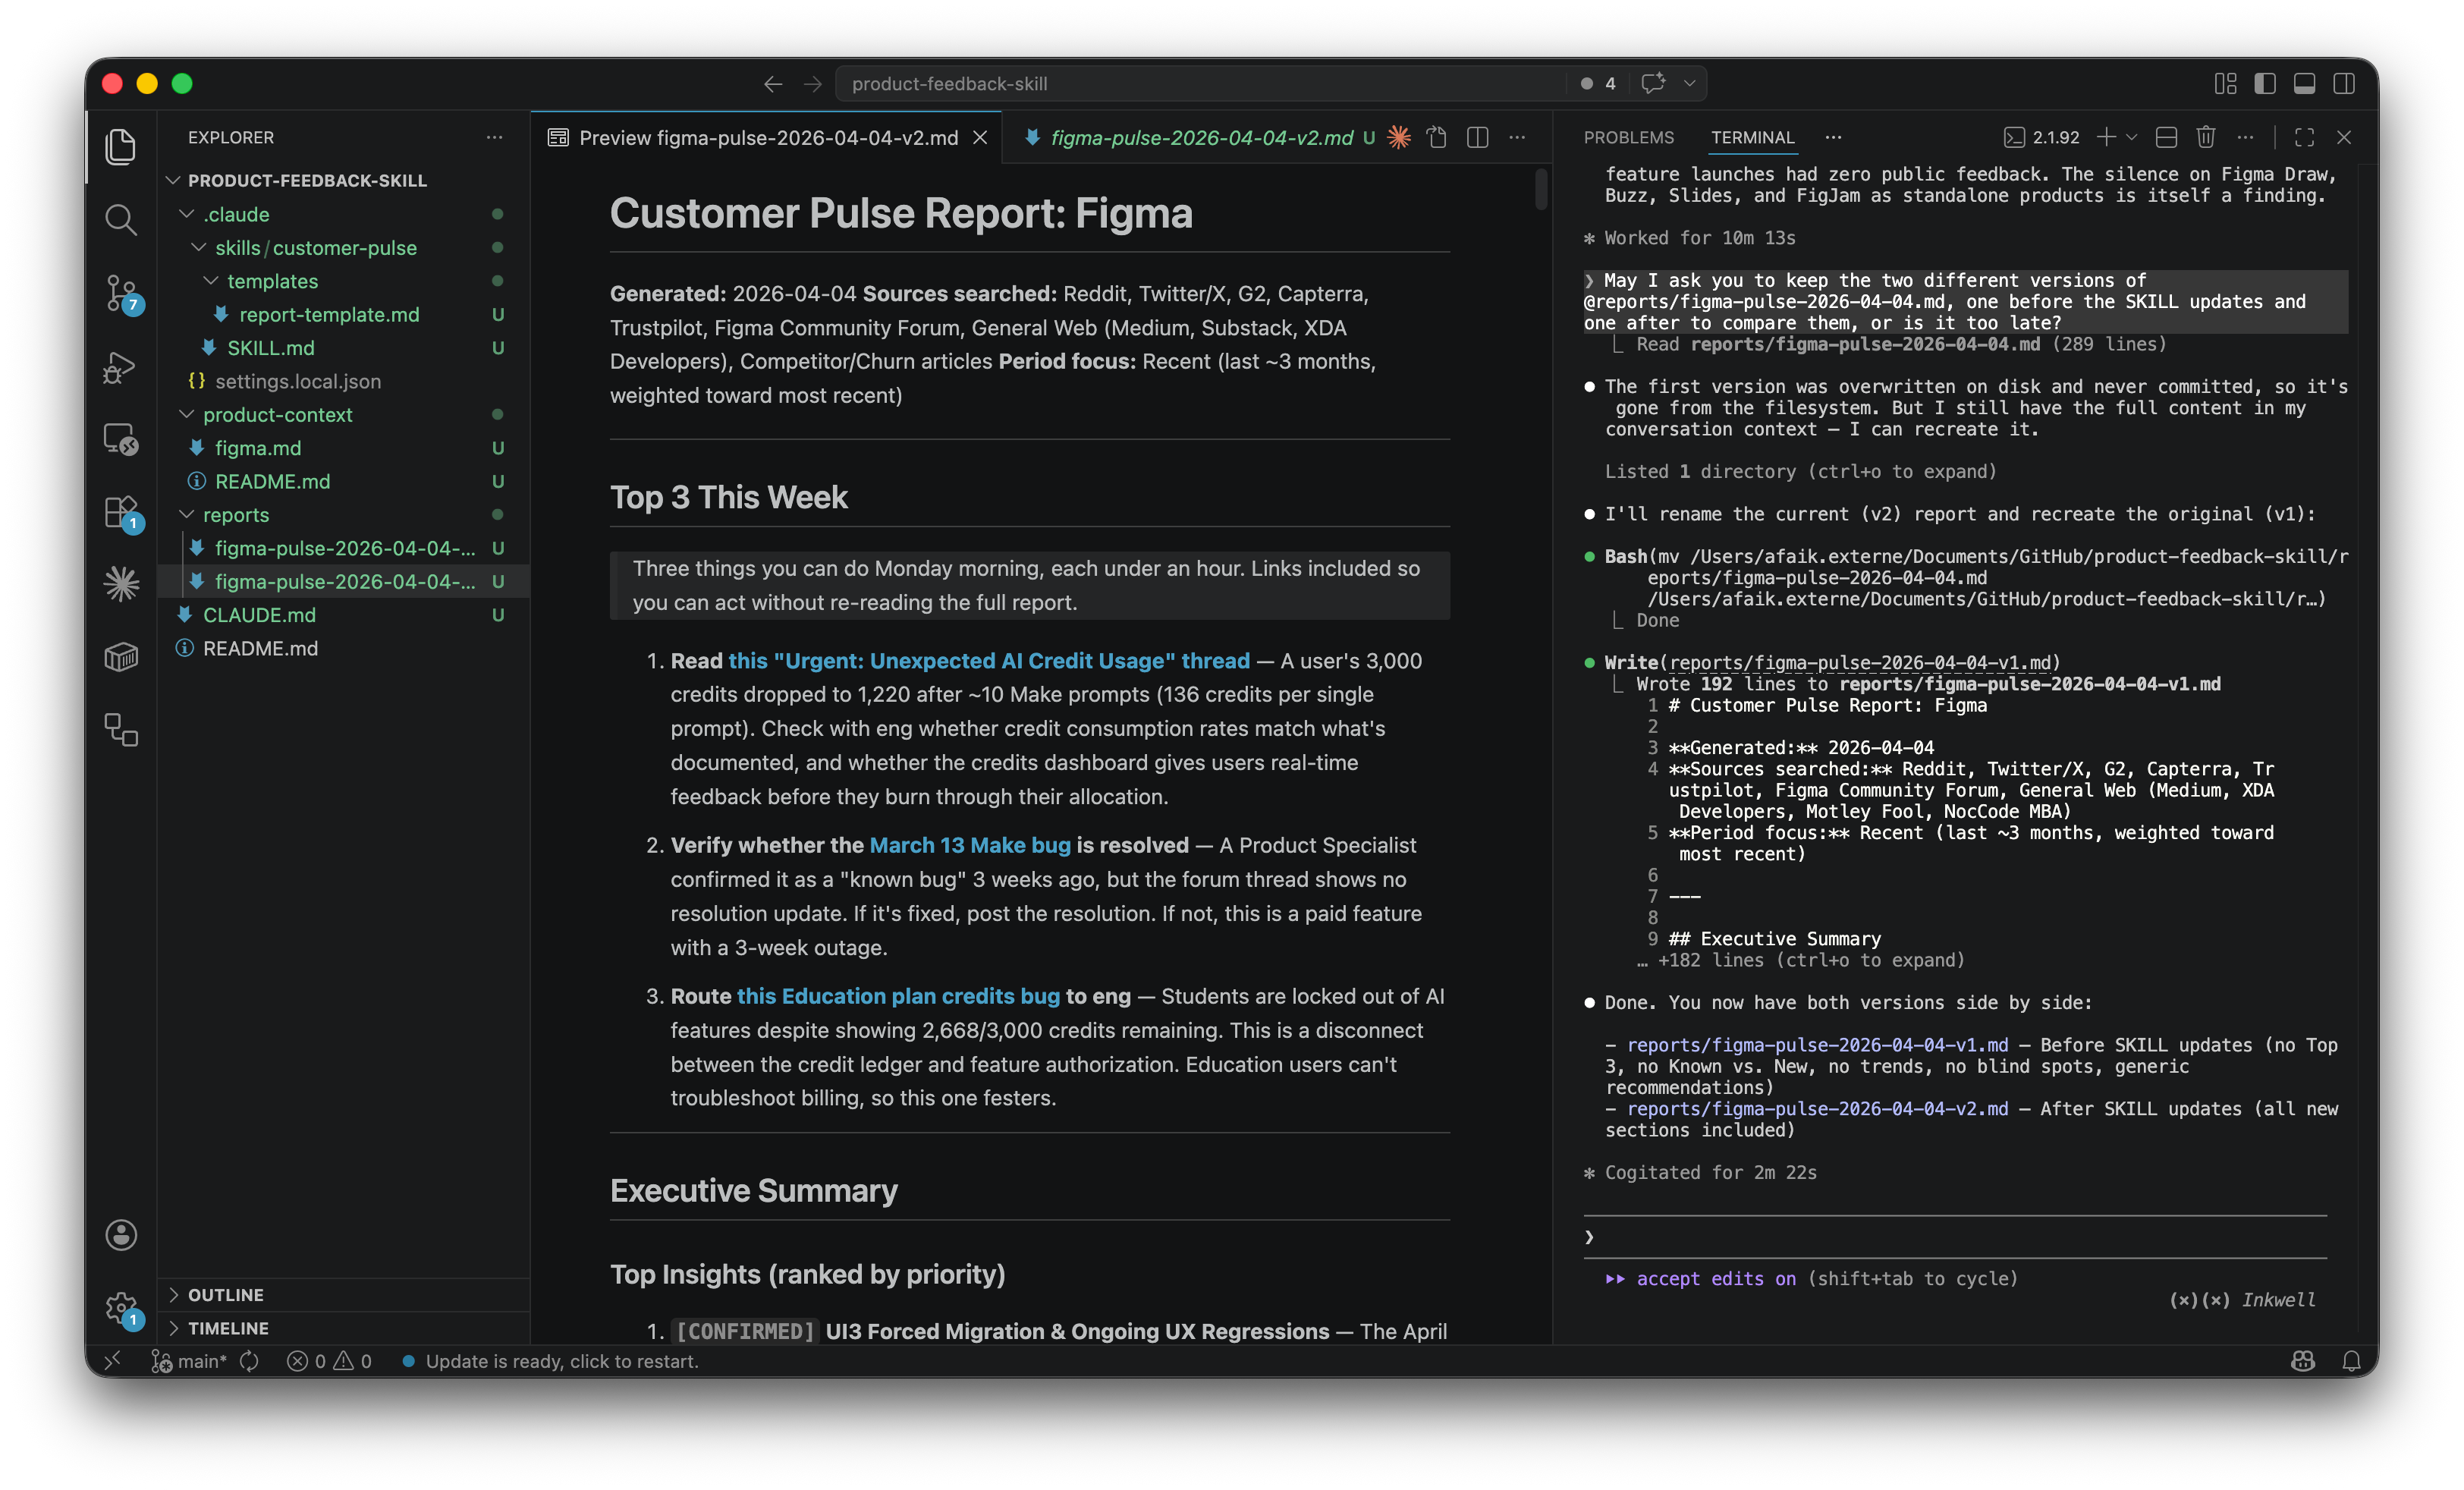
/customer-pulse figmaAnd then just watch. It’s genuinely fun to see. Claude reads the Figma product context, starts searching the web (Trustpilot reviews, forum threads, comparison articles), fetches the most relevant pages, extracts real user quotes, groups them into themes, scores each by severity, and writes a full report to reports/. The whole thing takes a few minutes because Claude is making 12 web searches and fetching up to 20 pages. Just let it do its thing.
When it’s done, open the generated report in the reports/ folder. Right-click the file tab → ”Open Preview” to see it formatted instead of raw text.

One command. A full customer feedback analysis with source URLs, severity rankings, sentiment direction, and a “Top 3 things to do this week” action list. Try /customer-pulse slack for the other product.
Level 2: Understand what skills are
OK so the report just appeared. That’s cool. But what actually happened behind the scenes? Three files made the whole thing work. Let’s open each one.

Step 1: Open the SKILL.md
In the explorer sidebar, navigate to .claude/skills/customer-pulse/SKILL.md. Click it. Or read it directly on GitHub.
 and the beginning of the step-by-step instructions.")
Take a moment to read it. This is the entire skill. A Markdown file. No code. No API calls. No special syntax. Just English. If you can write an email, you can write a skill. Seriously.
Right-click the tab → ”Open Preview” to see it formatted. That’s easier to read once you understand the structure.

It has two parts. The header (called frontmatter) controls how the skill behaves. The settings that matter most:
description: how Claude decides whether to suggest the skill. Vague descriptions like “analyzes stuff” don’t work. Specific ones like “use when the user wants to understand customer sentiment” do. It’s like giving a teammate a proper job description.disable-model-invocation: true: prevents the skill from auto-triggering. For a skill that makes 30+ web calls, you want explicit control.allowed-tools: lists tools Claude can use without asking permission each time. Without it, Claude pauses 20+ times to ask. With it, the skill runs smoothly.$ARGUMENTS: when you type/customer-pulse figma, “figma” replaces$ARGUMENTSin the instructions.
The body tells Claude what to do, step by step, in plain English. The official skills documentation has the full reference.
When does it make sense to build a skill? Tasks that are repeatable, multi-step, and benefit from context. If you’d need to re-explain the same context more than twice, it’s worth encoding as a skill. For one-off tasks, just ask Claude directly.
Step 2: Open the product context
Navigate to product-context/figma.md. Or read it on GitHub.
This file describes Figma: features, customer segments, pricing, known pain points, competitors. The skill reads it before searching. That’s why the report isn’t generic. Without product context, you get “users complain about performance.” With it, you get “the March 2026 regression affected component manipulation specifically, compounding the long-standing 2GB memory cap issue that hits enterprise teams with variant-heavy design systems.”
This separation is the clever part. The SKILL.md defines the process. The product context defines the knowledge. Change the context, and the entire analysis shifts. Without touching the instructions.
If you were doing this at work, your context file could include customer personas, Jira backlog categories, OKRs, NPS themes, competitive analysis, and roadmap features. The richer the context, the smarter the analysis. The skill doesn’t care where the knowledge comes from. It just reads the file.
Step 3: Understand how skills compare to other tools

A saved prompt. Every time you paste your product description and analysis request into ChatGPT, you’re doing manually what a skill does automatically. A skill reads your files for you. The context is always there. No pasting.
A custom GPT or Gem. Lives in someone else’s cloud. Can’t read your local files. Can’t create documents in your repo. A skill is a Markdown file you own, version-controlled with git.
NotebookLM. Same “rich context” idea, but limited to answering questions and generate a certain type of content. Skills can search the web, create files, and produce reports that feed into your next workflow. Skills are rich context plus real actions in the same place.
Perplexity. Great for one-time answers. A skill gives you a versioned, repeatable process that improves over time. A Perplexity search doesn’t compound. A skill does.
Skills also work beyond Claude Code. You can use them in claude.ai (upload as zip) and in the Claude desktop app with Cowork. Claude Code is the most powerful surface though, with full network access and features like allowed-tools.
Step 4: Open the CLAUDE.md
Last file. Open CLAUDE.md at the project root. Or read it on GitHub.

A README.md is for humans. CLAUDE.md is for Claude. It tells Claude what the project is about, what files matter, and how things connect. Claude reads it automatically at the start of every session. Create one for any project by typing /init. Keep it under 30 lines.
Level 3: Build your first skill step by step
If you’ve read my previous post on how to save +5 hours a week with Gems, the process here will feel familiar. Same loop: ask the AI to write the instructions, test them, see what’s wrong, improve them, test again. With Gems, you do this in a web interface. With Claude Code skills, you do it inside your project folder. The principle doesn’t change. The power does.
Here’s how I actually built /customer-pulse. Not the clean version. The real one. Before the details, here’s the overview:
, Test on another product.")
Describe the problem. No technical instructions. Just explain what you need.
Review the skill. Ask Claude Code to check its own work.
Run it and evaluate. See what’s good, what’s missing.
Improve the instructions, not the output. Fix the SKILL.md so every future run is better.
Test on a different product. Make sure it generalizes.
Step 1: Describe your problem
I opened Claude Code and typed:
I’m a product manager and one of my jobs is to explore customer feedback across different platforms (app stores, review sites, forums) so I can make better decisions and understand the problems our users are facing. But it’s time consuming. I sometimes miss important sources, and I struggle to synthesize and identify the most actionable feedback. I was wondering if it makes sense to create a system here that helps me do that every time. Feel free to ask me any questions.
I didn’t say “create a .claude/skills/ folder.” I described a problem. You don’t need to know terminal commands. You need to know how to describe a problem clearly. That’s a skill product people already have.
Claude asked clarifying questions: what product, what sources, what format. I said Figma. It proposed a 4-phase architecture with a scoring system and guardrails. Then it built everything. I just watched files appear in the VS Code Explorer.


Step 2: Review the work
Here’s a workflow I wish someone had told me about earlier: the double-loop. One AI session builds. Another reviews. You make the decisions.
I asked Claude Code in another session to check the skill against best practices. It found five issues: lowercase file name (should be SKILL.md), no $ARGUMENTS support, missing disable-model-invocation, missing allowed-tools, and a too-generic description. I shared the findings back in the initial session and Claude Code fixed everything in minutes. I asked AI to check AI’s work, and then I made the decision about what to fix.
One thing I also learned: Claude sometimes creates a command (the old format) when you ask for a skill. Commands work, but lack the frontmatter options. Always double-check. You’re the pilot, even in autopilot mode.
Step 3: Run it and evaluate
The first run produced a solid report. 65+ data points, ten ranked themes with real quotes and source URLs. But it was missing things. No blind spots section. No separation of “already known” vs “new discovery.” The recommended actions were generic (”publish a performance roadmap”), the kind of advice any consultant would give for $500/hour without knowing your product.
Step 4: Improve the skill, not the report
I was about to edit the report. Then I stopped. If I fix the report, I get a better report once. If I fix the SKILL.md, every future run produces a better report automatically. You’re not building a document. You’re building a machine that produces documents.
Here’s exactly what I told Claude. No prompt engineering. Just describing what was wrong:
The report is missing a blind spots section. I want to know what data is missing and why.
Separate confirmed known issues from new discoveries. Tag each theme as CONFIRMED or NEW.
The recommended actions are too generic. Make them reference specific data from the report.
Add a “Top 3 this week” section at the top with concrete actions and links.
Track whether each theme is getting worse, staying stable, or improving.
Claude Code updated the SKILL.md. I ran it again. Same Figma. Same search budget.
The difference was striking. The v2 report tagged every theme as [CONFIRMED] or [NEW]. The blind spots section revealed that 15 of 17 features launched at Config 2025 had zero public feedback. That’s a strategic insight, not just a gap.
Practical tip: after three rounds of iteration, Claude started giving me circular answers. I typed /clear and it immediately got better. It resets the conversation while keeping your files. I use it regularly now.
Step 5: Test it on a different product
I wanted to try Slack. But when I needed a new product context file, I caught myself about to do the same one-shot research again. And then I thought: wait. Isn’t this exactly what skills are for?
That’s how the skill fever gets you. I built /product-context instead, a second skill that researches any product and generates the context file automatically. Typed /product-context Slack, got a filled-in context file, then ran /customer-pulse slack.
It worked. Different product, same quality. The skill found 25 incidents in 90 days, a ghost-seat credit arbitrage, and enterprise privacy concerns about the desktop AI agent.

Read the full Slack report on GitHub.
What started as “let me test with another product” turned into “let me build another skill.”
Three ways to set up your product context: auto-generate with /product-context, paste your own internal docs, or combine both. If you’re at a real company, your internal documentation is your richest source.
Expect ideas to explode
After I built /customer-pulse, ideas started exploding. Like popcorn: every kernel triggered three more. “What if I built a skill that tracks competitor launches?” “What about an automated NPS synthesis?” I couldn’t stop.
The last time I felt this was Notion in 2019. Wanting to spend weekends restructuring everything into this new system. With Notion, it was “I need to move all my notes into this tool.” With skills, it’s “I need to redo all my previous projects with this new approach.”
Here’s my honest warning: once you build your first skill, you’ll see them everywhere. Write your ideas down. Prioritize. Don’t build them all tonight. I say this from experience because I’ve been there, staring at the terminal at midnight, convincing myself “this one will only take 20 minutes.”
But that feeling is the point. “PM becoming a builder” isn’t just about learning a new tool. It’s about a shift in how you see problems. Before skills, a repetitive task was just a task. After skills, every repetitive task is an opportunity to build something. That perceptual shift is the real transformation. And honestly? It’s the most fun I’ve had with AI tools in a long time.
Level 4: Go further
I’m not an expert on everything that follows. These are the topics I want to explore next. What I can tell you is that after building my first skill, I feel like I’ve become an architect of my own workflows. It’s the first time I feel like if I go to work this Monday, I’ll be a completely different person. Not because I learned a new feature, but because I see my work differently.
MCP servers plug new data sources into Claude Code. Imagine the skill pulling your product context from Confluence automatically.
Hooks are automated actions triggered by events. I’m curious about using them to automate things like “run customer-pulse every Monday morning.”
Agents and sub-agents handle complex multi-step workflows where skills aren’t enough. Start with skills. Graduate to agents when you hit the ceiling.
The ecosystem: A few starting points worth bookmarking:
Anthropic’s official skills: document processing, demos, and a skill-creator.
Pawel Huryn’s PM skills: 100+ skills for product work. The most comprehensive PM collection.
Community collections: curated lists with thousands of skills.
But the skill you build yourself will always be more valuable than a generic one. These collections are starting points. The real power is in building your own.
Your turn
I started this article thinking I’d explain what skills are. I ended up building a customer feedback tool, a product context generator, and a system that gets better every time I use it. All from conversations. No code.
The thing that surprised me most isn’t the technology. It’s how it changed the way I think. I used to see repetitive tasks as part of the job. Now I see them as skills waiting to be built.
Build your own skills. Open Claude Code. Describe a problem you face every week. Here are five ideas:
Competitor watch. “Search for what my top 3 competitors shipped last week, give me a summary with links.”
Meeting recap. “Take a meeting transcript, extract decisions, action items, and open questions in my team’s template.”
Release notes drafter. “Read the last 20 git commits, group them by theme, write user-facing release notes.”
Onboarding guide. “Read our documentation and create a structured onboarding plan for a new team member.”
Weekly digest. “Search for the latest news about [topic], summarize the top 5, highlight what’s relevant to our roadmap.”
Each of these is one conversation with Claude Code. Describe the problem, let Claude build the skill, review it, iterate. The same five steps from Level 3.
And remember: write your ideas down. Don’t build them all tonight. But do build the first one. That’s the one that changes everything!